Feeds:
Posts
Comments

DSC_1207

Well, I’m late for posting the Bakers Challenge. Again.  I love to volunteer at my daughters school and the past few weeks have been quite hectic with end of school field trips and activities. Please forgive me.

This  month’s challenge was hosted by Shelley of C Mom Cook. She asked everyone to make cinnamon buns, or one its many variations. And there are tons. I think cinnamon rolls was one of the first breads that I ever made and   there is something so comforting about rich, warm bread filled with sugary goodness and covered in more sugary goodness. If you have never tried making these (or some version of them), please don’t hesitate to try. It’s  really quite simple.

The basic concept of a cinnamon roll is yeasted dough rolled out into a rectangular shape, then brushed with a good dose of butter. A cinnamon sugar mixture is then sprinkled over this and then the dough is rolled up and sliced. the slices are place, cut side up, in a pan to  rise and then baked.

What is the difference between a “cinnamon” bun and a “sticky” bun? The first is drizzled with either a cream cheese or confectioners sugar glaze when still warm from the oven while a sticky bun has a butter/sugar mixture in the bottom of the pan that sliced dough gets placed into for their final rise. basically the extra sugary goodness goes in either before baking or after. In mine I did a little of both!

A variety of doughs can be used. An enriched dough is most common. All that means is that the dough has some butter and eggs in it. Sourdough is ultra tasty. Brioche dough is crazy wonderful for this (lots  of added butter and eggs in the dough). Hell, let all thoughts of calories go out the window and use puff pastry. While this is more like a cronut it still counts as a cinnamon bun to me (and my thighs).  Don’t let the thought of making bread dough frighten you. It is one of the most rewarding things you can do in the kitchen. That being said , I have at times used plain old white bread dough bought from the freezer section at the market and made sticky buns with delicious results. Seriously, all paths lead to the same end. Deliciousness.

I baked a few versions this month. First I went with one with a filling of cinnamon, candied orange peel and walnuts. I know my friend Kathy is cringing right now at the thought of candied orange peel but I love it.  Later in the month I made little mini cinnamon buns for the volunteer appreciation night at the grade school. For these I just made a half batch of dough and rolled a skinnier rectangle so that when I rolled it up it only rolled 1 1/2 turns and then I cut 1/3 inch slices. I hope that makes sense. These were good and went quickly due to their manageable size. Nobody wants to be at a school gathering trying to eat a mammoth sized pastry in front of strangers. That is something better left for home.

DSC_1183

For my final version I went with a rhubarb and custard filled sticky bun. My rhubarb plant outside is gigantic and I need reasons to use it. I used Bird’s custard after reading in a food history book about how Birds came about. It turns out that during WWII families in England were rationed one (yes, 1) egg per week so the manufacturers came up with a product that required no eggs and very little sugar, which was rationed as well. Since I keep a can in the closet for when the urge to make Nanaimo bars strike, this seemed perfect. Well, actually, I used the last of my eggs to make the dough and didn’t feel like going out to get some more….

The best part about making cinnamon/sticky buns? other than eating them, is that you can prepare them the day before and slip the pan of unrisen slices in the fridge until morning. You just wake up, turn your oven on, and let the cold rolls warm up a bit on the counter while your oven heats up. I find that even 15 minutes at room temperature is enough before popping them into the oven.

Please make sure to visit Shelley’s site to see her tasty versions. BAKE ON!

 Dough

3 ¼ to 3 ½ cups all-purpose flour
2 tbsp sugar
2 ¼ tsp instant yeast (if using active dry yeast make sure to proof it first)
½ tsp salt
1 cup of  milk, heated to just around 100F  (I used 2%)
2 large eggs, at room temperature
1 tsp vanilla extract
½ cup unsalted butter, at room temperature


Stir three cups of the flour, sugar, yeast, and salt in a stand mixer fitted with the dough hook or in a large mixing bowl.

Add the milk, eggs ,vanilla  and butter to the dry ingredients and continue mixing until the dough comes together.  If necessary, add the remaining flour, a little at a time, until the dough is smooth and not sticky to the sides of the bowl. Continue to knead for about 5 minutes.

Place the dough into a lightly greased bowl and cover with cling wrap or a tea towel until it has doubled in bulk. This should take about hour. If it is very hot in your house this might be shorter or if your house is cool it could take a little longer.

Meanwhile, prepare the filling.

Rhubarb:

Take 4-5 stalks of fresh rhubarb and cut them into 1/4 – 1/3 inch slices. Add  1/2 cup sugar (or more to taste) . Mix this together and let it macerate until ready to use.DSC_1193

Custard:

1 1/2 Tablespoons (22 ml) Bird’s custard powder
1 1/2 Tablespoons (22ml) granulated sugar
1 cup  (250ml) milk
1/2 vanilla bean, seeds scraped out (save the pod for your sugar or salt jar) or 1 teaspoon rum


In a small saucepan, mix together the custard powder and the sugar. Over medium high heat, whisk in the milk until well blended. If using the seeds of a vanilla bean, add it now. Bring to a full boil, whisking frequently. Take off the heat. If using rum, add now. Place the hot custard into a bowl and place a piece if cling wrap directly onto the surface to prevent a “skin” forming. Cool in the fridge while the dough is rising.


Get your pan ready:

In a 12 hole muffin tin, place 1/2 teaspoon each of butter and brown sugar. Place in a warm oven for a few minutes to slightly melt the two.

Set aside .

June 28, 2014


Assembly:

Roll out your dough onto a lightly floured surface. Make a rectangle roughly 12 x 9 inches. Feel free to eyeball this. Spread a layer of cooled custard over the dough leaving about 1/2 inch border all the way around.

Lightly drain your rhubarb, reserving the pink liquid for your glaze (optional)

Sprinkle the rhubarb over the entire surface . With the wide end facing you, start rolling up your dough, jelly roll style. Pinch the seam together and slice into Twelve 1 1/2 inch slices. Place cut side up into each muffin cup.

Cover with cling wrap and place in the fridge overnight until morning.

When you are ready to bake, take the cold pan out of the fridge and place on the counter. Remove the cling wrap. Heat your oven to 350F. After about 15 minutes, pop the sticky buns into your oven and bake for 25 minutes or until golden brown.

May 28 2014

If you are baking the same day: after placing the sliced rolls into your muffin tin, cover them with either plastic wrap or a tea towel and let them rise again for another hour before baking at 350F for 25 minutes.

If you don’t have a muffin tin, place them into a rectangle or round cake pan with a little space around them to expand.

Optional glaze:(since my daughter was having a friend sleepover this was not optional in out house)

Take 1 1/2 cups confectioners sugar and mix with 2 tablespoons of the reserved pink rhubarb syrup. If it is too thick, add a tiny bit more until you get a consistency of thick cream. When the sticky buns come out of the oven, take them out of the pan and drizzle the pink icing of each of them.

DSC_1213

This easy dough recipe is from Anna Olsen.


.

DSC_1299


I just realized that it is the end of the month and I never wrote up this post! I actually baked it last week and it was really tasty. I made the full recipe and go three large loaves out of it. We kept one loaf and the others were the perfect ” thank you ” for two friends of mine who helped me out last weekend with my daughter while we went to a wedding.  One drove her all the way across town to her gymnastics class so we could attend the ceremony and the other had her over for a sleepover. Are friends great? I know mine are and I really appreciated the help. These delicious loaves came in very handy indeed.

Karen of Bake My Day! was the host for the Bread Baking Babes this month and she chose this lovely bread. I am a poor buddy who doesn’t follow due dates very well…..

DSC_1297

For this recipe you need to start it the day before (or up to 4 days in advance if you want) since it’s one of those no/low knead doughs. The wild rice also takes about an hour to cook. I can’t believe I actually had some in the closet! It’s good stuff, I need to remember to make it more. The recipe calls for 1 cup cooked (about 1/4 uncooked) but I doubled the amount to 2 cooked cups. Other changes I made were using half whole wheat flour and also adding 3 ounces 100% starter.

this is going to be short since I am so late so BAKE ON! my friends


Wild Rice and Onion bread

6 cups (27 oz / 765 g) unbleached bread flour (I used half WW, half unbleached flour)
2 1/4 teaspoons (0.6 oz / 17 g) salt, or 3 1/2 teaspoons coarse kosher salt
2 tablespoons (0.66 oz / 19 g) instant yeast (I used 1 tablespoon and 3 ounces starter)
1 cup (6 oz / 170 g) cooked wild rice or another cooked grain (I added 2 cups)
1/4 cup (2 oz / 56.5 g) brown sugar (I used only 2 tablespoons)
11/2 cups (12 oz / 340 g) lukewarm water (about 95°F or 35°C)
1/2 cup (4 oz / 113 g) lukewarm buttermilk or any other milk (about 95°F or 35°C) (I used plain yogurt)
1/4 cup (1 oz / 28.5 g) minced or chopped dried onions, or 2 cups (8 oz / 227 g) diced fresh onion (about 1 large onion)
1 egg white, for egg wash (optional)
1 tablespoon water, for egg wash (optional)DSC_1292

Do Ahead
Combine all of the ingredients, except the egg wash, in a mixing bowl. If using a mixer, use the paddle attachment and mix on the lowest speed for 1 minute. If mixing by hand, use a large spoon and stir for 1 minute. The dough should be sticky, coarse, and shaggy. Let the dough rest for 5 minutes.
Switch to the dough hook and mix on medium-low speed, or continue mixing by hand, for 4 minutes, adjusting with flour or water as needed to keep the dough ball together. The dough should be soft, supple, and slightly sticky.
Transfer the dough to a lightly floured work surface. Knead the dough for 2 to 3 minutes, adding more flour as needed to prevent sticking. The dough will still be soft and slightly sticky but will hold together to form a soft, supple ball. Place the dough in a clean, lightly oiled bowl, cover the bowl tightly with plastic wrap, and immediately refrigerate overnight or for up to 4 days. (If you plan to bake the dough in batches over different days, you can portion the dough and place it into two or more oiled bowls at this stage.)DSC_1294

On Baking Day
Remove the dough from the refrigerator about 2 hours before you plan to bake. Shape the dough into one or more sandwich loaves, using 28 ounces (794 g) of dough for 4 1/2 by 8-inch loaf pans and 36 ounces (1.02 kg) of dough for 5 by 9-inch pans; into freestanding loaves of any size, which you can shape as bâtards, baguettes, or boules; or into rolls, using 2 ounces (56.5 g) of dough per roll. When shaping, use only as much flour as necessary to keep the dough from sticking. For sandwich loaves, proof the dough in greased loaf pans. For freestanding loaves and rolls, line a sheet pan with parchment paper or a silicone mat and proof the dough on the pan.
Mist the top of the dough with spray oil and cover loosely with plastic wrap. Let the dough rise at room temperature for 1 1/2 to 2 hours, until increased to about 1 1/2 times its original size. In loaf pans, the dough should dome at least 1 inch above the rim. If you’d like to make the rolls more shiny, whisk the egg white and water together, brush the tops of the rolls with the egg wash just before they’re ready to bake.
About 15 minutes before baking, preheat the oven to 350°F (177°C), or 300°F (149°C) for a convection oven.
Bake the loaves for 10 to 15 minutes, then rotate the pan; rotate rolls after 8 minutes. The total baking time is 45 to 55 minutes for loaves, and only 20 to 25 minutes for rolls. The bread is done when it has a rich golden color, the loaf sounds hollow when thumped on the bottom, and the internal temperature is above 185°F (85°C) in the center.
Cool on a wire rack for at least 20 minutes for rolls or 1 hour for loaves before slicing.

DSC_1301

PÃO DE QUEIJO

DSC_1091

I have to admit I loved this months Daring Bakers Challenge. Why? Because even after looking at the recipe several times this month I just got around to trying it out today and was thrilled to see how fast it came together. 5 minutes to mix it together, 20 minutes in the oven and then you are rewarded with little magic puffs, crispy on the outside and pillowy soft on the inside. Oh, did I forget to mention they are filled with cheesy goodness? I would say these are the Brazilian version of French gougères. But different. And gluten-free. Isn’t that a nice bonus? This is a recipe worth keeping for when you have company over with dietary needs that you normally don’t cook for. Like gluten-free cooking. the secret ingredient is sour cassava (tapioca) starch. Made from the yucca plant, the sour tapioca starch undergoes a natural fermentation process and the texture is more granular before baking than regular tapioca flour. Our host this month, the lovely Renata from“Testado, Provado & Aprovado!”, has this to say about the starch:

“TAPIOCA STARCH (also known as CASSAVA STARCH) is the main ingredient of Pão de Queijo. Here in Brazil there are two types: REGULAR and SOUR. The regular type is easier to find in other countries, but if you are lucky enough to find the sour type in your area, I highly recommend you try it (quantities will be provided when applicable). It looks pretty much like any other starch, powdery and white, sometimes it has little granules.
You can find tapioca starch at amazon.com:
Regular Tapioca starch (tapioca flour)
Sour Tapioca Starch (this is a Brazilian brand, quite overpriced. Here in Brazil it costs around US$ 2!)”

DSC_1312
Here in Calgary I had no problem finding the sour starch at my local South American market (yes, I have a  South American market down the street). I hope that it is just as easy for you (try looking in the spanish section). Otherwise, just use regular  tapioca flour.

The second most import ingredient is cheese. The authentic recipe calls for “Queijo Minas Curado” which is typical from Minas Gerais. They did not have this at the store so I relied on what I had in the fridge, smoked applewood cheddar. I don’t know what the other cheese tastes like, Reneta compares it to Monterey Jack, but the applewood cheddar was AMAZING.

DSC_1323

These are super simple to make, and are best are best eaten straight from the oven, or warm if you can wait that long. Keep a batch of rolled dough balls in the freezer to bake straight out of the freezer. Roll smaller balls so when company pops by they are the perfect accompaniment with cocktails, or larger balls for a dinner side dish or Panini roll.

I made the traditional version, but you must visit Renata’s site to get the two other versions. If I only had a waffle iron… I also cut the recipe down to 1/4  since there was just the three of us but next time (and there will be a next time) I will make the full batch and freeze the uncooked dough balls. Bake On!

TRADITIONAL PÃO DE QUEIJO
Servings:
Yields about 80 small balls

Ingredients:

500 gm (4 cups) tapioca starch (If you have access to sour tapioca, you can use 250gm (2 cups) of each)
1 cup (250 ml) whole milk
2-3/4 tablespoons (40 ml) (1½ oz) (40 gm) butter
1 teaspoon (5 ml) (3 gm) salt (or to taste depending on how salty your cheese is)
3 cups (750 ml) (9 oz) (250gm) Monterey Jack Cheese (or another cheese of your liking, or a mix of cheeses), coarsely grated
1 to 3 large eggs

Directions:

Heat milk, butter, and salt in a small sauce pan until it comes to a boil. Watch closely as it may boil over. Remove from heat and set aside.

Sift the  tapioca starch into a large bowl.

Pour the hot liquid  mixture over the tapioca and start stirring with a fork. The milk mixture will not be enough to form a dough yet. You will have a lumpy mixture, that’s what it is supposed to be.Keep stirring with the fork, breaking down the lumps as much as you can, until the mixture cools down to warm.

Preheat your oven to moderately hot 400° F/200° C/gs mark 6

DSC_1310

Add the grated cheese to the tapioca mixture and mix well, now using your hands.

Lightly beat the eggs with a fork and add little bits until the dough comes together into a soft but pliable dough. You only have to knead it a bit, not as much as you knead a yeasted bread. It’s OK if it is slightly sticky.Form balls with the dough and place them on a baking sheet lined with parchment paper or silicon mat or lightly greased with vegetable oil. If necessary, you can oil your hands to make shaping easier. The size of the balls may vary from small bite-sized balls to the size of ping-pong balls. They will puff up quite a bit after baking.25 minutes or until they just start to brown on the bottom. You may have golden spots of cheese on the crust. Don’t over-bake as they will get hard and bitter.

DSC_1311

NOTE: If your dough gets too soft and sticky to shape balls, you can always add a bit more tapioca starch or pop the dough into a piping bag and pipe the dough on a baking sheet.


Additional Information from Renata:

This recipe doesn’t require a stand mixer and, traditionally, it is made by hand. This recipe does not require a stand mixer and, traditionally, it is made by hand. However, it is indeed sort of a “heavy” dough. However, it is indeed a sort of “heavy” dough. Though I have never tried using a stand mixer here, I found someone who has. Though I have never tried using a stand mixer here, I found someone who has. Her name is Raiza Costa and she blogs at Dulce Delight. Her name is Raiza Costa and she blogs at Dulce Delight. She’s a Brazilian living in the US and she makes lovely videos in English. She’s a Brazilian living in the U.S. and she makes lovely videos em Inglês. I thought I’d share her “Pão de Queijo” post (with video) with you: I thought I’d share her “Cheese Bread” post (with video) with you:
Another link to a video showing the process by hand. Another link to a video showing the process by hand. It’s in Portuguese but the method is clearly shown: It’s in Portuguese but the method is Clearly shown:
Sour manioc starch (poviho azedo) and manioc starch (also known as sweet manioc starch or poviho doce) are both extracted from yucca. The difference is that sour manioc starch undergoes a natural fermentation process. As a result, manioc starch (the sweet one) has a much finer consistency and more delicate texture than sour manioc starch.
Read more at http://leitesculinaria.com/32757/recipes-brazilian-cheese-rolls.html#Xhw8sSPoMEYCkob6.99


DSC_1316


DSC_1261

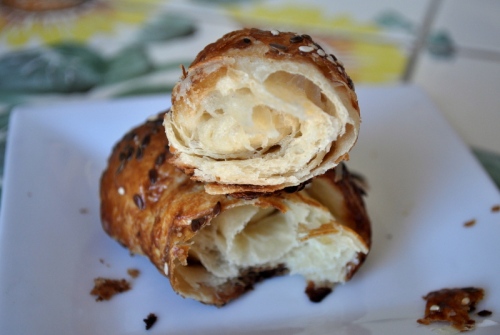
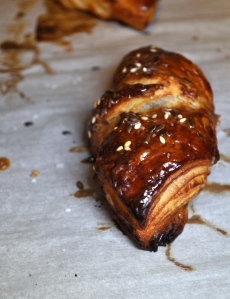
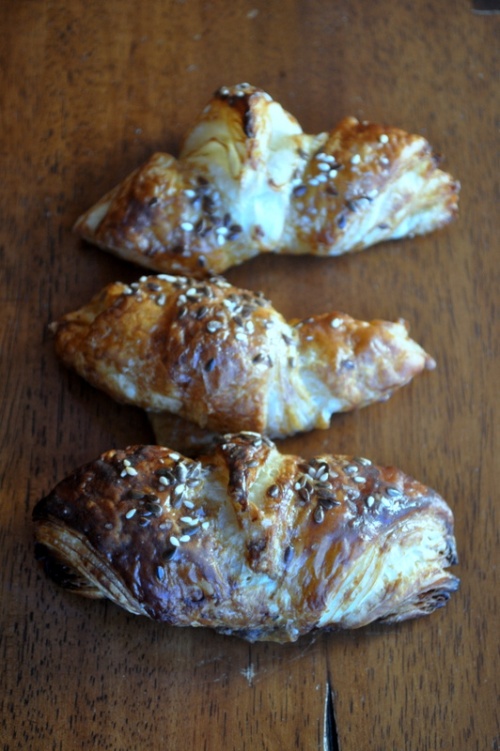
I’m drooling while writing this.  I actually had to take these and put them in the freezer or else the entire lot would be in my stomach right now. Maybe it’s because I haven’t made croissants in a few months, or that I have a deep weakness for all things buttery, or that I love pretzels, but I do know is that these are quite tasty (and dangerous).  Bread Baking Babe Heather, of Girlichef  fame, chose pretzel croissants for this months bread experience. The recipe follows the basic method for making laminated dough but in the final step you dip the unbaked, risen croissant into a bath of cold water and baking soda, giving it that dark exterior so loved in a good pretzel. I made a half batch of dough and small croissants since I know my weaknesses. Both husband and daughter happily ate one at breakfast today with an extra going into the lunchbag for her teacher.DSC_1253


A few things to take note of before starting croissants. Flavorful croissants happen over the course of a few days. Three is best for me. Read the recipe and methods entirely before starting. Back in  January of 2007, the Daring Kitchen had us make croissants. You won’t find that post here since mine were a complete failure.  Things that I stink at baking only make me keep trying.That being said, I then went and tried and retried with various recipes until one day I realized “I’ve got it”. Did I go through a lot of butter” ? Damn straight I did. Are they scary to make? not anymore. In fact, I make them at least every 3-4 months. What I learned along the way is patience. Always let the dough rest in the fridge for a day before incorporating the butter block. This develops flavor. I also add some sourdough starter as well. Again, flavor.  Let your dough rest a good hour in the fridge between turns. When you are rolling the dough and it isn’t rolling out easily, put it back in the fridge for another 10 minutes, then try again. It really does help. After the final turn, I like to put it back in the fridge overnight before shaping and baking. When proofing, I put the pan in the cold oven on the middle rack, placing a pan of hot water on the bottom rack. This creates a nice moist, warm environment for them to rise in. Thirty minutes before baking, pull the tray and pan of water out, then turn your oven to heat up to 425F. Give it the full thirty minutes to pre-heat.

For the butter block, I find it easiest to start with room temperature butter. Then  mix in the flour thoroughly.  Why add flour? Most butter (unless it’s expensive European butter) has too much water content so the flour absorbs some of this.  I then line a square pan with plastic wrap and place my butter in, using another piece of plastic wrap to push and squish it into a flat even layer. The pan then gets back in the fridge until cold and then I just pop out the plastic wrapped cold butter block. Easy.

I like Heathers method of incorporating the block into the dough. It worked great and delivered many crispy layers of goodness. The shattering shell of a deep, dark shell with a moist, feathery interior. Hungry yet? Bake On!

PRETZEL CROISSANTS

adapted from Pretzel Making at Home by Andrea Slonecker

for the dough:DSC_1250-001
1/2 cup (120 ml) lukewarm milk (~110° F)
7 g (1/4 ounce / 2-1/4 teaspoons) active dry yeast
3 tablespoons firmly packed brown sugar (golden or dark)
410 g (3-1/4 cups) unbleached all-purpose flour + more for work surface
2 teaspoons fine sea salt
1 ounce (2 tablespoons) unsalted butter, cubed, at room temp
1/2 cup (120 ml) cold pilsner-style beer ( I didn’t have any beer so I added some water)

I also added 25g of 100% starter

for the butter block:
340 g (12 ounces / 24 tablespoons) cold unsalted butter
2 tablespoons unbleached all-purpose flour

to finish:
60 grams (1/4 cup) baked baking soda (see notes)
1 egg yolk beaten with 1 tablespoon milk
coarse salt
flax or sesame seeds , optional

Stir the yeast and 1 tablespoon of the brown sugar into the lukewarm milk and allow to sit until foamy, 5 minutes or so. Whisk the flour, remaining brown sugar, and salt in a large bowl. Use your fingertips to rub the butter into the flour mixture, breaking it up into tiny flour-coated pieces the size of breadcrumbs. Stir in the yeast mixture and the beer using a wooden spoon or rubber spatula to form a shaggy mass.
Turn the dough out onto an unfloured work surface and knead eight to ten times, until all of the flour is just incorporated. You don’t want to over work it, because you don’t want the butter to melt too much. The dough will not be a smooth mass; you will see some flecks of butter. It should be soft and tacky, but not sticky. Adjust as needed with flour or water. Lightly oil a large bowl and set the dough into it. Cover with plastic wrap. Place in refrigerator for 8 to 24 hours (24 will give you the best flavor).
making the butter block
Beat the butter and flour together in the bowl of a stand mixer, using the paddle attachment until it forms a smooth mass (or by hand, using a lot of elbow grease). This should take about a minute. You want the butter to be pliable without beating air into it or melting it.

Spread the butter between 2 large sheets of plastic wrap (or parchment or wax paper), and use a rolling pin to shape into a rectangle that is about 8″x9″. Use a straight edge to form corners, but work quickly as you want the butter to stay cool. Wrap in plastic and refrigerate until you’re ready to roll out the dough.April 28 2014

Scatter a little bit of flour on your work surface, then turn the dough out onto it. Roll it out into a rectangle that is 10″x15″ and about 1/4″ thick. Using your hands, gently pull and stretch the dough to form straight edges and sharp corners. Brush excess flour off of the dough. Set the dough with a long edge facing you.
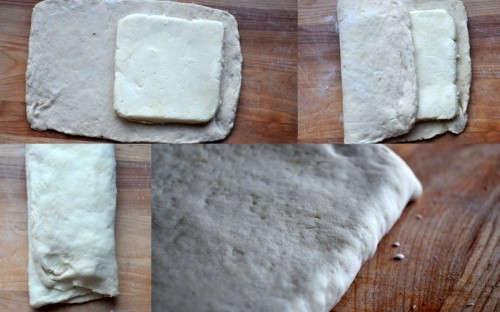
Mentally divide the dough into 3 equal portions. Place the butter block over the right 2/3 of the dough, leaving a 1″ border on the outer edges. Fold the empty left portion of the dough over the middle third. Now, lift and fold the right section of dough over that. You should have 3 layers of dough that encase 2 layers of butter. Pinch the outsides and the seams together and lightly press the layers together using a rolling pin. This completes the first turn. Wrap in plastic and refrigerate for 1 hour.
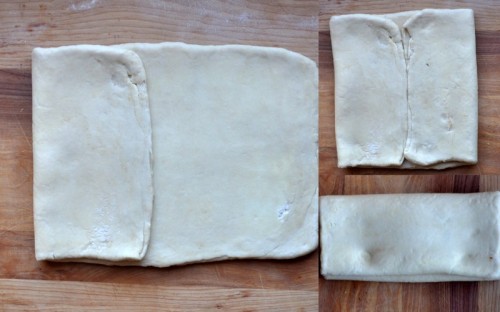
Remove the dough from the fridge and set it on your lightly floured work surface. Roll dough out into a 10″x20″ rectangle, pulling and stretching to form straight edges and sharp corners. Brush off any excess flour. Set the dough with a long edge facing you. Fold both of the short ends in to the center, leaving a 1/4″ gap where they meet (think of a book jacket). Fold one side of the dough over the other. Lightly press the layers together using a rolling pin, and square and sharpen the edges and corners. This completes the second turn. Wrap in plastic and refrigerate for 1 hourApril 28 20141

3rd (and final) turn:
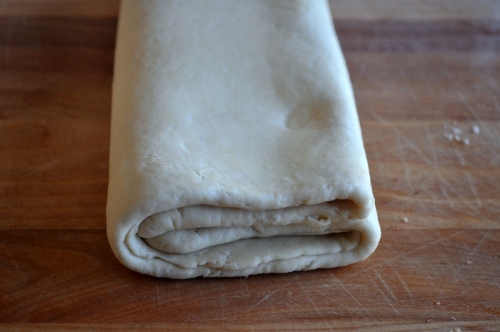
Lightly dust your work surface and the top of the dough with flour. Roll dough out into a 10″ by 15″ rectangle. Do another trifold, as done in the first turn (mentally divide into thirds, then fold one third over the center, followed by the last third). Square the edges and sharpen the sides; wipe off excess flour. Wrap in plastic and refrigerate for at least 2 hours, but up to another 24 hours.
At this point, you can wrap the dough tightly in plastic wrap, slide it into a freezer baggie, and freeze for up to 1 week. Defrost overnight in the refrigerator before proceeding to final shaping.DSC_1234

final shaping:
Line two rimmed baking sheets with parchment paper and set aside.
Lightly dust your work surface and top of your dough with flour. Roll out into a 15″x18″ rectangle that is ~1/4″ thick. Pull and stretch to form straight edges and sharp corners. Patch any holes where butter may have popped through by dusting them with flour. Brush any excess flour off the dough.
Heathers method: Cut the rectangle in half lengthwise, creating two 15″x9″ sheets of dough. Using a pizza cutter or bench scraper, cut each piece of dough into three equal strips, the short way. Then cut each strip in half diagonally, so that you left with 6 triangles. Repeat with other piece of dough.DSC_1243

Me: For shaping I  have cardboard template that I made last year and just keep in my drawer until needed. It is 3 inches wide at the base and 5 inches long. I find it so easy to make consistently even shaped croissants.
If  you like, cut a 1/2″ notch in the center of each triangle base, then beginning at that end, roll the triangles up, tugging on the tip to elongate it slightly, then gently pressing it into the dough. Place on the prepared baking sheets with the tip tucked under, and curve the ends to form crescent shapes (the notch helps with the curving process). If you prefer a “straight” croissant, the notch isn’t necessary. Either way, it won’t hurt anything.
Cover the croissants with damp, clean kitchen towels and allow to rise at cool room temperature until they have almost doubled in size and feel spongy, ~2 hours.
At this point, slide the croissants into the refrigerator for 20 minutes while you prepare the dipping solution. Preheat oven to 425° F, positioning one rack in the upper third of the oven, and one in the lower third.
prepare the dipping solution:BBBuddy Badge April 2014
Add the baked baking soda in 8 cups of cold water and stir until completely dissolved. One by one, dip the croissant dough into the dipping solution, allow the excess to drip off, then set back on the lined trays. Brush the tops with the egg wash, then sprinkle with coarse salt and sesame seeds or poppy seeds, if using
Slide into preheated oven immediately and bake for 15-18 minutes (rotating pans from front to back and top to bottom halfway through), until they are deeply browned, crispy, and flaky. They should feel light and airy if you pick them up.
Transfer to a wire rack to cool for 10 minutes before serving (or let them sit on the sheet tray for 5-10 minutes. I found that they soaked the butter on the pan back into them if I did this). They are best enjoyed the day they are made, ideally warm from the oven. Store any extras in a paper bag for a day. You can reheat them by placing them in a 350° F oven for ~5 minutes.
to make Baked Baking Soda:
Baked baking soda is an alternative to working with lye that still lends pretzels their dark, burnished crust. To make the baked baking soda, spread 1/4 cup (~70 grams) of baking soda out on a baking tray lined with parchment paper or foil (or in a pie pan). It will decrease in weight, but shouldn’t decrease in volume. Slide it into an oven that has been preheated to 250° F/120° C and bake for 1 hour. Cool completely, then store in an airtight container at room temperature. If you see lots of pretzels in your future, make a large batch to store since it keeps indefinitelyDSC_1257

Please make sure to visit the real babes to get a visual feast

DSC_1186


The April Daring Baker’s Challenge was hosted by Wolf of Wolf’s Den . She challenged us to Spring into our kitchens and make Easter breads reflecting cultures around the world. Please make sure to visit her blog and see the amazing German (Osterbrot) and Italian (Anello dDi Pasqua Maria Pia) Easter breads  that she made. I so wanted to bake the Osterbrot but I just didn’t have enough time so it goes on the bucket list…


Since moving to Canada  10 yrs ago I have been so blessed with not only a luscious husband and amazing daughter, but with extraordinary friends. Both my husband and I have no family out West so to be able to fill our house on holidays with good friends is such a treat for us and helps fill that empty hole in our hearts not being with our moms and family. Over the years our house has become a sort of commune, with one friend or another eating (or sleeping over ) a few nights a week. We always welcome them with open arms and love sharing good times with them. My husbands best friend, who has been living with us a few days a week for the past year while conducting business here in Calgary, now has one of his old friends moving here from back East. And I mean very Greek. He drove out west a month ago not knowing DSC_1218anybody. Since we both know how that is, he has been over for dinner at least 5 times already, with everyone  being extremely welcoming (or trying to be). So with that in mind, I baked Tsouréki , a very traditional Greek Easter bread to help make him feel more at home.

Holiday breads, especially Easter breads, are enriched breads. This means that they contain eggs, and usually also butter and milk, making them more indulgent than “lean” bread. Eggs represent rebirth, or new life. Many holiday breads are braided as well, like this one. If you have never tried baking a braided bread, I can’t express enough how much fun they are to make. You can make anywhere from 3 to 12 strand loaves. Start with 3 strands and move your way up as you get more comfortable. I personally like the look of a 6 strand braid but that is just me. Please look at the  end of my post on challah bread for multiple links on braiding techniques to help you.

DSC_1183

This bread is scented with makhlépi, (also known as mahleb, mahlepi and other spelling variations) is a spice derived from the seed kernels of the Prunus mahaleb, a type of cherry tree (also referred to as a Rock cherry or St. Lucie cherry), and primarily used in Middle Eastern, Mediterranean and Eurasian cuisines. They are small kernals with a bitter almond kind of flavor. I was very excited when I saw this ingredient since I had some on hand from when I made Assyrian Spinach Pies last year. The kernals are steeped in water, discarded and then the liquid is used to flavor the dough. Now, I realize this might not be easy to find in some areas, so just substitute plain water in its place if you cannot find it.

At one end of the bread a red-dyed egg is inserted into the dough before baking. This represents the blood of Christ. the best way to get a dark red egg is by using commercial red dye as opposed to the little tablets that come in Easter egg dying kits. Bake On!

DSC_1190

Tsouréki 
Makes 2 small loaves


1 1/2 teaspoon active dry yeastDSC_1199
1 cup (8 oz) warm milk
4-5  cups flour
3/4  cups sugar
2 tsp. makhlépi , also known as Malhab (optional)
1/4 cup water
4 tbsp. butter, melted and cooled
4 eggs, 1 lightly beaten and set aside for the egg wash
Salt
2 teaspoons. grated orange zest
2 teaspoons grated lemon zest
2 hard-cooked eggs, dyed red

pearl sugar or black cumin seeds to decorate, if desired


Dissolve yeast in milk in a large bowl. Stir in 1/2 cup of the flour and 1/4 cup of the sugar, cover bowl with plastic wrap, and set aside for 1 hour. Steep makhlépi, if using, in 1/4 cup simmering water for about 5 minutes. Strain, discard makhlépi, and set aside liquid to cool.

scented liquid into yeast mixture; if you aren’t using the makhlépi then just use plain water instead. Add the butter and 3 of the eggs and mix thoroughly. Sift 4 cups of the flour, salt, and remaining 1/2 cup sugar into mixture. Add orange and lemon zest, and mix thoroughly. Turn out dough onto a floured surface. Knead (adding more flour if necessary) until smooth, about 10 minutes, then form into a ball and place in a lightly greased bowl. Alternatively, knead using a stand mixer, fitted with the dough hook, for 10 minutes. Place in a clean, lightly grease bowl and cover with a clean dish towel. Set aside to rise for 2 hours.

Turn the dough back onto the floured surface. Divide into 6 parts, rolling into ropes about 15″ long. For each loaf, tightly braid 3 ropes, then press 1 dyed egg  near the end of each braid. Set bread aside to rise again for 1 hour on a parchment paper lined baking sheet.

Preheat oven to 350˚  thirty minutes before baking.

Brush bread with reserved beaten egg, sprinkle with pearl sugar if desired, and bake until golden, 40–50 minutes .Let cool completely.

Enjoy!

DSC_1181


Enjoy!


This recipe was adapted from here

DSC_1170

If you haven’t already guessed, I  love baking bread, and Easter has a large assortment of traditional breads to choose from. Please make sure to check back next week when the Daring Baker’s have a beautiful German Easter bread recipe for everyone. I had this bread already in mind before I knew about next weeks challenge so I figured the more the merrier and am posting this before Easter so it gives you a chance to make one this weekend.

Like all holiday breads, this one contains eggs. Eggs symbolized new life so it is only fitting for Easter (and Christmas and Rosh Hashanah). This one is baked in a round loaf, to symbolize the sun. The light lemony fragrance of this dough  is so inviting. You can make one large, and very impressive, 10-inch loaf or two smaller ones, which is what I did. They are equally impressive, just smaller. We are a small family so it’s better to keep and small loaf for ourselves and share a loaf with friends. Why don’t you bake some today and share with your friends? Bake On!


Alpine Easter Bread

makes one large 10-inch round loaf or two small 6-inch round loavesDSC_1153

1/2 cup (4 oz/150 ml) whole milk
1/2 Cup (4 oz) unsalted butter
1 Tablespoon active dry yeast
1 teaspoon sugar
1/2 Cup (4 oz/150 ml) warm water (105-115f) or room temp water- it will just take longer to rise
4 Cups(17 ounces), or more, unbleached AP flour
2/3 Cup granulated sugar
2 tsp grated lemon zest (lemon)
3 eggs, room temperature
2 tsp vanilla extract, or the seeds of 1 vanilla bean
1/2 tsp lemon extract

For the Glaze

1 Cup (4 oz / 120 g) powdered sugar
1 Tablespoon melted butter
3 Tablespoons Amaretto (or milk)

In a small saucepan combine the milk and butter and heat until the butter has melted. Let it cool to about 105 F.

In a large bowl  combine the warm water, 1 teaspoon sugar, and yeast. Whisk to dissolve the yeast and let stand for about 10 minutes, or until it is foamy.

Why is this necessary? Active dry yeast needs to proof in water before use. If you use instant dry yeast it can get added with all of the other ingredients.

Add 2 cups of the flour, sugar, lemon zest, salt ,the milk/butter mixture, eggs and extract (or vanilla seeds). Beat for a few minutes until creamy. Add the remaining flour 1/2 cup at a time on low-speed (or by hand!) until a nice soft dough is formed. Add additional flour if needed. Here in Calgary it is quite dry so I tend to require less flour.  It should still be slightly tacky. Knead for 10 minutes.

Place the dough into a greased container, turn to coat the top, and cover with plastic wrap. Let rise until doubled in bulk, at least 2 hours (yes, 2 hours). Alternately you can let it sit at room temperature for 1 hour then place the container in the refrigerator overnight. This will help develop the flavor. The next day let it sit out at room temperature for 30 minutes before proceeding.

Turn the dough out onto a clean work surface and shape it into a smooth round loaf. Place it into a greased 10-inch springform pan or a 4-inch deep 10-inch cake pan or two 6-inch round springform pans.  Loosely cover with plastic wrap and let rise until doubled, about 1 hour.

30 minutes before baking, preheat your oven to 350 F.

While the bread is baking prepare the glaze. Simply stir the melted butter, powdered sugar, and liqueur  together until it is smooth with no visible lumps. Set aside.

Bake the bread for 50-60 minutes if using a 10-inch pan, or 35-45 minutes if using a smaller pan. It should be a deep golden brown. Let the bread stand for 15 minutes before removing it from the pan. Place on a wire rack over a piece of parchment or wax paper (to catch the drips). Drizzle the warm loaf(s) with all of  the glaze, letting it run down the sides. Stud the outer edge with whole almonds, if desired. Let cool completely. Enjoy!!

DSC_1161

Recipe Source: Baking Bread Old and New traditions by Beth Hensperger

 DSC_1112

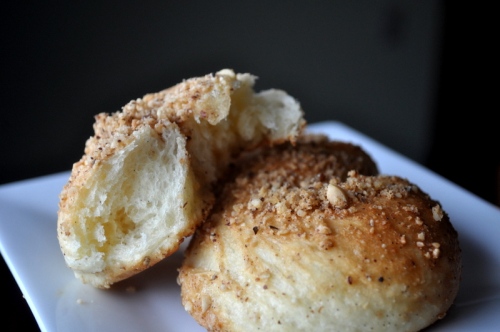
Water-Proofed? Seriously, what that mean? When I read that Elle, from Feeding My Enthusiasms, decided to choose a recipe from  James Beard’s  “Beard On Bread” my first thought was good on you for going back to the classics. But this is no classic; this is pure inventive thinking. Could Elle be serious about this “method”?  I immediately  went looking for my old  1974 edition and sure enough, on page 142, Water-proofed bread.  “The bread is called “water-proofed” because the dough is submerged in a bath of water for the first rising”.  How is this even possible and what in the world made him think of  even trying this? And it works…  I wish that he would have embellished on this method since it says nothing about it in the book and I couldn’t find anything on the internet about the origins of this. Anyone out there have any clues? If so, please fill me in. I guess all that matters is that the end result is light, airy and delicious.

DSC_1108


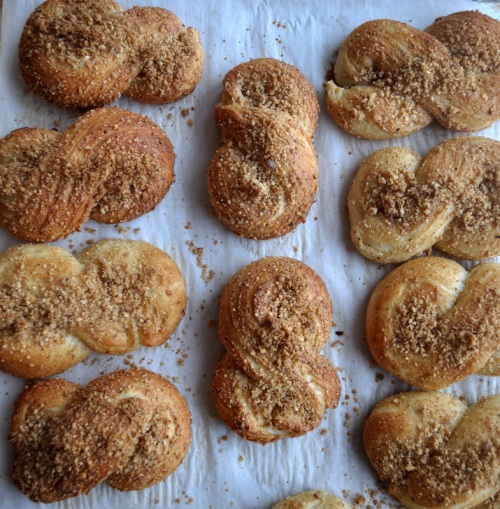
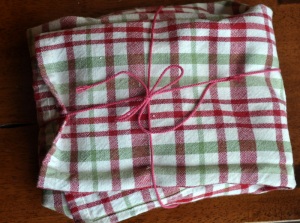
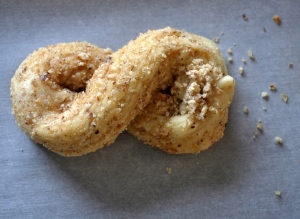
Please make sure to head over to Elle’s site for the original recipe since the recipe in the book immediately following water-proofed bread is water-proofed egg twists, which is what I made. Same concept, different shape. The recipe calls for rolling the dough in sugar and chopped nuts while shaping and since  I had  some hazelnut praline on hand I  thought this would be a nice way to use it. You will need a large bowl to fill with water that will be able to hold your dough, and a clean kitchen towel to wrap the dough in. The towel will get quite messy since the dough will want to stick to it so I would recommend a tight weaved cotton towel so no fibers get picked up by the dough.

there are a few interpretive questions I had about the recipe and it’s methods. It calls for 3 1/2 cups of flour but he only mentions 3 cups in the recipe. You will need all 3 1/2 cups. It calls for 1/2 cup butter, cut into pieces. The length of kneading was sketchy to me so I just used my standing mixer and kneaded for about 10 minutes. Like I said, the end result was delicious.

This was a really interesting method to making bread and I am toying with the idea of trying it with a different bread recipe just to see if it works with something like rye bread or an olive loaf. In the meantime, Bake On!BBBuddy badge march 14

Water-Proofed Egg Twists

makes 18 buns (they also freeze beautifully after baking)

1 package (2 1/4 tsp)  active dry yeast   
1/2 Cup plus 1 Tablespoon granulated sugar
1/2 Cup warm water (no hotter than 110 f)
3 1/2 Cups all-purpose flour
1 tsp salt
1/2 Cup (4 oz) unsalted butter, cut into pieces
1/4 Cup warm milk (no hotter than 110F)
3 eggs, lightly beaten
1 teaspoon pure vanilla extract, or the seeds scraped from 1 vanilla bean
1/2 Cup finely chopped walnuts, hazelnuts, or pecans


Mix 1/2 cup of granulated sugar and the chopped nuts; set aside

Proof the yeast with the remaining 1 tablespoon sugar in the warm water. Put 2 cups of flour in a large mixing bowl and add the salt and butter. Rub the butter into the flour until it resembles course meal. I pulsed it a few times in my mini food processor instead. Add the milk and the yeast mixture, and beat well. Add the eggs, vanilla, and the remaining flour and beat until springy and airy. Scrape the dough onto a lightly floured surface and knead for 1 minute. I added everything at once and kneaded, using my standing mixer and dough hook, for 10 minutes.

DSC_1091

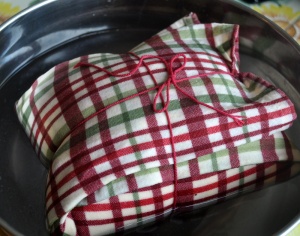
Okay, now for the fun part. Get a large bowl and fill it with tepid water (about 90F).  Spread a clean, cotton kitchen towel on the counter and flour it liberally. Place the dough into the center and wrap it up just like a present.

DSC_1093

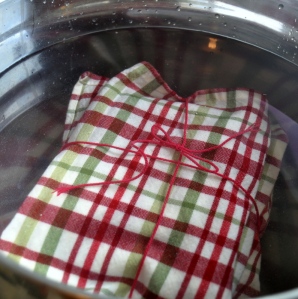
Tie it loosely (so it can expand), but securely, and submerge it into the bowl of water. DSC_1095


It will sink like the Titantic.

Let it sit  for 40 minutes and it will magically float to the top.

DSC_1098

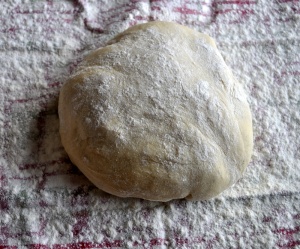
Remove it from the bowl, letting the excess water drip off, and unwrap the dough. Scrape the dough from the towel (it will be pretty messy) onto a lightly floured surface and shape into a ball, kneading in a little flour since it will be quite sticky. Make 18 pieces. I used a scale and weighed them out in 50 gram increments.

DSC_1102

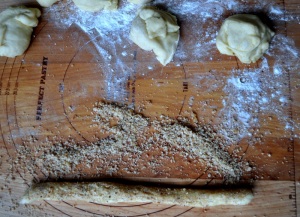
Spread your sugar nut mixture out and roll the dough pieces in it, rolling the dough out into 8 inch logs. Pinch the ends together and then twist into a figure eight.

DSC_1103

Place onto a parchment lined baking sheet, cover with lightly greased plastic wrap or a clean kitchen towel and let rise for another 30-40 minutes. I like to put my pan in the cold oven, on the middle rack,  with a bowl of hot water placed onto the bottom rack. I then in keep it in until I preheat the oven.

Bake in a preheated 375F oven for 15-20 minutes or until golden brown. Let cool before eating.

DSC_1108


DSC_3960

Is it really necessary for me to tell you that this bread is delicious? I mean, come on, just look at it! Thin, crispy and hot off the grill. It doesn’t get much better… AND it’s fast. It is often deep-fried in the streets of Morocco, but in this case we are just grilling it stove top in a pan.

The Bread Baking Babes are celebrating their 6th and anniversary and Lien chose this special bread to start the celebration. As a buddy who hopes to be a Babe one day, I was happy to join in the fun.  Mine doesn’t look quite as crispy as Lien’s but I chose to fill mine to make them a bit more substantial so they could be an afternoon snack for my daughter. All I can say is that I can’t wait to make these again, and neither can my 7-year-old.

They dough is simple and straight forward with only 5 minutes of resting time. I needed to pick Scarlet up from school so I put my dough in the fridge for 30 minutes before baking. I think that this chilling time made the dough much easier to handle. After dividing the dough, now for the tricky part; stretching the dough paper-thin. Except that, in my case,  after making sfogliatelle a few months ago, this part was a breeze. For me, the key is to grease up your hands when stretching the dough. I just used a little vegetable oil but  I have no doubt that some melted butter would be divine.

DSC_3962

Three separate fillings were tried. The first was grated carrots sautéed with ginger, cumin and cilantro. Next up was some crumbled goat cheese and a sprinkling of crunchy pistachios. When there were done I finished it with a drizzle of honey (have I ever mentioned how much I love this combination?). The third filling was thinly sliced strawberries and then a heavy swirl of nutella on top; my daughters favorite. I still was able to make one with nothing, just plain jane. I think I liked it plain the best or at least a solid tie with the carrot filling. Bake On!

RgaïfBBBuddy badge feb 14

500 g (about 2 cups) all-purpose flour
5.5 g  ( 1 1/4 tsp) dry yeast
1/2 tsp salt
250 ml  (1 cup) water
50 ml  (1/4) olive oil

Mix flour, yeast and salt in a large bowl.
Kneading by machine: Add water and start kneading with the dough hook, adding more water as necessary. Knead until the dough is very elastic and doesn’t stick to the sides anymore.
Kneading by hand: Make a well in the centre and add some water, start mixing in the flour where it touches the water. Little by little add more water and keep mixing in the flour. Start kneading, grease your hands with a little oil to prevent sticking. Knead about 20 minutes. Add water if it feels too dry. The dough needs to be very elastic and no dough should stick to your hands.

Jan 28, 2014-001
Shape: Make 10 dough balls. Coat every ball with a little olive oil. Let them rest for about 5 minutes. Flatten the ball with your hand as much as you can. Lightly coat your hands with some oil. Stretch the dough. Take care to get no (or a little as possible) holes in the dough. You need to stretch the dough until it gets as thin as you can, thinner than paper if possible. It’s best done on a counter top, stretching the dough and sticking it to the surface, so it doesn’t spring back. This is not easy. I found that chilling the  dough for about 30 minutes really helped. Now fold the dough in squares by folding the round sides inwards.

Bake the squares in a medium-hot large pan on both sides. Only use more oil if the Rgaïf stick to the pan.

You can also deep fry them (as the do in southern Morocco)

Serve: You can serve them with syrup, (strawberry) jam, chocolate sauce. But also you can use savory things, like thinly slices meat, cheese etc.

You can also spread some filling in them, before folding and baking them. just keep in mind to make it thin.
DSC_3949

(adapted from: “Vrijdag couscousdag” by R. Ahali)

Please stop by and say “Happy Anniversary” to all of the Babes

Tanna-My kitchen in 1/2 cups

DSC_3884-001
Wow- what a fun bakers challenge this month!  Baumkuchen (which translated to tree cake) is a cake that is traditionally cooked on a spit, with a thin layer of batter spread on, then cooked, then another thin layer of batter, cooked, and so on, until many layers (as many as 30) are built up. It is then taken off the spit and stood upright. When cut into the slices look like the many rings of a tree. This cake is also extremely popular is Asia during weddings since it looks like a ring. During the 18th & 19th centuries these cakes were very popular in Europe, sometimes with 300 (!) eggs being used for a big occasion.

Since not many people own a spit, for this months Bakers Challenge, Francijn , from “Koken in de Brouwerij gave us  simpler version to try,  which is Schichttorte (layered cake, Schicht means layer). This is a simple version of Baumkuchen, with horizontal layers. The layers in Schichttorte are not dipped, but smeared, and the cake is not baked on a spit, but in a baking mould (tin) (pan) producing a flat multi-layered cake. It is Schichttorte that we will be baking for this month’s challenge.

I have two old pastry books that have information about Baumkuchen but I never thought I would be giving it a go, even in a modified version. My first version was made using Francijn’s recipe. It was moist and delicious, thanks to almond paste and 6 eggs. This cake definitely improves with age. The big problem with this cake? I didn’t brown it enough on top to get the distinct layered look.DSC_3868
And this is 10 layers of batter!. I was so afraid of burning it and drying it out that I lost the effect. I also had the oven rack in the middle of the oven when it should have been on the top, closer to the top burner. Not all was lost though, since it was really tasty. Next time I will try it with the oven on broil and see what happens.

For my next version, I decided to use a recipe from my own pastry book, Traditional Cakes and Pastries by Barbara Maher. This book is out of print, unfortunately. I used a 6 inch square pan for this one, so I halved the recipe (less temptation). A few tablespoons of cocoa powder went into half of that batter and orange zest (& a drop of color) into the other half.

Each layer takes about 4 minutes to cook so this is not a cake to make when you are busy doing other things. It’s also very easy – it just takes time. Bake On!

Baumkuchen

Prepare a  10-inch (25 cm) spring form pan or a 8×10-inch (20×25 cm) cake pan
Makes 12 pieces

Batter:

6 large eggs (room temperature)
pinch of salt
1/2 cup plus 2 tablespoons (150 ml) (4-1/4 oz) (120 gm) granulated sugar
2/3 cup (160 ml) (5-1/3 oz) (150 gm) marzipan
1 cup minus 2 tablespoons (1-3/4 sticks) (7 oz) (200 gm) softened unsalted butter
3/4 cup (180 ml) (3-1/2 oz) (100 gm) confectioner’s (icing) sugar
2 teaspoons (10 ml) (1 package) (8 grams) vanilla sugar or granulated sugar
2/3 cup (160 ml) (3-1/2 oz) (100 gm) all-purpose flour (sifted)

Glaze:
1/3 cup (80 ml) (3½ oz) (100 gm) apricot jam
2 tablespoons (30 ml) orange liqueur (optional)
1 cup (240 ml) (7 oz) (200 gm) dark chocolate couverture chunks
1 tablespoon (15 ml) pure coconut oil

oil to grease your pan parchment paper 10-inch (25 cm) spring form pan / 8×10 inch (20×25 cm) cake tin

Directions: Preheat your oven to hot 450°F/230°C/gas mark 8. Line your cake tin with parchment paper, grease both paper and pan.

Separate the eggs.

Beat the egg whites with the salt until nearly stiff, add the sugar and beat until really stiff.  Finely crumble the marzipan and beat it with the softened butter, confectioner’s (icing) sugar and vanilla sugar until soft and creamy. Add the egg yolks one by one and beat well between each addition. Add the stiff egg whites and flour and gently fold it into the batter, trying not to lose too much air.

Smear 1/12th to 1/10th  of the batter (about 2 tablespoons) on the bottom of the pan, keep the sides of the pan clean, and bake for (about) 4 minutes in the oven, until it is cooked and brown. Take the pan out of the oven, smear the next portion of batter carefully over the first, and bake for another 4 minutes or until cooked and brown. Repeat until all batter is used. If you need to flatten a bubble insert a tooth pick or similar to deflate the bubble.This is only 2 tablespoons of batter
Let the cake cool down for a few minutes, take it out of the pan, remove the parchment paper and let the cake cool completely on a wired rack. Trim the edges.  Heat the jam a little, pass it through a sieve, and add the orange liqueur (optional). Cover the cake with the jam and let it cool.
Melt the chocolate with the coconut oil in a bowl above warm water. Pour it over the cake to cover completely, move the cake to a cool place and wait until the glaze is dry
DSC_3865

Version 2
for a 6 inch square pan

125 g/4.5 oz butter, softened
125 g/4.5 oz granulated sugar
4 eggs, separated
1 tbsp. rum
25 g/1 oz ground almonds
65 g/2 1/4 oz AP flour, sifted
65 g/ 2 1/4 oz potato flour, sifted

2 Tablespoons cocoa and zest of 1 orange. One drop orange coloring, if desired.

follow the same mixing method as above except before adding the stiff egg whites, split the batter in half. I used a scale to make this very easy but by eye is fine too. Add the cocoa powder to one half, then the zest and coloring to the other half. Now fold half of the egg whites into the chocolate mixture and the other half of the egg whites into the orange mixture. Layer the batter and cook as above.

DSC_3847

Happy New Year everyone. A very belated one but still sincere. I have taken some time off from blogging over the holidays so I can enjoy myself and live in the moment. My little girl and I were lucky enough to once again go to New York for 6 weeks to be with my mom for Christmas. This year was filled with many bonuses. Two of my sisters came home to spend Christmas with us as well ; it’s been 20+ years since any of my sisters spent Christmas morning with us. My sister Stacey brought her husband and 3 kids with her (it’s been 4 years since I have seen my beloved nephews and niece). Then 2 days before Christmas my husband calls to say he is flying in on x-mas eve, courtesy of his good brother! While my oldest sister flew back to Atlanta the day after Christmas, her daughter, who now lives in Toronto, called on the 30th to say she was driving down to spend New Years Eve with us. With her husband (who I had never met) and her new 6 month old baby boy! Seriously, when they talk about spending time with your loved ones during the holidays, this is what they meant. What a treat for us all.  New York Dec 2013

While I baked up some 16 varieties of cookies, 12 panettone, 4 cakes for church coffee hour, 2 birthday cakes, 2 stollen, and a buche de noel (whew!), I did not make time to write about it. It takes me hours to get a post up. I don’t know how people can post everyday. Truly I don’t.  I’m lucky if I do 2 or 3 a month. Or on this case, none. Maybe there is some secret I don’t know about…

Anyway, I have been back in Calgary for a week now  and already have loaded myself up with new cookbooks to look at. One of them is “The New Artisan Bread In 5 Minutes” by Jeff Hertzberg and Zoe Francois. This is a revised edition (30 new recipes) of their bestseller Artisan Bread in 5 minutes a day and is perfect for anyone who is a.) afraid of baking bread, b.) doesn’t own a stand mixer, or c.) loves bread. Much to my delight, I then saw that Jamie of Life’s a Feast picked a recipe from this very book for the Bread Baking Babes. Being a bread buddy is a delight of mine so I started right away with giving this a go since I had some chopped prunes already in the closet. An overnight soak in brandy helped (doesn’t it always?) deepen their complex flavor.

I still don’t understand how the gluten develops without any kneading, but who am I to question this apparently successful method. The dough is high hydration, almost more cake batter like when you mix it up, which is why it can stay in the fridge for up to 2 weeks, making it possible to have fresh-baked bread within a 2 hours notice. That is, as long as you have some dough in the fridge. The only downside I see to this book is that you have to prepare the dough in advance  at least the day before.  I still love the traditional way of baking though, there is something so organic about kneading, proofing, shaping, waiting some more and then baking. Or feeding your sourdough starter that’s been sitting on the counter and lovingly been attended to for months (or years). That being said, this is pretty darn cool, and easy. I will be trying a few more recipes from this book just to confirm this. Poor me, having to eat fresh bread….

So, on to this very interesting bread. It is bread, as in real bread, not like banana bread, which is cake-like. It is also deep and dark in flavor, thanks to dark cocoa powder and bittersweet chocolate, but it is not sweet. Perfect with a cup of coffee or tea (I tried both). I made three versions, one with prunes, one with dried cherries and hazelnuts and the last with just toasted hazelnuts. And more chocolate, of course, since bittersweet chocolate is good for you. so get your mixing bowls out and Bake On!

CHOCOLATE BREAD RECIPE (Chocolate Chocolate Chip Bread)
Makes two 2-pound loaves. This recipe is easily doubled or halved.

2 ½ cups (565 ml) lukewarm water (100°F or below)
¾ cup (170 ml) vegetable oil
1 Tbs (0.35 oz / 10 g) granulated yeast
1 to 1 ½ Tbs (17 to 25 g) kosher salt – * use less if using fine table salt, more if using coarse salt
1 cup (7 ounces / 200 g) sugar
5 ½ cups (1 pound, 11 ½ ounces / 780 g) all-purpose flour
¾ cup (3 ounces / 85 g) dark, unsweetened cocoa powder
1 ½ cups (6 ounces / 170 g) bittersweet or sweet chocolate chips
Mixing and storing the dough:

Mix the oil, yeast, salt and sugar with the water in a 6-quart bowl or a lidded (not airtight) food container.

Mix in the flour, cocoa powder and the chocolate chips without kneading, using a spoon or heavy-duty stand mixer (with paddle). If you are not using the machine, you may need to use wet hands to incorporate the last bit of flour.

Cover (not airtight) and allow to rest at room temperature until the dough rises and collapses (or flattens on top), approximately 2 hours.DSC_3823-001

The dough can be used immediately after the initial rise, though it is easier to handle with cold. Refrigerate the container of dough and use over the next 5 days. Beyond the 5 days, freeze the dough in 1-pound (about 450 g) portions in airtight containers for up to 4 weeks. When using frozen dough, thaw in the refrigerator for 24 hours before using, then allow the usual rest and rise time.DSC_3836-002


Chocolate Prune Bread:
Makes one 1 ½ pound loaf

1 ½ pounds (about 680 g – the size of a small cantaloupe) of the Chocolate Chocolate Chip Bread dough
Softened unsalted butter for greasing the pan
2 ounces (55 g) high-quality bittersweet chocolate – * use 6 ounces (170 g) if you did not add chocolate chips to the original Chocolate Bread Dough
¾ cup chopped pitted prunes
Egg wash (1 egg beaten with 1 Tbls water)
¼ cup (50 g) sugar for sprinkling over the top of the bread and preparing the pan

On baking day, generously grease an 8 ½ x 4 ½ – inch (22 x 11 ½ cm approx) nonstick loaf pan with butter, sprinkle some sugar evenly over the butter and shake the pan to distribute. Besides making a regular loaf pan I also used 3 medium-sized panettone papers.

Dust the surface of the refrigerated dough with flour and cut off a 1 ½ pound piece (for the smaller loaves I used 12 ounce pieces) Dust the piece with more flour and quickly shape it into a ball by stretching the surface of the dough around to the bottom on all sides, rotating the ball a quarter turn as you go. Using a rolling-pin, roll out the dough into a ½ – inch-thick (scant 1 ½ cm) rectangle. As you roll out the dough, use enough flour to prevent it from sticking to the work surface but not so much as to make the dough dry.

Sprinkle the chocolate and chopped prunes over the dough and roll up the dough jelly roll style to enclose them. Fold the dough over itself several times, turning and pressing it down with the heel of your hand after each turn. This will work the chocolate and prunes into the dough; some may poke through.

January 21, 2014

With very wet hands (I floured my hands instead), form the dough into a loaf shape and place it into the prepared pan. Allow to rest and rise for 90 minutes, loosely covered with plastic wrap

Preheat the oven to 350°F (180°C). A baking stone is not required and omitting it shortens the preheat.

Using a pastry brush, paint the top of the loaf with egg wash and sprinkle with sugar (I used Swedish pearl sugar) . Bake the loaf in the center of the oven for 50 to 60 minutes until firm. Smaller or larger loaves with require adjustments to baking time.

Remove the bread from the pan and allow to cool on a rack before slicing and eating. Enjoy!

Please check out if and how the other Babes managed their own Chocolate Prune Bread:BBB jan 14

Bake My Day – Karen
Bread Baking Babe Bibliothécaire – Katie
blog from OUR kitchen – Elizabeth
Feeding my enthusiasms – Elle
girlichef – Heather
Lucullian Delights – Ilva
Living in the Kitchen with Puppies – Natashya
My Kitchen In Half Cups – Tanna
Notitie Van Lien – Lien