Feeds:
Posts
Comments

Archive for the ‘Nuts’ Category

 DSC_1112

Water-Proofed? Seriously, what that mean? When I read that Elle, from Feeding My Enthusiasms, decided to choose a recipe from  James Beard’s  “Beard On Bread” my first thought was good on you for going back to the classics. But this is no classic; this is pure inventive thinking. Could Elle be serious about this “method”?  I immediately  went looking for my old  1974 edition and sure enough, on page 142, Water-proofed bread.  “The bread is called “water-proofed” because the dough is submerged in a bath of water for the first rising”.  How is this even possible and what in the world made him think of  even trying this? And it works…  I wish that he would have embellished on this method since it says nothing about it in the book and I couldn’t find anything on the internet about the origins of this. Anyone out there have any clues? If so, please fill me in. I guess all that matters is that the end result is light, airy and delicious.

DSC_1108


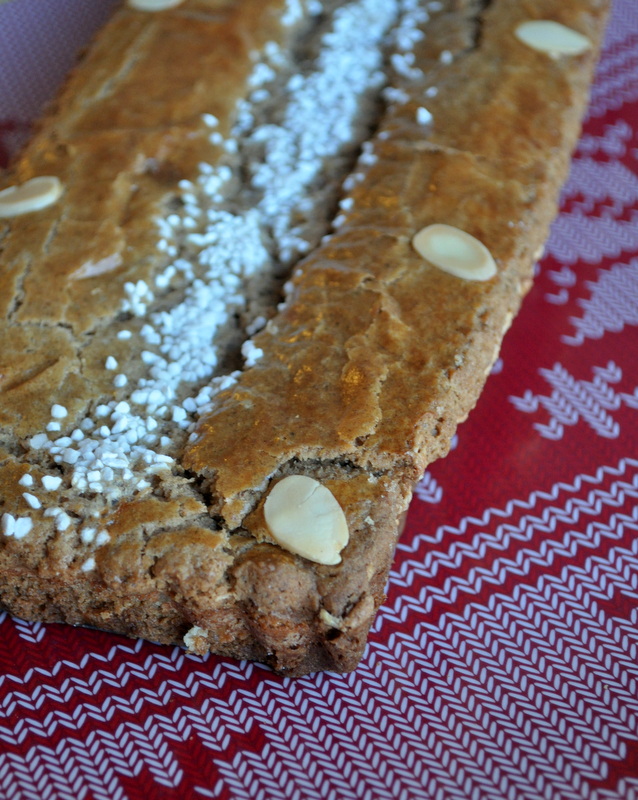
Please make sure to head over to Elle’s site for the original recipe since the recipe in the book immediately following water-proofed bread is water-proofed egg twists, which is what I made. Same concept, different shape. The recipe calls for rolling the dough in sugar and chopped nuts while shaping and since  I had  some hazelnut praline on hand I  thought this would be a nice way to use it. You will need a large bowl to fill with water that will be able to hold your dough, and a clean kitchen towel to wrap the dough in. The towel will get quite messy since the dough will want to stick to it so I would recommend a tight weaved cotton towel so no fibers get picked up by the dough.

there are a few interpretive questions I had about the recipe and it’s methods. It calls for 3 1/2 cups of flour but he only mentions 3 cups in the recipe. You will need all 3 1/2 cups. It calls for 1/2 cup butter, cut into pieces. The length of kneading was sketchy to me so I just used my standing mixer and kneaded for about 10 minutes. Like I said, the end result was delicious.

This was a really interesting method to making bread and I am toying with the idea of trying it with a different bread recipe just to see if it works with something like rye bread or an olive loaf. In the meantime, Bake On!BBBuddy badge march 14

Water-Proofed Egg Twists

makes 18 buns (they also freeze beautifully after baking)

1 package (2 1/4 tsp)  active dry yeast   
1/2 Cup plus 1 Tablespoon granulated sugar
1/2 Cup warm water (no hotter than 110 f)
3 1/2 Cups all-purpose flour
1 tsp salt
1/2 Cup (4 oz) unsalted butter, cut into pieces
1/4 Cup warm milk (no hotter than 110F)
3 eggs, lightly beaten
1 teaspoon pure vanilla extract, or the seeds scraped from 1 vanilla bean
1/2 Cup finely chopped walnuts, hazelnuts, or pecans


Mix 1/2 cup of granulated sugar and the chopped nuts; set aside

Proof the yeast with the remaining 1 tablespoon sugar in the warm water. Put 2 cups of flour in a large mixing bowl and add the salt and butter. Rub the butter into the flour until it resembles course meal. I pulsed it a few times in my mini food processor instead. Add the milk and the yeast mixture, and beat well. Add the eggs, vanilla, and the remaining flour and beat until springy and airy. Scrape the dough onto a lightly floured surface and knead for 1 minute. I added everything at once and kneaded, using my standing mixer and dough hook, for 10 minutes.

DSC_1091

Okay, now for the fun part. Get a large bowl and fill it with tepid water (about 90F).  Spread a clean, cotton kitchen towel on the counter and flour it liberally. Place the dough into the center and wrap it up just like a present.

DSC_1093

Tie it loosely (so it can expand), but securely, and submerge it into the bowl of water. DSC_1095


It will sink like the Titantic.

Let it sit  for 40 minutes and it will magically float to the top.

DSC_1098

Remove it from the bowl, letting the excess water drip off, and unwrap the dough. Scrape the dough from the towel (it will be pretty messy) onto a lightly floured surface and shape into a ball, kneading in a little flour since it will be quite sticky. Make 18 pieces. I used a scale and weighed them out in 50 gram increments.

DSC_1102

Spread your sugar nut mixture out and roll the dough pieces in it, rolling the dough out into 8 inch logs. Pinch the ends together and then twist into a figure eight.

DSC_1103

Place onto a parchment lined baking sheet, cover with lightly greased plastic wrap or a clean kitchen towel and let rise for another 30-40 minutes. I like to put my pan in the cold oven, on the middle rack,  with a bowl of hot water placed onto the bottom rack. I then in keep it in until I preheat the oven.

Bake in a preheated 375F oven for 15-20 minutes or until golden brown. Let cool before eating.

DSC_1108


Read Full Post »

DSC_3884-001
Wow- what a fun bakers challenge this month!  Baumkuchen (which translated to tree cake) is a cake that is traditionally cooked on a spit, with a thin layer of batter spread on, then cooked, then another thin layer of batter, cooked, and so on, until many layers (as many as 30) are built up. It is then taken off the spit and stood upright. When cut into the slices look like the many rings of a tree. This cake is also extremely popular is Asia during weddings since it looks like a ring. During the 18th & 19th centuries these cakes were very popular in Europe, sometimes with 300 (!) eggs being used for a big occasion.

Since not many people own a spit, for this months Bakers Challenge, Francijn , from “Koken in de Brouwerij gave us  simpler version to try,  which is Schichttorte (layered cake, Schicht means layer). This is a simple version of Baumkuchen, with horizontal layers. The layers in Schichttorte are not dipped, but smeared, and the cake is not baked on a spit, but in a baking mould (tin) (pan) producing a flat multi-layered cake. It is Schichttorte that we will be baking for this month’s challenge.

I have two old pastry books that have information about Baumkuchen but I never thought I would be giving it a go, even in a modified version. My first version was made using Francijn’s recipe. It was moist and delicious, thanks to almond paste and 6 eggs. This cake definitely improves with age. The big problem with this cake? I didn’t brown it enough on top to get the distinct layered look.DSC_3868
And this is 10 layers of batter!. I was so afraid of burning it and drying it out that I lost the effect. I also had the oven rack in the middle of the oven when it should have been on the top, closer to the top burner. Not all was lost though, since it was really tasty. Next time I will try it with the oven on broil and see what happens.

For my next version, I decided to use a recipe from my own pastry book, Traditional Cakes and Pastries by Barbara Maher. This book is out of print, unfortunately. I used a 6 inch square pan for this one, so I halved the recipe (less temptation). A few tablespoons of cocoa powder went into half of that batter and orange zest (& a drop of color) into the other half.

Each layer takes about 4 minutes to cook so this is not a cake to make when you are busy doing other things. It’s also very easy – it just takes time. Bake On!

Baumkuchen

Prepare a  10-inch (25 cm) spring form pan or a 8×10-inch (20×25 cm) cake pan
Makes 12 pieces

Batter:

6 large eggs (room temperature)
pinch of salt
1/2 cup plus 2 tablespoons (150 ml) (4-1/4 oz) (120 gm) granulated sugar
2/3 cup (160 ml) (5-1/3 oz) (150 gm) marzipan
1 cup minus 2 tablespoons (1-3/4 sticks) (7 oz) (200 gm) softened unsalted butter
3/4 cup (180 ml) (3-1/2 oz) (100 gm) confectioner’s (icing) sugar
2 teaspoons (10 ml) (1 package) (8 grams) vanilla sugar or granulated sugar
2/3 cup (160 ml) (3-1/2 oz) (100 gm) all-purpose flour (sifted)

Glaze:
1/3 cup (80 ml) (3½ oz) (100 gm) apricot jam
2 tablespoons (30 ml) orange liqueur (optional)
1 cup (240 ml) (7 oz) (200 gm) dark chocolate couverture chunks
1 tablespoon (15 ml) pure coconut oil

oil to grease your pan parchment paper 10-inch (25 cm) spring form pan / 8×10 inch (20×25 cm) cake tin

Directions: Preheat your oven to hot 450°F/230°C/gas mark 8. Line your cake tin with parchment paper, grease both paper and pan.

Separate the eggs.

Beat the egg whites with the salt until nearly stiff, add the sugar and beat until really stiff.  Finely crumble the marzipan and beat it with the softened butter, confectioner’s (icing) sugar and vanilla sugar until soft and creamy. Add the egg yolks one by one and beat well between each addition. Add the stiff egg whites and flour and gently fold it into the batter, trying not to lose too much air.

Smear 1/12th to 1/10th  of the batter (about 2 tablespoons) on the bottom of the pan, keep the sides of the pan clean, and bake for (about) 4 minutes in the oven, until it is cooked and brown. Take the pan out of the oven, smear the next portion of batter carefully over the first, and bake for another 4 minutes or until cooked and brown. Repeat until all batter is used. If you need to flatten a bubble insert a tooth pick or similar to deflate the bubble.This is only 2 tablespoons of batter
Let the cake cool down for a few minutes, take it out of the pan, remove the parchment paper and let the cake cool completely on a wired rack. Trim the edges.  Heat the jam a little, pass it through a sieve, and add the orange liqueur (optional). Cover the cake with the jam and let it cool.
Melt the chocolate with the coconut oil in a bowl above warm water. Pour it over the cake to cover completely, move the cake to a cool place and wait until the glaze is dry
DSC_3865

Version 2
for a 6 inch square pan

125 g/4.5 oz butter, softened
125 g/4.5 oz granulated sugar
4 eggs, separated
1 tbsp. rum
25 g/1 oz ground almonds
65 g/2 1/4 oz AP flour, sifted
65 g/ 2 1/4 oz potato flour, sifted

2 Tablespoons cocoa and zest of 1 orange. One drop orange coloring, if desired.

follow the same mixing method as above except before adding the stiff egg whites, split the batter in half. I used a scale to make this very easy but by eye is fine too. Add the cocoa powder to one half, then the zest and coloring to the other half. Now fold half of the egg whites into the chocolate mixture and the other half of the egg whites into the orange mixture. Layer the batter and cook as above.

Read Full Post »

DSC_3847

Happy New Year everyone. A very belated one but still sincere. I have taken some time off from blogging over the holidays so I can enjoy myself and live in the moment. My little girl and I were lucky enough to once again go to New York for 6 weeks to be with my mom for Christmas. This year was filled with many bonuses. Two of my sisters came home to spend Christmas with us as well ; it’s been 20+ years since any of my sisters spent Christmas morning with us. My sister Stacey brought her husband and 3 kids with her (it’s been 4 years since I have seen my beloved nephews and niece). Then 2 days before Christmas my husband calls to say he is flying in on x-mas eve, courtesy of his good brother! While my oldest sister flew back to Atlanta the day after Christmas, her daughter, who now lives in Toronto, called on the 30th to say she was driving down to spend New Years Eve with us. With her husband (who I had never met) and her new 6 month old baby boy! Seriously, when they talk about spending time with your loved ones during the holidays, this is what they meant. What a treat for us all.  New York Dec 2013

While I baked up some 16 varieties of cookies, 12 panettone, 4 cakes for church coffee hour, 2 birthday cakes, 2 stollen, and a buche de noel (whew!), I did not make time to write about it. It takes me hours to get a post up. I don’t know how people can post everyday. Truly I don’t.  I’m lucky if I do 2 or 3 a month. Or on this case, none. Maybe there is some secret I don’t know about…

Anyway, I have been back in Calgary for a week now  and already have loaded myself up with new cookbooks to look at. One of them is “The New Artisan Bread In 5 Minutes” by Jeff Hertzberg and Zoe Francois. This is a revised edition (30 new recipes) of their bestseller Artisan Bread in 5 minutes a day and is perfect for anyone who is a.) afraid of baking bread, b.) doesn’t own a stand mixer, or c.) loves bread. Much to my delight, I then saw that Jamie of Life’s a Feast picked a recipe from this very book for the Bread Baking Babes. Being a bread buddy is a delight of mine so I started right away with giving this a go since I had some chopped prunes already in the closet. An overnight soak in brandy helped (doesn’t it always?) deepen their complex flavor.

I still don’t understand how the gluten develops without any kneading, but who am I to question this apparently successful method. The dough is high hydration, almost more cake batter like when you mix it up, which is why it can stay in the fridge for up to 2 weeks, making it possible to have fresh-baked bread within a 2 hours notice. That is, as long as you have some dough in the fridge. The only downside I see to this book is that you have to prepare the dough in advance  at least the day before.  I still love the traditional way of baking though, there is something so organic about kneading, proofing, shaping, waiting some more and then baking. Or feeding your sourdough starter that’s been sitting on the counter and lovingly been attended to for months (or years). That being said, this is pretty darn cool, and easy. I will be trying a few more recipes from this book just to confirm this. Poor me, having to eat fresh bread….

So, on to this very interesting bread. It is bread, as in real bread, not like banana bread, which is cake-like. It is also deep and dark in flavor, thanks to dark cocoa powder and bittersweet chocolate, but it is not sweet. Perfect with a cup of coffee or tea (I tried both). I made three versions, one with prunes, one with dried cherries and hazelnuts and the last with just toasted hazelnuts. And more chocolate, of course, since bittersweet chocolate is good for you. so get your mixing bowls out and Bake On!

CHOCOLATE BREAD RECIPE (Chocolate Chocolate Chip Bread)
Makes two 2-pound loaves. This recipe is easily doubled or halved.

2 ½ cups (565 ml) lukewarm water (100°F or below)
¾ cup (170 ml) vegetable oil
1 Tbs (0.35 oz / 10 g) granulated yeast
1 to 1 ½ Tbs (17 to 25 g) kosher salt – * use less if using fine table salt, more if using coarse salt
1 cup (7 ounces / 200 g) sugar
5 ½ cups (1 pound, 11 ½ ounces / 780 g) all-purpose flour
¾ cup (3 ounces / 85 g) dark, unsweetened cocoa powder
1 ½ cups (6 ounces / 170 g) bittersweet or sweet chocolate chips
Mixing and storing the dough:

Mix the oil, yeast, salt and sugar with the water in a 6-quart bowl or a lidded (not airtight) food container.

Mix in the flour, cocoa powder and the chocolate chips without kneading, using a spoon or heavy-duty stand mixer (with paddle). If you are not using the machine, you may need to use wet hands to incorporate the last bit of flour.

Cover (not airtight) and allow to rest at room temperature until the dough rises and collapses (or flattens on top), approximately 2 hours.DSC_3823-001

The dough can be used immediately after the initial rise, though it is easier to handle with cold. Refrigerate the container of dough and use over the next 5 days. Beyond the 5 days, freeze the dough in 1-pound (about 450 g) portions in airtight containers for up to 4 weeks. When using frozen dough, thaw in the refrigerator for 24 hours before using, then allow the usual rest and rise time.DSC_3836-002


Chocolate Prune Bread:
Makes one 1 ½ pound loaf

1 ½ pounds (about 680 g – the size of a small cantaloupe) of the Chocolate Chocolate Chip Bread dough
Softened unsalted butter for greasing the pan
2 ounces (55 g) high-quality bittersweet chocolate – * use 6 ounces (170 g) if you did not add chocolate chips to the original Chocolate Bread Dough
¾ cup chopped pitted prunes
Egg wash (1 egg beaten with 1 Tbls water)
¼ cup (50 g) sugar for sprinkling over the top of the bread and preparing the pan

On baking day, generously grease an 8 ½ x 4 ½ – inch (22 x 11 ½ cm approx) nonstick loaf pan with butter, sprinkle some sugar evenly over the butter and shake the pan to distribute. Besides making a regular loaf pan I also used 3 medium-sized panettone papers.

Dust the surface of the refrigerated dough with flour and cut off a 1 ½ pound piece (for the smaller loaves I used 12 ounce pieces) Dust the piece with more flour and quickly shape it into a ball by stretching the surface of the dough around to the bottom on all sides, rotating the ball a quarter turn as you go. Using a rolling-pin, roll out the dough into a ½ – inch-thick (scant 1 ½ cm) rectangle. As you roll out the dough, use enough flour to prevent it from sticking to the work surface but not so much as to make the dough dry.

Sprinkle the chocolate and chopped prunes over the dough and roll up the dough jelly roll style to enclose them. Fold the dough over itself several times, turning and pressing it down with the heel of your hand after each turn. This will work the chocolate and prunes into the dough; some may poke through.

January 21, 2014

With very wet hands (I floured my hands instead), form the dough into a loaf shape and place it into the prepared pan. Allow to rest and rise for 90 minutes, loosely covered with plastic wrap

Preheat the oven to 350°F (180°C). A baking stone is not required and omitting it shortens the preheat.

Using a pastry brush, paint the top of the loaf with egg wash and sprinkle with sugar (I used Swedish pearl sugar) . Bake the loaf in the center of the oven for 50 to 60 minutes until firm. Smaller or larger loaves with require adjustments to baking time.

Remove the bread from the pan and allow to cool on a rack before slicing and eating. Enjoy!

Please check out if and how the other Babes managed their own Chocolate Prune Bread:BBB jan 14

Bake My Day – Karen
Bread Baking Babe Bibliothécaire – Katie
blog from OUR kitchen – Elizabeth
Feeding my enthusiasms – Elle
girlichef – Heather
Lucullian Delights – Ilva
Living in the Kitchen with Puppies – Natashya
My Kitchen In Half Cups – Tanna
Notitie Van Lien – Lien

Read Full Post »

DSC_1938

pin it
The January Daring Bakers challenge was hosted by Francijn from Koken in de Brouwerij (cooking in the brewery), all the way the Netherlands. She chose a traditional Dutch treat called Gevulde Speculaas (which I am told translates to stuffed spice). The speculaas is a spice blend (you know how cookie butter is all the rage? that is speculaas spice you are drooling over) that is unique like curry powder – every one can be different depending on who’s making it. Cinnamon is the major player here but the team consists of many including, nutmeg, ginger, mace, cardamom, white pepper, anise, clove, coriander… you get the picture. It’s warm, spicy and mellow all at the same time.  Anyway, the dough for this cake is infused with the heady mixture and then it is stuffed with almond paste. Seriously, doesn’t just the thought of almond paste get you salivating?DSC_1928  Overall, this was fun and easy to make. Wait, I take that back. I have been making my own almond paste exclusively for many years now  and almost always have some in the freezer.(Funny sidenote: I actually put 2 pounds of almond paste in my suitcase to bring to my mothers in New York just this past December!) It can seem scary at first but if you own a food processor than you too can make almond paste. This will be the hardest part of this recipe and it’s not hard at all!! Oh, I forgot to mention how cheap it is compared to store-bought. Once you make it yourself I doubt that you will ever buy store-bought after that . It is never quite as smooth as store-bought but unless you are modelling with it you won’t notice the difference and the flavor is so much better. One more thing on making almond paste – you must use blanched almonds = almonds without the skin on. There are two ways to go about this; boil up a pot of water and then add a few cups of almonds. Let them boil 3 or 4  minutes then drain. Once cool enough to handle, the skins will slide off easily. Then you need to let the almonds thoroughly (like for a few days) OR, you can be really lazy like me and buy the big giant bag of blanched, sliced almonds sold at Costco. These take virtually no time at all to process down to a fine powder. You do what works best for you. Believe I have skinned many pounds of almonds in my time.

Okay, so there are three elements to this challenge: mixing up some speculaas spice, making almond paste, and preparing the dough. The almond paste and the dough can be prepared a few days in advance if you like (this really gives the spices a chance to develop), but you can also whip this up in a jiffy as well. Bake On!

Speculaas Spice blend

This is the blend I made up but please feel free to make up your own. All spices are ground before starting

8 teaspoons cinnamonDSC_1937
2 teaspoons nutmeg
2 teaspoons dried ginger
1 teaspoon cardamom
1 teaspoon clove
1 teaspoon anise seed
1 teaspoon white pepper
1 teaspoon coriander

mix everything together and store in an airtight container.

Almond Paste

Francijns recipe: (I actually used this one for the cake so as to stay true to her recipe)

7/8 cup (210 ml)(125 gm)(4½ oz) raw almonds (or 1-1/3 cups (320 ml)(125 gm) (4½ oz) ground almonds)
5/8 cup (150 ml) (125 grams) (4½ oz) granulated sugar
1 large egg
1 teaspoon (5 ml) (3 gm) lemon zest

Grind the almonds for one or two minutes in a food processor, until you see nothing but very small pieces. (Or skip this step if you use ground almonds.)
Add the sugar, and grind for another one or two minutes. It must be very fine after this step.
Add the egg and let the food processor combine it – if it is powerful enough. Otherwise you will have to combine it with your fingers.

My usual recipe:

1  cup blanched almondsDSC_1922
1 cup confectioners (powdered sugar)
3 Tablespoons light corn syrup
1/4 teaspoon rose-water
dash almond extract

Place the almonds and a few tablespoons of the sugar in the bowl of a large food processor and whirl until it is a fine powder. Add the remaining sugar and start the machine. Add the rose-water and extract. Drizzle in the light corn syrup until it comes together and forms a smooth ball.

You can store this in thee fridge for a few weeks or months in the freezer.

I use a scale to measure out equal parts blanched almonds and confectioners (powdered) sugar so I can make large or small amounts. I tend to eyeball the light corn syrup and add little by little until I get the consistency I want. (I told you this was easy…)

Dough

1 ¾ cups (250 gm) (9 oz) all-purpose (plain) flourDSC_1923
1 teaspoon (5 ml) (5 gm) baking powder
¾ cup (150 grams) (5-1/3 oz) brown sugar, firmly packed
a pinch salt
2 tablespoons (30 ml) (15 gm) (½ oz) speculaas spices
3/4 cup (1½ stick) (175 gm) (6 oz) unsalted butter, softened

Put flour, baking powder, sugar, salt and spices in a bowl. Cut the butter in dices and add. Knead until smooth. Feel free to add a little milk if the dough is too dry. Wrap in plastic wrap and put in the refrigerator for two hours. I used my standing mixer to do this and I did need to add a little less than 1/4 cup of milk to my dough. I then let it sit in the fridge overnight.

You can choose to make the dough a few days in advance, just like the almond paste, that will benefit the flavor.

Assembling and baking the Gevulde Speculaas

Ingredients: speculaas dough, almond paste, 1 large egg, and blanched almonds for decorating (optional)

shallow baking pan, 8×10 inch (20×26 cm) or, round with of diameter 10 inch (26 cm)

Grease the pan. Preheat the oven to  350°F/180°C/gas 4

Divide the dough into two portions.

DSC_1926

Roll out both portions on a lightly floured surface, until they are exactly the same size as the baking pan. Put one of the layers in the pan and press it lightly to fill the bottom.

Lightly beat the egg with a teaspoon cold water and brush  1/3 of the egg over the dough in the pan.

Roll out the almond paste between two sheets of parchment, until it is exactly as big as the pan, and put it on the dough in the pan. (If you chose to make the paste soft, you can smear the paste instead of rolling it.) Press the paste lightly down to fit in the pan, and brush the next 1/3 of the egg over it. Place  the second layer of dough on top of the paste, press it lightly, and make as smooth as possible. Brush the last 1/3 of the egg over the dough. and decorate the pastry with the almonds, if you like. I sprinkled swedish pearl sugar down the center of my large one with just a few almonds slices down the sides. Bake for 30-40 minutes or until a toothpick inserted comes out clean. Cool completely. Enjoy!

DSC_1932

Read Full Post »