Feeds:
Posts
Comments

Archive for the ‘Pie’ Category

DSC_1558

Since I skipped the last two Daring Bakers Challenge’s I was determined to get back in the swing this month. The September challenge was hosted by Lucie of Chez Lucie and she chose a traditional Czech pastry called Kolache. We were given thee different versions to try: Pražský koláč (Prague Kolach), Chodské koláče (Kolache from Chodsko), and   Dvojctihodné/Moravské koláče (Two Fillings/Moravian Kolaches) .   According to Wikipedia, Montgomery, Minnesota is the kolacky capital of the world. Who knew?? Maybe because they are so tasty….

DSC_1561

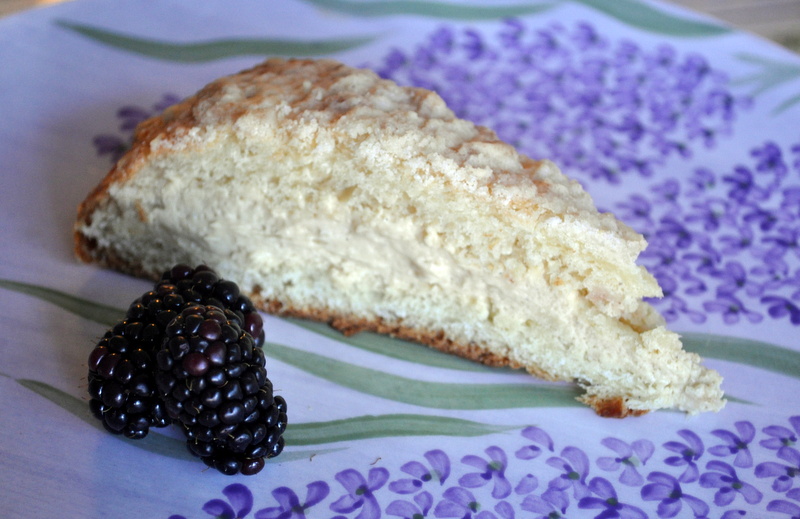
I made the Prague Kolache two weeks ago for a dinner we had with friends. I really was incredibly simple to put together and was light and delicious. When people ask for seconds I know it’s a winner. I could have eaten the whole thing myself. It’s essentially a large, round bread filled with a lightened pastry crème. For mine I chose to make a homemade butterscotch pudding for a little added flavor but the original calls for a simple custard. Do what floats your boat (or what you have on hand).

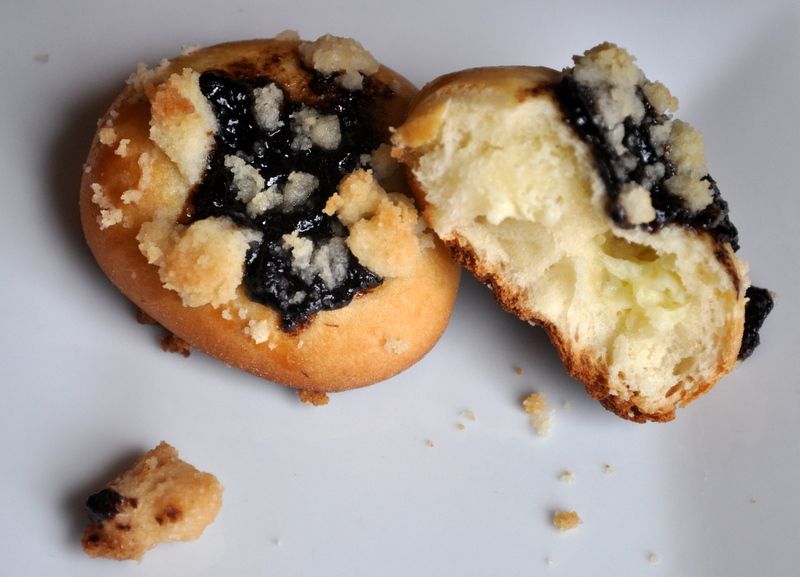
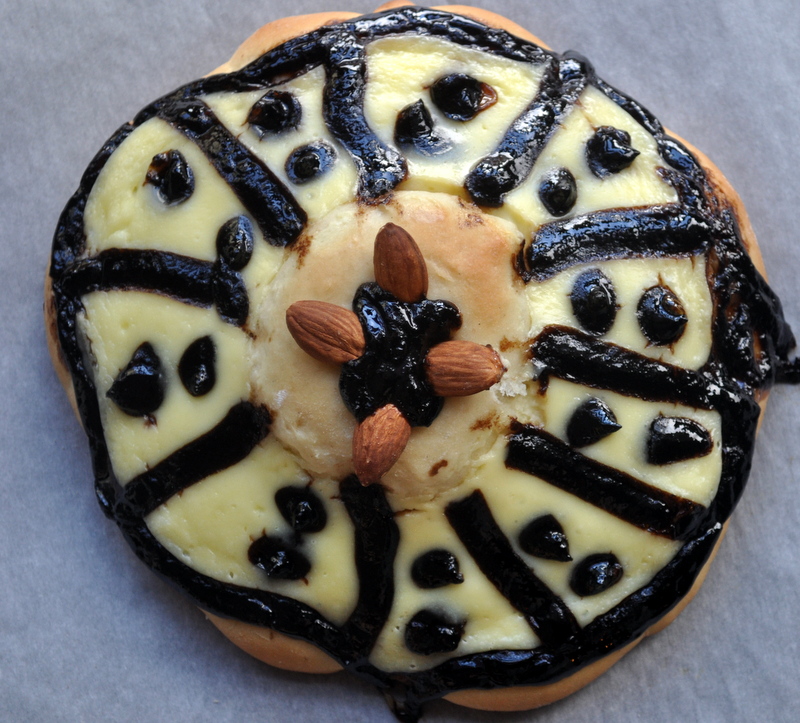
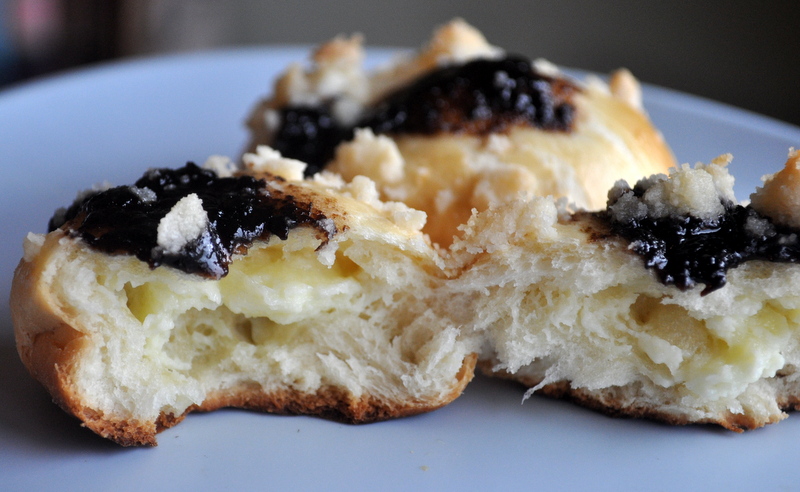
The Moravian Kolaches are little pillows of dough filled with a lightly sweetened quark and topped with a fruit jam.   Since I didn’t have any quark I used sour cream that I strained for 24 hours to thicken it. Again, make it work for you. I cheated on the third version by using some of the leftover dough and filling from the morovian version (see the  photo above). Please stop by Lucies blog to see her great step by step photos of all three versions.


While I really liked every version, the Prague version was hands down the winner, both for flavor and ease of preparation. Please try them and get back to me which was your favorite. Bake on!

DSC_1522


Ingredients
for cake:
1¾ cups (420 ml) (9 oz) (250 gm) all-purpose (plain) flour
½ cup (120 ml) (125 gm) mayonnaise (store-bought or home-made), room temperature (yes, mayonnaise)

2 tablespoons (30 ml) (1 oz) (30 gm) granulated sugar
1 small egg, room temperature
15 gm (½ oz) fresh yeast or 1 packet (2 teaspoons) (7gm) dry active yeast
5 tablespoons (75 ml) milk, warm
½ teaspoon (3 gm) salt
for the pastry cream:
2 cups (500 ml) milk, divided
½ cup (120 ml) (3½ oz) (100 gm) granulated sugar plus 1 tablespoon (½ oz) (15 gm)vanilla sugar
½ cup (120 ml) (2-2/3 oz) (75 gm) vanilla pastry cream powder (such as Birds)
1 stick (½ cup) (4 oz) (125 gm) butter, room temperature
5 tablespoons (75 ml) heavy whipping cream, chilled
for streusel topping:
1/3 cup (1¾ oz) (50 gm) plain flour
¼ cup (60 ml) (1¾ oz) (50 gm) butter, chilled and diced
¼ cup (60 ml) (1¾ oz) (50 gm) caster (or granulated) sugar
½ teaspoon (2 gm) ground cinnamon
for finishing:
1 small egg, lightly beaten

Directions:
In a bowl of your stand mixer, sift flour and make a hole in the middle. Crumble the yeast into the hole, add 1 teaspoon sugar and about 3 teaspoons warm milk. Mix yeast, sugar and milk with fork and lightly sprinkle the surface with flour. Cover the bowl with towel and let rise for 10-15 minutes. Add rest ingredients (mayonnaise, sugar, milk, egg and salt) and knead with dough hook on low speed for 10 minutes, until you have smooth dough. If you are using instant yeast, it is okay to place everything into the bowl at once.

Turn the dough onto a lightly floured surface. Cover with towel or plastic wrap and let rise for about an hour to double in volume. Form the dough into a ball and place it onto the baking sheet lined with parchment paper. With your palms and fingers press the dough and shape it to disc about 20–25 cm (8-10 inch) in diameter and 2–3 cm (¾-1 inch)thick. Let rise for 30 minutes.

Meanwhile preheat your oven to moderate 320°F/160°C/gas mark 3 .

Make the streusel topping. In a medium bowl, mix together sugar, flour and cinnamon. Add cold butter and with your fingers, mix all ingredients until crumbly. Brush the cake with the beaten egg and sprinkle with generous amount of streusel topping. Bake for 20 minutes until golden brown. Let cool on a wire rack.DSC_1517


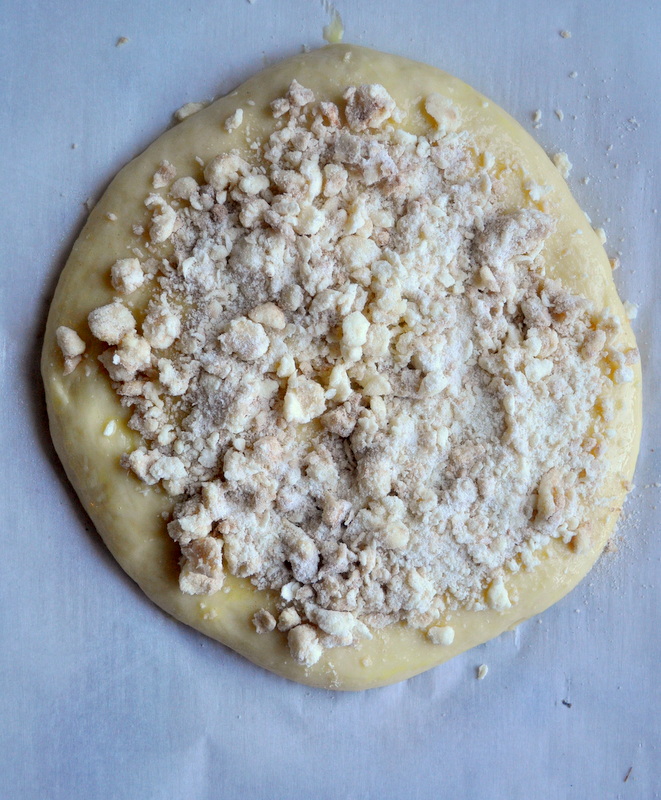
Prepare the pastry cream.
In a small bowl, mix well ½ cup (125ml) milk with the vanilla pastry cream powder. Set aside. In a saucepan, mix the rest of the milk 1½ cup (375ml) with the sugar and vanilla sugar and bring it to boil, stir occasionally. Add the milk-pasty cream powder mixture and boil for 3 – 5 minutes, stirring constantly.
Transfer the mixture into a bowl of your standing mixer fitted with paddle attachment and let cool completely, while stirring constantly on a low speed. Add diced butter and mix together.
Separately whip the double cream until stiff. Mix with vanilla cream.

Don’t be ashamed to use boxed vanilla pudding!

Cut cooled cake lengthwise and spread the cream onto the bottom part. Cover with upper part. Cut into 8 to 10 pieces


DSC_1554


MORAVIAN KOLACHES

Servings: about 30 small or 10 large kolaches 


Ingredients
for dough
3-2/3 cup (880 ml) (17-2/3 oz) (500 gm) all-purpose (plain) flour (use semi-coarse grounded if you can find in your store)
¾ cup (180 ml) (3½ oz) (100 gm) confectioner’s (icing) sugar
1 cup (250 ml) milk, warm
1/3 cup (80 ml) (2-2/3 oz) (75 gm) butter, melted
30 gm (1 oz) fresh yeast or 2 packets (4 teaspoons) (½ oz) (15 gm) active day yeast
pinch of salt
2 small egg yolks
for quark fillingDSC_1541
3 cups (1-2/3 lb) (750 gm) quark
1 small egg yolk
confectioner’s (icing) sugar to taste
for plum filling
2/3 cup (160 ml) (7 oz) (200 gm) plum jam
rum or hot water to soften jam if too thick
for streusel topping
1/3 cup (1¾ oz) (50 gm) plain flour
¼ cup (60 ml) (1¾ oz) (50 gm) butter, chilled and diced
¼ cup (60 ml) (1¾ oz) (50 gm) caster (or granulated) sugar

for finishing
1 egg, lightly beaten

Directions:
In a bowl mix together yeast and 1 teaspoon sugar. Add 4 tablespoons (¼ cup) warm milk, mix well and sprinkle with 1 tablespoon flour. Cover with plastic wrap and let rest for 10 – 15 minutes. (Skip this if you are using instant yeast. I used SAF Gold. Everything goes in the bowl together)
In a bowl of your electric mixer (or in a large bowl) mix flour, sugar, salt, egg yolks, butter, milk and leavened yeast. Knead with dough hook (or with wooden spoon) on low speed for about 10 minutes. Cover with plastic wrap and let rise for about one hour to double its volume.

Prepare quark filling – just mix all ingredients
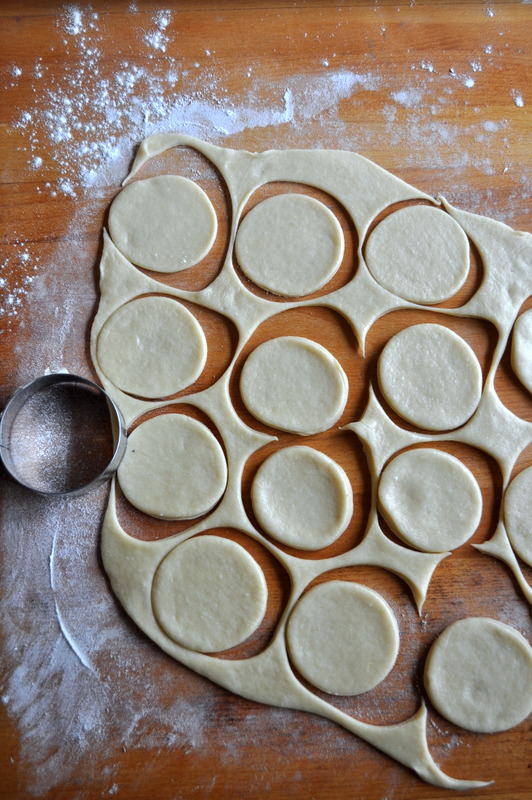
DSC_1540

and

plum filling – mix plum jam with rum or water to soften it. Set aside.


Prepare streusel topping. In a medium bowl, mix together sugar, flour and cinnamon. Add cold butter diced in small cubes and with your fingers, mix all ingredients until crumbly. Alternately,  in a saucepan melt the butter, add flour and sugar at once and mix with fork until crumbly. Set aside.


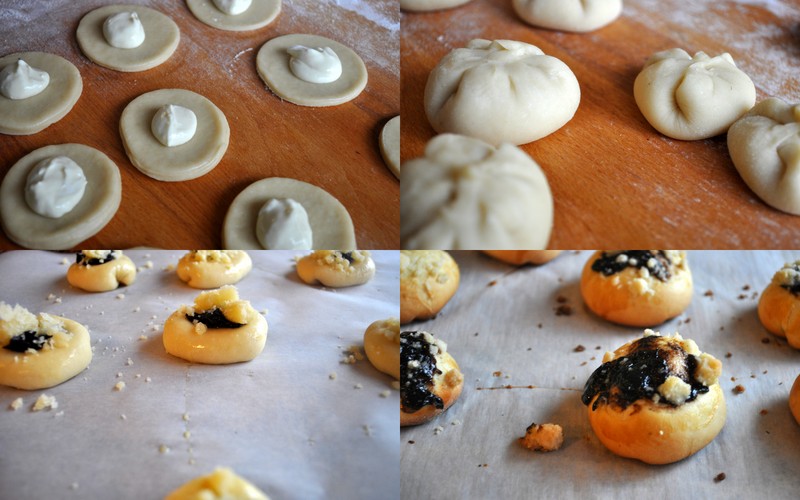
When the dough is risen turn it onto a lightly floured surface and roll it with rolling pin to a thickness of about 2 cm (¾ inch). Cut with 10cm (4 inch) cookie cutter or just with a glass (if you want small kolaches) or divide the dough into 10 equal pieces (if you want large kolaches). Flatten each piece with your hands and fill with about 1 rounded teaspoon of  quark filling. Wrap it into a “purse” shape and pinch all the seams to seal.Preheat oven to moderate 340°F/170°C/gas mark 3. Line 2 – 3 baking sheets with parchment paper. Put each kolach onto a prepared baking sheet with seam down. Press each kolach in the middle to make an indent. Brush it with egg wash and fill holes with plum filling. Sprinkle it with streusel topping. Bake for about 20 minutes to golden brown.

Sept 14, 2014


Storage & Freezing Instructions/Tips:
All kolaches are best the first and second day but you can store them in an airtight container in a fridge up to 3 (Prague kolach) or 5 (Chodske and Double filling kolaches) days. You can also freeze Prague kolaches WITHOUT filling in a freezer for one month.

Additional Information:
Some additional recipes, in Czech:
http://dolcevita.blog.cz/0707/grandiozni-ceske-kolace
http://dulique.blogspot.cz/2010/01/sweettoothday-prazsky-kolac.html
http://www.svasniprojidlo.cz/2014/05/prazsky-kolac.html
http://www.ceskatelevize.cz/porady/10084897100-kluci-v-akci/206562221900…

Read Full Post »

DSC_1207

Well, I’m late for posting the Bakers Challenge. Again.  I love to volunteer at my daughters school and the past few weeks have been quite hectic with end of school field trips and activities. Please forgive me.

This  month’s challenge was hosted by Shelley of C Mom Cook. She asked everyone to make cinnamon buns, or one its many variations. And there are tons. I think cinnamon rolls was one of the first breads that I ever made and   there is something so comforting about rich, warm bread filled with sugary goodness and covered in more sugary goodness. If you have never tried making these (or some version of them), please don’t hesitate to try. It’s  really quite simple.

The basic concept of a cinnamon roll is yeasted dough rolled out into a rectangular shape, then brushed with a good dose of butter. A cinnamon sugar mixture is then sprinkled over this and then the dough is rolled up and sliced. the slices are place, cut side up, in a pan to  rise and then baked.

What is the difference between a “cinnamon” bun and a “sticky” bun? The first is drizzled with either a cream cheese or confectioners sugar glaze when still warm from the oven while a sticky bun has a butter/sugar mixture in the bottom of the pan that sliced dough gets placed into for their final rise. basically the extra sugary goodness goes in either before baking or after. In mine I did a little of both!

A variety of doughs can be used. An enriched dough is most common. All that means is that the dough has some butter and eggs in it. Sourdough is ultra tasty. Brioche dough is crazy wonderful for this (lots  of added butter and eggs in the dough). Hell, let all thoughts of calories go out the window and use puff pastry. While this is more like a cronut it still counts as a cinnamon bun to me (and my thighs).  Don’t let the thought of making bread dough frighten you. It is one of the most rewarding things you can do in the kitchen. That being said , I have at times used plain old white bread dough bought from the freezer section at the market and made sticky buns with delicious results. Seriously, all paths lead to the same end. Deliciousness.

I baked a few versions this month. First I went with one with a filling of cinnamon, candied orange peel and walnuts. I know my friend Kathy is cringing right now at the thought of candied orange peel but I love it.  Later in the month I made little mini cinnamon buns for the volunteer appreciation night at the grade school. For these I just made a half batch of dough and rolled a skinnier rectangle so that when I rolled it up it only rolled 1 1/2 turns and then I cut 1/3 inch slices. I hope that makes sense. These were good and went quickly due to their manageable size. Nobody wants to be at a school gathering trying to eat a mammoth sized pastry in front of strangers. That is something better left for home.

DSC_1183

For my final version I went with a rhubarb and custard filled sticky bun. My rhubarb plant outside is gigantic and I need reasons to use it. I used Bird’s custard after reading in a food history book about how Birds came about. It turns out that during WWII families in England were rationed one (yes, 1) egg per week so the manufacturers came up with a product that required no eggs and very little sugar, which was rationed as well. Since I keep a can in the closet for when the urge to make Nanaimo bars strike, this seemed perfect. Well, actually, I used the last of my eggs to make the dough and didn’t feel like going out to get some more….

The best part about making cinnamon/sticky buns? other than eating them, is that you can prepare them the day before and slip the pan of unrisen slices in the fridge until morning. You just wake up, turn your oven on, and let the cold rolls warm up a bit on the counter while your oven heats up. I find that even 15 minutes at room temperature is enough before popping them into the oven.

Please make sure to visit Shelley’s site to see her tasty versions. BAKE ON!

 Dough

3 ¼ to 3 ½ cups all-purpose flour
2 tbsp sugar
2 ¼ tsp instant yeast (if using active dry yeast make sure to proof it first)
½ tsp salt
1 cup of  milk, heated to just around 100F  (I used 2%)
2 large eggs, at room temperature
1 tsp vanilla extract
½ cup unsalted butter, at room temperature


Stir three cups of the flour, sugar, yeast, and salt in a stand mixer fitted with the dough hook or in a large mixing bowl.

Add the milk, eggs ,vanilla  and butter to the dry ingredients and continue mixing until the dough comes together.  If necessary, add the remaining flour, a little at a time, until the dough is smooth and not sticky to the sides of the bowl. Continue to knead for about 5 minutes.

Place the dough into a lightly greased bowl and cover with cling wrap or a tea towel until it has doubled in bulk. This should take about hour. If it is very hot in your house this might be shorter or if your house is cool it could take a little longer.

Meanwhile, prepare the filling.

Rhubarb:

Take 4-5 stalks of fresh rhubarb and cut them into 1/4 – 1/3 inch slices. Add  1/2 cup sugar (or more to taste) . Mix this together and let it macerate until ready to use.DSC_1193

Custard:

1 1/2 Tablespoons (22 ml) Bird’s custard powder
1 1/2 Tablespoons (22ml) granulated sugar
1 cup  (250ml) milk
1/2 vanilla bean, seeds scraped out (save the pod for your sugar or salt jar) or 1 teaspoon rum


In a small saucepan, mix together the custard powder and the sugar. Over medium high heat, whisk in the milk until well blended. If using the seeds of a vanilla bean, add it now. Bring to a full boil, whisking frequently. Take off the heat. If using rum, add now. Place the hot custard into a bowl and place a piece if cling wrap directly onto the surface to prevent a “skin” forming. Cool in the fridge while the dough is rising.


Get your pan ready:

In a 12 hole muffin tin, place 1/2 teaspoon each of butter and brown sugar. Place in a warm oven for a few minutes to slightly melt the two.

Set aside .

June 28, 2014


Assembly:

Roll out your dough onto a lightly floured surface. Make a rectangle roughly 12 x 9 inches. Feel free to eyeball this. Spread a layer of cooled custard over the dough leaving about 1/2 inch border all the way around.

Lightly drain your rhubarb, reserving the pink liquid for your glaze (optional)

Sprinkle the rhubarb over the entire surface . With the wide end facing you, start rolling up your dough, jelly roll style. Pinch the seam together and slice into Twelve 1 1/2 inch slices. Place cut side up into each muffin cup.

Cover with cling wrap and place in the fridge overnight until morning.

When you are ready to bake, take the cold pan out of the fridge and place on the counter. Remove the cling wrap. Heat your oven to 350F. After about 15 minutes, pop the sticky buns into your oven and bake for 25 minutes or until golden brown.

May 28 2014

If you are baking the same day: after placing the sliced rolls into your muffin tin, cover them with either plastic wrap or a tea towel and let them rise again for another hour before baking at 350F for 25 minutes.

If you don’t have a muffin tin, place them into a rectangle or round cake pan with a little space around them to expand.

Optional glaze:(since my daughter was having a friend sleepover this was not optional in out house)

Take 1 1/2 cups confectioners sugar and mix with 2 tablespoons of the reserved pink rhubarb syrup. If it is too thick, add a tiny bit more until you get a consistency of thick cream. When the sticky buns come out of the oven, take them out of the pan and drizzle the pink icing of each of them.

DSC_1213

This easy dough recipe is from Anna Olsen.


.

Read Full Post »

DSC_2741

Or is it a finger in every pie? I’m not sure and who cares because these hand pies are outrageously delicious!

The host for the June Daring Bakers Challenge is Rachael from Pizzarossa and she asked everyone to roll out the crust and bake some pie. I urge you all to go visit her site for some wonderful pie ideas. The crack pie (from Milk Bar fame) is really a winner, but it should be called fat pie since that is what happens when you can’t stop yourself from eating it. |I really love baking pie and had a lot of grand ideas of all the pies I would make this month. Except that life got in the way. I was baking croissants like crazy for a school function and have been baking a lot of vegan food for a close friend. I then developed a nasty sinus infection which was accompanied by a headache that wouldn’t stop. And the flood (and state of emergency). So I had to let a few things slide. Like Pie. I think I will make a plan to bake a pie once a week this summer. There are a lot of recipes out there to try , and to invent.  In particular, I own a book called “Farm Journal’s complete pie book” published in 1965 which contains 700 pie recipes that I would love to tackle. Maybe not all 700 but a few at least…. So on the pie (s) I did bake.  Luscious Saskatoon berry hand pies. DSC_2733

Never heard of a Saskatoon berry? Neither did I until I moved to western Canada. They are similar to a blueberry but with a little huckleberry flavor thrown in. Not too sweet and very fleshy too (where a blueberry is more squishy). I love them because when you cook them they still hold their individual shape instead of popping and turning into one big mass. I had to empty out my freezer last week and found some hand picked Saskatoon berries (courtesy of my friend Heidi) from last fall. Oh, the excitement. If you are lucky enough to find frozen Saskatoon berries at the market, buy them!  Fresh or frozen blueberries would work just as great. You know what? ANY fruit would work great in this recipe.

Okay, so what’s the big deal about pie anyway? Well, it’s all in the crust. Which is why so many people are afraid to make it. A bad crust is well, bad, but a great crust is heaven. My advice? try a few different recipes until you find the one that you are comfortable with and then make it a bunch of times. All of sudden pie dough is really simple to make and to handle. The best tip of all? Have everything cold. It makes the whole process so much easier. Now, there are MANY dough recipes out there. Really flaky pie crust is achieved using lard or shortening while a rich pate brisee is made using all butter. A good medium is using half shortening and half butter. Whatever you are using cut it up into small pieces and place in the freezer for about 30 minutes first. Remember, cold. I personally like to use ice cold vodka instead of water in my dough. I believe it makes a better crust (along with a little vinegar). Pie dough comes in all shapes and sizes though; crushed cookies mixed with butter, oil based dough, cheese based, coconut, chocolate, meringue, pretzel crumbs, crushed cereal…. you get the idea. Any special equipment? While a food processor makes the entire process take just about 1 minute, a pastry cutter works great too. Two butter knives work just as well, it just takes a little while longer to cut the fat into the flour. Pie dough also freezes quite nicely, so when you make some it’s not a bad idea to prepare some extra and wrap well to place in the freezer for a later use.  I remember my mom always taking the scraps of pie dough and smearing them with butter and cinnamon sugar to bake off in the oven as a treat for us kids. Memories… like the corners of my mind….

This particular pie dough is made with flour,  butter, sour cream and a touch of baking powder. No liquid. The “letter folding” technique when you roll out the dough also makes such a tender, high and flaky pastry. It really is divine. Bake On!!

Pastry Dough

  • 2 cups (8.8 oz/ 241 g) all-purpose flour
  • 1/2 teaspoon salt
  • 1/2 teaspoon baking powder
  • 1 cup (16 tablespoons/8 oz /227 g) cold unsalted butter
  • 1/2 cup(4 oz/ 113 g) cold sour cream

Filling

  • 2 Cups (8 oz/227g) Saskatoon berries, fresh or frozen (or blueberries/blackberry/raspberry)
  • 1/4 Cup (1 3/4 oz/50g ) granulated sugar
  • 1 tablespoon instant tapioca (or cornstarch or instant clear- gel)
  • 3 teaspoons lemon juice

* 1 egg (beaten) and some sanding sugar for the topping . This step is optional but the egg wash gives the pastry a lovely golden color when baked. The sprinkling of sugar is purely decorative but a nice touch.


Make the pastry dough:

Whisk together the flour, salt, and baking powder. Add the butter, working it  to make a coarse mixture. Leave most of the butter in large, pea-sized pieces. If using a processor use the pulse button to cut the butter in (The somewhat large pieces of cold butter will create steam when it goes in the oven which makes for a flaky pastry).DSC_2717 Stir in the sour cream. The dough will be crumbly. Don’t panic. . Turn it out onto a floured work surface, and bring it together with a few quick kneads.

Roll it into an 8″ x 10″ rectangle. Dust both sides of the dough with flour, and starting with a shorter end, fold it in three like a business letter. Flip the dough over, give it a 90° turn on your work surface, and roll it again into an 8″ x 10″ rectangle. Fold it in three again.

Wrap the dough, and chill for at least 30 minutes before using.

2013-06-22


Make the filling:

Place all the ingredients in a small pan set over medium heat. Cook until the mixture starts to thicken, about 5 minutes. Pour into a clean bowl and let cool to room temperature.

Assembly:

Preheat the oven to 425°F; place a rack on the middle shelf. Line a baking sheet with parchment paper.

Take the dough our of the fridge and let it sit at room temperature for 10 minutes so it is easier to handle. Roll the dough into a 14″ x 14″ square.  Cut out sixteen 3 1/2″ squares.DSC_2729

 Divide the filling among eight of the squares, using about a heaping tablespoon for each. Brush some of the beaten egg along the edges of each filled square. Cut a little vent into the each of the remaining eight squares so that steam can escape while baking. Top each filled square with a vented square, and press firmly  along the edges with the tines of a fork  to seal.  Transfer the pies to a parchment lined baking sheet. Place into the refrigerator for 15 minutes before baking.  Brush the top of each pie with the remaining beaten egg, and sprinkle with sparkling sugar.

DSC_2732

 Bake the pies for 18 to 20 minutes or until golden brown.

Let cool for at least 20 minutes before serving or you will scald the roof of your mouth. Enjoy!

DSC_2734


This amazing recipe is from King Arthur Flour. Can I tell you how much I would love to work in their test kitchen….

Read Full Post »

DSC_2468

“A man who was fond of wine was offered some grapes at dessert after dinner. ‘Much obliged’, said he, pushing the plate aside, ‘I am not accustomed to take my wine in pills’.” – Jean Anthelme Brillat-Savarin

Ready for a little taste of France? The April Bakers Challenge is hosted by Natalia of Gatti Fili e Farina and she chose Savarin,a yeasted cake made with a rich dough the soaked in syrup and served with pastry or chantilly cream (which is just pastry cream mixed with whipped cream to lighten it). I bet ice cream would be pretty good, too.

A little history, taken from “What’s cooking America”

Baba (BAH-bah) – Baba is called Babka in Poland and in France. In French, the word baba meaning, “falling over or dizzy.” These are small cakes made from yeast dough containing raisins or currants. They are baked in cylindrical molds and then soaked with sugar syrup usually flavored with rum (originally they were soaked in a sweet fortified wine). After these cakes were soaked in the wine sauce for a day, the dried fruits would fall out of them.

 1600s – It is believed to be a version of a kugelhopf, which was invented in Lemberg in the 1600s. The baba was brought to Paris, France by King Stanislas Leszczynska, the deposed king of Poland and the father-in-law of King Louis XV (1710–1774) of France when he was exiled to Lorraine. According to legend, he found the customary kouglhopf too dry for his liking and dipped the bread in rum. He was so delighted that he named the cake after one of the heroes of his favorite book, Ali Baba from A Thousand and One Nights. Later, his chef refined the sweet bread by using brioche dough and adding raisins to the recipe. The dish was then simply called “baba.”

According to the famous book called Larousse Gastronomique, The Encyclopedia of Food, Wine & Cookery, by Prosper Montagne:

“At the same time a Parisian Maitre Patissier, Julien, by omitting raisins from the dough, giving the cake another shape and changing the syrup in which it was steeped (this syrup remained the secret of his establishment for a long time) created the Brillat-Savarin, which later became simply savarin.”DSC_2463

The Oxford Companion to Food by Alan Davidson says that one of the Julien brothers, from a family of Parisian pastry-makers, set his mind to experimenting with the baba recipe sometime in the 1840s. The result was this rich and tasty dessert, which he named in honor of Jean Anthelme Brillat-Savarin (1755-1826), celebrated French gourmet and writer on gastronomy.

The dessert became very popular in France, but the people called it Baba Au Rhum and soon dropped the name Savarin. In other parts of the world, the cake is known as simply Savarin. In Turkey this cake is called “father’s cake.”

So what this is saying is that Savarin, Baba Au Rhum, ad Kouglhofp are all in the same family, but seriously, isn’t all food a derivitive of  another in some way?. We just keep re-inventing the same wheel over and over. Thank goodness it’s a  long road…

You will be making an enriched dough for this. What is that? Well, if you have ever made brioche, panettone, or challah then you are already familiar with enriched doughs. It just means that it has eggs and butter so you have to work longer at getting the gluten developed. With a stand mixer that means about 15-20 minutes mixing time, by hand, longer. I cut this recipe in half and made individual cakes with the help of some vintage tins since I wasn’t expecting too may people to drop by this week. I would love to make a single large oe for a dinner party though. Anyway, my friends, Bake On!

Ingredients

2½ cups (600 ml) (12-1/3 oz) (350 gm) bread flour

2 tablespoons (30 ml) water, lukewarm

6 (320 gm) large eggs at room temperature, separated

½ satchel (1½ teaspoons) (4 gm) instant yeast or 15 gm (½ oz) fresh yeast

4 teaspoons (20 ml) (20 gm) sugar

2/3 stick (1/3 cup) (80 ml) (75 gm) butter at room temperature

1 tablespoon (15 ml) (15 gm) (½ oz) orange and lemon zest (I used the zest of a blood orange ad 1 tsp of fioro di sicilia)

1 teaspoon (5 ml) (6 gm) salt

¼ cup (60 ml) (2 oz) (55 gm) butter for greasing the work surface, hands, dough scraper & baking pan

Sponge

In a small bowl mix 2 tablespoons  (30 ml) lukewarm water, 3 tablespoons (1 oz) (25 gm) flour and yeast , cover with cling film and let rise 60 minutes

Dough

After 30 minutes put the egg whites in the mixer bowl and start working with the paddle at low-speed adding flour until you have a soft dough that sticks to the bowl (about 2 cups or 270 gm) and work until it comes together , cover with cling film and let rest 30 min

Add the sponge to the mixer bowl along with a tablespoon of flour and start mixing at low-speed (if you wish to add the zest do it now)

When it starts pulling away from the sides of the bowl add one yolk and as soon as the yolk is absorbed add one tablespoon of flour. Add the second yolk , the sugar and as soon as the yolk is absorbed add one tablespoon of flour. Raise the speed a little, add the third yolk and the salt and as soon as the yolk is absorbed add one tablespoon of flour. Keep on adding one yolk at the time and the flour saving a tablespoon of flour for later.DSC_2437

Mix the dough until is elastic and makes threads, about 5-7 minutes.  Add the butter at room temperature and as soon as the butter is adsorbed add the last tablespoon of flour. Keep on mixing till the dough passes the window pane test, about 10 minutes.DSC_2443

Cover the dough with cling film and let it proof until it has tripled in volume 2 to 3 hours.

You can prepare the Pastry cream now if you choose to use it, and refrigerate it.

While you wait prepare your baking pan buttering it very carefully not leaving too much butter on it. Grease your dough scraper, your hands and your work surface and put the dough on it and fold with the Dough Package Fold two or three times around (5 folds twice or three times). Cover with cling foil and let it rest 15 minutes on the counter.Turn the dough upside down and with the help of your buttered dough scraper shape your dough http://www.youtube.com/watch?v=ta2_h6Qogp0 in a rounded bun.

Make a hole in the center with your thumb and put it in the prepared pan. Cover with cling film and let rise in a warm spot until the dough reaches the top of the pan about 1 hour.2013-04-252

Pre-heat oven to moderate 340°F/170°C/gas mark 3

Bake the Savarin for about 40 minutes until the top is golden brown; meanwhile, prepare the Syrup

When the Savarin is done take it out of the oven, let it cool and remove carefully out of the pan. You have two choices now : you can immerse it in syrup right now or you can let it dry out (so it will lose some of his moisture that will be replaced by the syrup) and soak it later on.

DSC_2453

To immerse it in syrup it is a good idea to place it in the mold you baked it in (a spring-form pan one wouldn’t work for this) and keep adding ladles of syrup until you see it along the rim of the pan. Or you can just soak it in a big bowl keeping your ladle on top of it so it doesn’t float. Once the Savarin is really well soaked carefully move it on a cooling rack positioned over a pan to let the excess syrup drip off. The soaked Savarin gains in flavor the next day .Whatever you decide the day you want to serve it, glaze it and fill the hole with your filling of choice and decorate it. You can serve the Savarin with some filling on the side.DSC_2455

Syrup:

1 1/2 cups (350 ml) water

1 1/2 cups (350 ml) blood orange juice

1/2 cup Amaretto, separated in two

3/4 Cup sugar

Boil the water, juice, 1/4 cup Amaretto, and sugar for 5 minutes. Remove from the heat and add the remaining 1/4 cup Amaretto. Cool completely.

Natalia’s Peach Syrup:

1½ cups  (350 ml) peach tea
1½ cups (350 ml) peach juice
1½ cups (350 ml) water
1 cup (240 ml) (8 oz) (225 gm)  sugar
zest of one lemon
one cinnamon stick

Glaze:

2 tablespoons (30 ml) Jam (I used lingonberry for the color, but apple or peach is great)
2 tablespoons water

In a saucepan mix jam and water and warm up. When the savarin is cool and soaked, brush it with the glaze

DSC_2470
Storage & Freezing Instructions/Tips:

You can store the dried savarin for 5 days in a closed container. If you have soaked it cover well with cling foil and store it in the refrigerator for up to 5 days.

Additional Information: Folding  http://www.youtube.com/watch?v=ta2_h6Qogp0

Read Full Post »

National Pie Day

Since today is national pie day, I thought I would get in the spirit and bake a little pie. I mean that literally. A 9 inch pie is just too much for just us without company coming over, so I made 12 mini pies so we could give some away. With a pie crust in the freezer (see, things like this do come in handy), and a regular muffin tin, this was quite quick to put together.  If you don’t have a large, round cutter, you can flip a small bowl over and use that as your template. The crust should only come halfway up the sides of the muffin cup, unless you want a very deep dish pie.

So, do you part and bake a pie today… or at least eat one. Bake On!

Chocolate Banana Coconut Pie

Makes one 9 inch pie or 12 small pies

You will need one recipe for flaky pie dough. (you will need 1/2 this recipe)

Chocolate Ganache:

3/4 Cup (6 oz) heavy cream
6 Ounces Bittersweet chocolate
1 teaspoon coconut extract
1/2 teaspoon vanilla extract
1/4 teaspoon almond extract

Chop the chocolate into small pieces and place in a heatproof bowl. Heat the cream until almost boiling and then pour over the chocolate. Let this sit for 3 minutes. Whisk together until smooth and creamy (this will take less than a minute), then stir in the extracts until well blended. Set aside to set up for 30 minutes (my pie crust was thawing during this time).

*Preheat your oven to 350F*

Filling:

1/4 Cup (2 oz) unsalted butter, softened
1/2 Cup (4 oz) dark brown sugar
1/2 Cup (4 oz) granulated sugar
1/2 Cup (4 oz) whole milk
2 small, very ripe bananas, mashed
1 teaspoon pure vanilla
1 1/2 Cups (6 oz) sweetened shredded coconut

Beat the butter and sugars together until light and fluffy. Add the egg, milk ,mashed bananas, and vanilla and beat on medium speed for 3 minutes. It will look slightly curdled- don’t worry. Stir in the coconut. Set aside.

Assembly:

Roll out you pie to 1/8 inch thickness and cut out twelve 4 inch circles. Press each circle into a muffin space so it is evenly and firmly in the bottom well. It will be halfway up the sides.

Drop a tablespoon’s worth of the chocolate ganache into each little pie shell.

Cover with a very large spoonful (about 1/4 cup) of the coconut filling. When you use up all of the filling, each of your little pie shells will be very full. That is what you want; the filling will settle as it bakes.

Place in your preheated oven and bake for 20 minutes . Let cool completely. Run a sharp knife around the edges to loosen before taking them out of the pan.

Read Full Post »

Pumpkin Pie (Happy Thanksgiving!)

Great people, Great conversation, Great food = The Perfect Canadian Thanksgiving.

It’s the simple things in life which bring the most happiness. Sitting around the table with my loving,gorgeous husband , our happy, creative daughter (who just happens to be beautiful), our family, our friends, sharing laughs and a fine meal. It’s these times that I treasure most.

On the menu for our Thanksgiving feast:

Pork loin stuffed with dried peaches

Peach stuffed pork loin, carrot souffle, stuffing, shredded brussel sprouts with bacon and hazelnuts, cranberry sauce, and last but not least, pumpkin pie with calvados ice cream. The adult cocktail was a mix of pear vodka, ginger simple syrup, pear nectar, and a splash of sparkling apple cider. Topped with a few frozen cranberries it was a real fall treat. The little one was more than happy with a glass of egg nog (non alcoholic, of course).

Pumpkin pie is one of those desserts that we only seem to have once a year, but then you wonder, why? It really is so good, it should get more respect on the pie ladder. Maybe this year it will.

PUMPKIN PIE

Makes One 9 inch pie

Filling:

2 tablespoons All-purpose flour
2 1/2 teaspoons cinnamon
1/8 teaspoon ground cloves
1/4 teaspoon ground nutmeg
1/2 teaspoon ground ginger
zest of 1 small orange
1/2 teaspoon salt
3/4 cup brown sugar
2 Tablespoons molasses
2 Tablespoons corn syrup
1 1/2 Cups (12 ounces) canned pumpkin
In a large mixing bowl, mix everything together until completely smooth and blended. Cover and place in the fridge overnight to let the flavors meld and mellow.

Pie Crust:

1 1/4 Cups all-purpose flour
1 Cup toasted, ground pecans
1/4 tsp salt
3 Tablespoons shortening
4 Tablespoons cold butter, cut into small pieces
3-5 Tablespoons ice-cold vodka or water

In a food processor, place the flour, ground pecans, salt and shortening. Whirl until the shortening is in fine bits and evenly distributed. Add the butter and now pulse the machine just until the butter  is mixed in but still in fairly big bits |(that = flakey pastry). You do not want to overwork the dough or it will become tough. Add the cold liquid and pulse just a few times more. Dump it out onto a clean work surface , gather it into a ball, flatten it slightly into a disk shape and wrap in plastic. Chill for 30 minutes.

Roll out the into a 12 inch circle and transfer to the pie plate, trimming any excess away. You can use this for leaf decorations like I did, if you wish. Crimp the edges and place the dish back in the fridge for 30 minutes.

 Meanwhile, pre-heat your oven to 450 F.

Take the crust out of the fridge, pour in the filling, and bake on the bottom rack at 450 for 15 minutes. Turn the heat down to 350 F, switch the pie to the middle rack,  and continue to bake for another 35 minutes. If the crust starts to brown too quickly, cover it with a bit of foil. Let cool completely. Enjoy!

Read Full Post »

Cherries, cherries, and more cherries! It’s that time of year again here, cherry season that is. It’s a relatively short season so it really is a time to rejoice. I love that this is a fruit that actually has a season, and you can’t buy them all year round. No, in North America cherries only grow in the summer, and only for a short time. I think this makes me appreciate their juicy goodness that much more.

We decided to take a quick trip this past weekend to the Flathead Lake region of Montana and get in on some of those amazing berries. While we were there we also took in the Swan Lake Huckleberry Festival and the Whitefish Huckleberry Days Arts Festival. What is not to love about Montana?! The drive along the eastern side of Flathead Lake is just one cherry orchard after the next; a truly beautiful drive. We stopped the Cherry Hill Orchards (hobug@montanasky.com), owned by the lovely Heidi and Jim.  After a few fun-filled hours there we left with 12 pounds of cherries (plus the 5 lbs we already had in the car!) and headed back home.We are definitely going back  next year and making that an annual summer jaunt.

Needless to say, I have been pitting cherries like a madwoman. So far I have a large bag in the freezer, made a clafouti (I’ll get to that another day), and oven dried a portion. Here is another amazing dessert using fresh cherries. At first glance it looks very complicated and time-consuming, but I promise you – it isn’t. In fact it is quite simple to make. Make the tart dough the day before if you want to spread it out. Bake this, I promise you won’t be disappointed. Oh, and I must tell you…. I made the tart shells in the morning, planning on baking them later in the day. Well… I forgot. I made the filling and poured it onto the rectangle shaped tart and then realized, “I forgot to bake the shell first!!!!”. Oh well, it was too late for that one, and into the oven it went anyway. I baked the other crust. Funny thing is, they both tasted great, and no one was any the wiser…. Bake on!

CHEERY CHERRY CHOCOLATE TART

Yield: One 9 1/2 inch tart, 8 to 12 servings

Chocolate Tart Pastry

1 egg white
1 tsp pure vanilla extract
1 C + 2 Tbls (5 ounces/140 g) all-purpose flour
3 Tbls unsweetened natural or dutch-process cocoa powder (I like to use black cocoa)
3 Tbls firmly packed light brown sugar
3 Tbls granulated sugar
1/4 tsp salt
3 ounces (3/4 stick/85 g) cold unsalted butter, cut into 1/4 inch pieces

In a small bowl, whisk together the egg white and vanilla; set aside

In a food processor, combine the flour, cocoa, sugars, and salt. Pulse a few times to blend. Scatter the butter pieces over the flour mixture and pulse until the mixture kind of looks like cormeal. With the motor running, pour in the egg white mixture and process until it starts to come together and form a ball (this is one of those times that I appreciate having a food processor; it takes so little time and effort to make this). Transfer the dough to a work surface and press the dough together, using the heel of your hand to help you. Shape it into a disk. You are now ready to roll out your dough! You can always just press the dough into your pan with your fingertips, however it’s much faster to roll it our using a rolling pin. If you don’t want to use the dough right away, wrap it up in plastic  wrap and place in the fridge for up to 3 days, or, wrap it in foil and freeze for up to three months.  Just make sure that either way you dough is nice and pliable before rolling out.

Here is a great method (thank you Flo Braker!) to follow:

You will need 1 piece of parchment paper and 1 piece of plastic wrap. Put the plastic wrap down,place the dough down, cover with the parchment paper,  and roll out to your desired shape. This will depend if you are using a round/square/rectangle shape pan. Center the rolling pin and push out from you in one stroke. Rotate the dough slightly and roll again. Keep rotating (in the same direction) and rolling until your tart dough is 1/8 thick. With a tart, you want a thin crust so you don’t end up with more crust than filling.

Peel off the parchment paper. Using the overhang of the plastic wrap as handles, invert the dough, pastry side down, over the center of you tart pan. Gently ease the dough into the pan, fitting it into all the nooks and crannies. Peel away the plastic wrap (how easy is that?). Trim away any excess. Now you place the dough into the fridge to get nice and cold (at least 1 hour).

You need to partially bake this tart shell (but remember my error…). Preheat the oven to 350 F. Prick the bottom of the shell all over with a fork. This allows the steam to escape while it is baking. Place in the oven and check after 7-8 minutes to see if the shell is bubbling. If it is, just prick the center to deflate it. Continue to bake for another 10 minutes or until it is no longer shiny and looks dry. Take of the oven and let cool completely.

Preheat your oven to 350F.

Cherry Filling

2 ounces (1/2 stick/55 g) unsalted butter
1 C (3/12 oz/100 g) powdered sugar
2 Tbls whole almonds, finely ground to yield 6 Tbls (1 ounce/30 g)
1/3 C (1 1/2 oz/40 g) all-purpose flour
1/3  C (2 1/2 fl oz/75 ml)egg whites (3 large)
3/4 tsp pure vanilla extract
1/2 tsp pure almond extract
2 Tbls cocoa nibs, finely chopped (optional)
10 ounces (280 grams) fresh sweet cherries, stemmed, pitted, and left whole (about 25)

Preheat your oven to 350F

Follow the directions here to make brown butter. Pour the butter into a small bowl and set aside to cool, about 5 minutes.

In a medium bowl, stir together the sugar, ground nuts and flour. In another medium bowl, whisk the egg whites just until foamy (this takes about 30 seconds by hand). Add the flour mixture and stir until combined. Gradually add the browned butter to blend thoroughly. Stir in the extracts and cocoa nibs. Let the mixture rest at room temperature for 30 minutes to thicken slightly.

Spoon the filling into the tart shell and spread evenly. Press the cherries all around the perimeter of the tart, saving a few to place decoratively down the middle. The filling should reach about half way up the cherries.

Bake the tart for 22-25 minutes, or until the surface is dull and springs back when lighlty pressed. Place on a wire rack and let cool completely.

Chocolate Drizzle

2 ounces (60 g) bittersweet or semi-sweet chocolate, finely chopped
3 tbls heavy cream

Place the cream in a small pan and bring to a boil (I admit that I always use the  microwave for this; 1 minute). Pour the cream over the chocolate, let it sit for 30 seconds, then whisk until smooth and creamy.Set aside at room temperature until the mixture cools a bit and starts to thicken.

Drizzle the chocolate over the tart in a zig zag pattern. this can be done using a disposable pastry bag, the corner of a small ziploc bag, or even just a spoon.

I also made a square version using a small cake pan that had a removable bottom. I just used my fingertips to get the sides.


Recipe source: Baking For all Occasions by great Flo Braker

Read Full Post »

Raspberry Ricotta Tart

Summer is pretty much in full swing right now, and the berries on our raspberry bush are in abundance this year. It seems that no matter how many you pick, there seems to be that much more the next day. I think I have frozen at least 8 -10 pints so far, besides all of the ones eaten fresh daily. Ahhh… the life. It helps that raspberries are one of the easiest things to grow. Basically, leave it alone. My kind of plant.

For the BBQ the other night I made a raspberry ripple ice cream and this, a raspberry ricotta tart. I’m calling it a tart but it could also be a crostata, I think.  This is real simple, rustic, beautiful summer eating. I wasn’t even planning on posting this until one of my guests stated that this was his favorite thing of the entire meal. If you have the ingredients on hand it only takes moments to put together. Again, perfect for summer. The base is puff pastry (who doesn’t love that?), so you can either make your own or use store-bought. While I actually like making my own (I am a glutton for punishment) and keeping it in the freezer, I had a sheet of store-bought sitting in the freezer and used that. Whatever you have will work. Bake on!

1 sheet puff pastry
1 small container ricotta cheese (I think mine was 225 g)
1/4 cup runny honey
1/4 granulated sugar
1 vanilla bean
2 tablespoons corn starch
2 egg yolks (save or freeze the whites for another use)
2 pints fresh raspberries, divided

Preheat your oven the 425 F

Roll out your sheet of puff pastry to approximately 12 x 15. Transfer to a baking sheet lined with parchment paper. Make a small lip by folding over the pastry about 1/3 of an inch all around. Lightly prick the center portion with the tines of a fork. Place the sheet into the freezer while you prepare the filling.

In a medium-sized bowl add the ricotta cheese, egg yolks, honey, sugar and corn starch. Scrape out the seeds from the vanilla bean and add to the bowl (Do not throw out the pod-save for another use). Stir everything together for about 1 minute, making sure it is fully smooth and blended.

Take the pastry out of the freezer and gently pour the cheese mixture into the middle of the tart. Using a spatula, spread the mixture evenly out, to about 1/8 inch of the border. If some goes onto the border, don’t worry, this will add to its rustic charm. Evenly sprinkle one pint of the raspberries over the top. Brush the border with a little cream or an egg wash (this helps to give it that golden brown color).
Bake in the oven for 25 minutes or until golden brown. As soon as it comes out,immediately sprinkle the other pint of raspberries over the top and drizzle a little more honey (if you wish) over the top. Let cool completely. Enjoy!

P.S.- since writing this 45 minutes ago, I have picked another 1 pound 4 ounces!!!!!

Read Full Post »

Ricotta Cheese Crostata

This months Bakers Challenge  was brought us by Simona  from briciole. It is a simple, yet delicious, Italian tart traditionally made with a jam filling or pastry cream and fresh fruit. I chose to do another  Italian filling; ricotta cheese with Marsala soaked raisins.

The pastry dough is extremely easy to work with. I used almond flour in combination with all-purpose and whole wheat flour.  You can’t really tell from the picture but there is a lattice crust on top. It was very simple to do and makes any dessert look elegant. I covered mine with some sliced almonds before baking to enhance the nuttiness of the crust but you can leave your plain so the lattice is the focal point; just brush the lattice with an egg wash before baking to give it a nice shine.

There are so many variations for fillings, so use your imagination and have fun!

Pasta Frolla (Italian shortbread pastry) 

Ingredients

  • 1/3 cup superfine sugar (I like to use vanilla sugar)*
  • 1/2 cup + 2 Tablespoons  unbleached all-purpose flour
  • 1/2 cup whole-wheat pastry flour
  • 1/3 cup almond flour, or almond meal, or coconut flour
  • a pinch of salt
  • 6 tablespoons [90ml, 85 g, 3 oz] cold unsalted butter, cut into small pieces
  • 1 large egg, lightly beaten
  • 1/4 teaspoon vanilla extract

*Superfine sugar is often also referred to as ultrafine, baker’s sugar or caster sugar. It’s available in most supermarkets. If you cannot find “superfine” sugar, you can make your own by putting some regular granulated sugar in a food processor or blender and letting it run until the sugar is finely ground.

I make vanilla sugar by putting the pods of vanilla beans (after I have scraped out the seeds) into my sugar container. Shake it well after 1 or 2 days to evenly distribute. It will infuse the sugar with the most heavenly vanilla fragrance.

Filling:

2 C whole milk ricotta cheese
2 eggs
1/2 C sugar
zest of 1 orange
1/2 tsp Foira di Sicilia or vanilla extract
1/2 C raisins, soaked in 1/4 C Marsala wine (or rum) for at least 2 hours, up to 24 hours.

Combine all the filling ingredients, except the raisins, in a food processor and whirl for 1 minutes. It will become very smooth and creamy. Drain the raisins and stir into the cheese mixture. Pour into the prepared crust. Place your reserved pie strips in a lattice fashion across the top and sprinkle generously with sliced almonds. Bake for approximately 35 minutes or until a golden brown. Let cool completely before taking it out of the tart pan.
This will keep very well in the fridge for up to 5 days, but bring it back to room temperature before serving.

Read Full Post »

Golden Buttermilk Custard Pie


All right, today’s recipe from “A World Of Baking” is a buttermilk pie. For my husband who is cringing right now at the thought of it, don’t worry, it doesn’t taste like buttermilk at all. It’s lovely little pie, simple and sweet. I would definatley make this again, but I would cut the sugar down by a 1/4 of a cup as it was a bit too sweet for me. It would be great to bring to a BBQ to have as dessert.

GOLDEN BUTTERMILK CUSTARD PIE

10 Inch pie shell, unbaked
1 C granulated sugar (or 3/4 if you choose)
1/4 tsp salt
3 Tbsp all-purpose flour
3 large eggs, separated
2 C buttermilk
1/2 C melted unsalted butter
2 tsp pure vanilla extract
1 tsp grated lemon zest

Combine sugar, salt, and flour to blend. Beat the egg yolks slightly and add the sugar mixture with the buttermilk, melted butter, vanilla, and lemon zest. Blend thoroughly. In a separate, clean bowl, whisk the egg whites until stiff and fold into the custard mixture. Pour into the prepared pie shell and bake at 425F for 5 minutes. Then reduce the heat to 325 F and bake for 45-50 minutes, or until a knife inserted in the center of the pie comes out clean.

Read Full Post »

Older Posts »