Feeds:
Posts
Comments

Archive for the ‘Bakers Challenge’ Category

DSC_1593


The infamous Viennese Sachertorte is taking center stage today. This is a very traditional cake that has been made famous by the argument of who originated the recipe. This is between the Sacher hotel and the Demel Bakery, and it has even gone before the courts to decide, with intense legal battles ensuing between 1954 and 1963. In the end, the Sacher hotel won the rights to call it’s cake the “original” sachertorte  and gave the Demel the rights to decorate its tortes with a triangular seal that reads Eduard-Sacher-Torte.

In the end, it is a chocolate sponge cake brushed with apricot glaze and covered in a chocolate glaze. Perfect after a night of music at the Vienna opera house. Better yet, at your house after a delicious meal with friends.

DSC_1596


This months Baker’s challenge is hosted by Korena of Korena in the Kitchen. Korena is a crazy good baker, so I insist that you must visit her blog and show her lots of praise. She deserves it.

It has to be 15 years since I made a sachertorte, so this was a treat to bake. It really is a pretty dessert. Please visit Korena’s page to see her recipe for a 9 inch torte. Since I have don’t have a need for such a large cake, I made a 6 inch version, which will easily serve 6 people.

Overall, it is a pretty simple cake to bake if you break it down. You will need 2 bowls to make the cake; one to whip the egg whites, another for the eggs/butter/flour portion. I whipped my whites, then transferred them to a clean bowl while I then mixed up the remaining batter. The apricot glaze is just strained jam. The boiled chocolate glaze is traditional, but does require a candy thermometer. I am going to say that if you don’t have a candy thermometer that you could just use a chocolate ganache poured over it with the same results. It’s all about working recipes around what you have. So my friends, Bake On!

SACHERTORTE

Chocolate sponge:

3 large eggs, separated
1/2 cup (2.2 oz) all-purpose flour
1/4  cup (1 oz) almond flour
1/4 teaspoon salt
6 oz (3/4 stick ) unsalted butter, softened
1/2 cup (100 g) sugar
3 ounces bittersweet chocolate, melted and cooled slightly

Apricot Filling/glaze:

2/3 cup apricot preserves (I actually used low sugar spread and I  eyeballed the amount)
1 tablespoon water
1 tablespoon rum

strong>Boiled chocolate icing:

3/4 cup (150 g) granulated sugar
2 ounces bittersweet chocolate, chopped
1/4 cup (30 g)  cocoa powder
1/3 cup (80 ml) water

Preheat the oven to 375 F. Grease and flour (I prefer to use cocoa powder) a 6 inch springform pan.

In a clean bowl, whisk the egg whites until soft peaks form. Slowly add 2 tablespoons of the sugar and continue beating until firm peaks form. Set aside.

In another bowl, beat the butter and the remaining sugar together until light and fluffy. Add the egg yolks, one at a time, until well mixed. Add the dry ingredients and mix until combined, then gently fold in the beaten egg whites until no white streaks are left. Scrape the batter into the prepared pan, level off the top and bake for 30-35 minutes or until tested with a clean toothpick. Let cool for 10 minutes then loosen the ring and let cool completely.

Invert the cake onto a cake board or plate (the bottom is now the top). Slice the cake horizontally in two.

Sept 26, 2014

make the filling/glaze

Put the preserves and the water in a bowl and heat until warm. Give it a good stir, mix in the rum, then strain to get out any big fruit bits.

Place the bottom layer of cake (on the cake board) onto a wire cooling rack  set over a piece of wax paper.This is to catch the drips; if you skip this step you will have a mess on your hands! Brush the top of the layer with some of the warm jam. Let it set up for 5 minutes before placing the top on. Remember, your top layer started out as the bottom of the cake. Brush the entire outside of the cake with the remaining jam mixture. Let this set while you make the chocolate icing.

October 27, 2014

make the boiled chocolate icing

Place the sugar, chocolate, cocoa powder and water into a small, heavy saucepan over medium heat. Stir until blended and bring to a boil. Cook, stirring, until the sauce registers 220 F on a candy thermometer.

Pour the hot sauce (be careful!) into a bowl and stir with a wooden spoon until smooth and glossy. Stirring makes it thick and smooth.

DSC_1585

Pour the chocolate icing over the top of the cake and spread with a spatula to cover the cake completely. Work as quickly as possible as to get the smoothest surface. Let stand until the icing is set (about 20 minutes) Lift the cake with two flat spatulas onto a serving plate. ..

NOW… if you want to get fancy (and who doesn’t?) you can melt a little chocolate and pipe it over the top to write out “sachertorte” or some pretty designs. Feel free to thin the chocolate out a little with a pinch of coconut oil or shortening. I used semisweet chocolate for my writing so it would show up better against the dark chocolate glaze. It really looks just a pretty without it so don’t stress yourself out if you are afraid of piping on your now beautiful cake.

Serve with a large dollop of whipped cream. Enjoy!!!

DSC_1590


Read Full Post »

DSC_1558

Since I skipped the last two Daring Bakers Challenge’s I was determined to get back in the swing this month. The September challenge was hosted by Lucie of Chez Lucie and she chose a traditional Czech pastry called Kolache. We were given thee different versions to try: Pražský koláč (Prague Kolach), Chodské koláče (Kolache from Chodsko), and   Dvojctihodné/Moravské koláče (Two Fillings/Moravian Kolaches) .   According to Wikipedia, Montgomery, Minnesota is the kolacky capital of the world. Who knew?? Maybe because they are so tasty….

DSC_1561

I made the Prague Kolache two weeks ago for a dinner we had with friends. I really was incredibly simple to put together and was light and delicious. When people ask for seconds I know it’s a winner. I could have eaten the whole thing myself. It’s essentially a large, round bread filled with a lightened pastry crème. For mine I chose to make a homemade butterscotch pudding for a little added flavor but the original calls for a simple custard. Do what floats your boat (or what you have on hand).

The Moravian Kolaches are little pillows of dough filled with a lightly sweetened quark and topped with a fruit jam.   Since I didn’t have any quark I used sour cream that I strained for 24 hours to thicken it. Again, make it work for you. I cheated on the third version by using some of the leftover dough and filling from the morovian version (see the  photo above). Please stop by Lucies blog to see her great step by step photos of all three versions.


While I really liked every version, the Prague version was hands down the winner, both for flavor and ease of preparation. Please try them and get back to me which was your favorite. Bake on!

DSC_1522


Ingredients
for cake:
1¾ cups (420 ml) (9 oz) (250 gm) all-purpose (plain) flour
½ cup (120 ml) (125 gm) mayonnaise (store-bought or home-made), room temperature (yes, mayonnaise)

2 tablespoons (30 ml) (1 oz) (30 gm) granulated sugar
1 small egg, room temperature
15 gm (½ oz) fresh yeast or 1 packet (2 teaspoons) (7gm) dry active yeast
5 tablespoons (75 ml) milk, warm
½ teaspoon (3 gm) salt
for the pastry cream:
2 cups (500 ml) milk, divided
½ cup (120 ml) (3½ oz) (100 gm) granulated sugar plus 1 tablespoon (½ oz) (15 gm)vanilla sugar
½ cup (120 ml) (2-2/3 oz) (75 gm) vanilla pastry cream powder (such as Birds)
1 stick (½ cup) (4 oz) (125 gm) butter, room temperature
5 tablespoons (75 ml) heavy whipping cream, chilled
for streusel topping:
1/3 cup (1¾ oz) (50 gm) plain flour
¼ cup (60 ml) (1¾ oz) (50 gm) butter, chilled and diced
¼ cup (60 ml) (1¾ oz) (50 gm) caster (or granulated) sugar
½ teaspoon (2 gm) ground cinnamon
for finishing:
1 small egg, lightly beaten

Directions:
In a bowl of your stand mixer, sift flour and make a hole in the middle. Crumble the yeast into the hole, add 1 teaspoon sugar and about 3 teaspoons warm milk. Mix yeast, sugar and milk with fork and lightly sprinkle the surface with flour. Cover the bowl with towel and let rise for 10-15 minutes. Add rest ingredients (mayonnaise, sugar, milk, egg and salt) and knead with dough hook on low speed for 10 minutes, until you have smooth dough. If you are using instant yeast, it is okay to place everything into the bowl at once.

Turn the dough onto a lightly floured surface. Cover with towel or plastic wrap and let rise for about an hour to double in volume. Form the dough into a ball and place it onto the baking sheet lined with parchment paper. With your palms and fingers press the dough and shape it to disc about 20–25 cm (8-10 inch) in diameter and 2–3 cm (¾-1 inch)thick. Let rise for 30 minutes.

Meanwhile preheat your oven to moderate 320°F/160°C/gas mark 3 .

Make the streusel topping. In a medium bowl, mix together sugar, flour and cinnamon. Add cold butter and with your fingers, mix all ingredients until crumbly. Brush the cake with the beaten egg and sprinkle with generous amount of streusel topping. Bake for 20 minutes until golden brown. Let cool on a wire rack.DSC_1517


Prepare the pastry cream.
In a small bowl, mix well ½ cup (125ml) milk with the vanilla pastry cream powder. Set aside. In a saucepan, mix the rest of the milk 1½ cup (375ml) with the sugar and vanilla sugar and bring it to boil, stir occasionally. Add the milk-pasty cream powder mixture and boil for 3 – 5 minutes, stirring constantly.
Transfer the mixture into a bowl of your standing mixer fitted with paddle attachment and let cool completely, while stirring constantly on a low speed. Add diced butter and mix together.
Separately whip the double cream until stiff. Mix with vanilla cream.

Don’t be ashamed to use boxed vanilla pudding!

Cut cooled cake lengthwise and spread the cream onto the bottom part. Cover with upper part. Cut into 8 to 10 pieces


DSC_1554


MORAVIAN KOLACHES

Servings: about 30 small or 10 large kolaches 


Ingredients
for dough
3-2/3 cup (880 ml) (17-2/3 oz) (500 gm) all-purpose (plain) flour (use semi-coarse grounded if you can find in your store)
¾ cup (180 ml) (3½ oz) (100 gm) confectioner’s (icing) sugar
1 cup (250 ml) milk, warm
1/3 cup (80 ml) (2-2/3 oz) (75 gm) butter, melted
30 gm (1 oz) fresh yeast or 2 packets (4 teaspoons) (½ oz) (15 gm) active day yeast
pinch of salt
2 small egg yolks
for quark fillingDSC_1541
3 cups (1-2/3 lb) (750 gm) quark
1 small egg yolk
confectioner’s (icing) sugar to taste
for plum filling
2/3 cup (160 ml) (7 oz) (200 gm) plum jam
rum or hot water to soften jam if too thick
for streusel topping
1/3 cup (1¾ oz) (50 gm) plain flour
¼ cup (60 ml) (1¾ oz) (50 gm) butter, chilled and diced
¼ cup (60 ml) (1¾ oz) (50 gm) caster (or granulated) sugar

for finishing
1 egg, lightly beaten

Directions:
In a bowl mix together yeast and 1 teaspoon sugar. Add 4 tablespoons (¼ cup) warm milk, mix well and sprinkle with 1 tablespoon flour. Cover with plastic wrap and let rest for 10 – 15 minutes. (Skip this if you are using instant yeast. I used SAF Gold. Everything goes in the bowl together)
In a bowl of your electric mixer (or in a large bowl) mix flour, sugar, salt, egg yolks, butter, milk and leavened yeast. Knead with dough hook (or with wooden spoon) on low speed for about 10 minutes. Cover with plastic wrap and let rise for about one hour to double its volume.

Prepare quark filling – just mix all ingredientsDSC_1540

and

plum filling – mix plum jam with rum or water to soften it. Set aside.


Prepare streusel topping. In a medium bowl, mix together sugar, flour and cinnamon. Add cold butter diced in small cubes and with your fingers, mix all ingredients until crumbly. Alternately,  in a saucepan melt the butter, add flour and sugar at once and mix with fork until crumbly. Set aside.


When the dough is risen turn it onto a lightly floured surface and roll it with rolling pin to a thickness of about 2 cm (¾ inch). Cut with 10cm (4 inch) cookie cutter or just with a glass (if you want small kolaches) or divide the dough into 10 equal pieces (if you want large kolaches). Flatten each piece with your hands and fill with about 1 rounded teaspoon of  quark filling. Wrap it into a “purse” shape and pinch all the seams to seal.Preheat oven to moderate 340°F/170°C/gas mark 3. Line 2 – 3 baking sheets with parchment paper. Put each kolach onto a prepared baking sheet with seam down. Press each kolach in the middle to make an indent. Brush it with egg wash and fill holes with plum filling. Sprinkle it with streusel topping. Bake for about 20 minutes to golden brown.

Sept 14, 2014


Storage & Freezing Instructions/Tips:
All kolaches are best the first and second day but you can store them in an airtight container in a fridge up to 3 (Prague kolach) or 5 (Chodske and Double filling kolaches) days. You can also freeze Prague kolaches WITHOUT filling in a freezer for one month.

Additional Information:
Some additional recipes, in Czech:
http://dolcevita.blog.cz/0707/grandiozni-ceske-kolace
http://dulique.blogspot.cz/2010/01/sweettoothday-prazsky-kolac.html
http://www.svasniprojidlo.cz/2014/05/prazsky-kolac.html
http://www.ceskatelevize.cz/porady/10084897100-kluci-v-akci/206562221900…

Read Full Post »

DSC_1207

Well, I’m late for posting the Bakers Challenge. Again.  I love to volunteer at my daughters school and the past few weeks have been quite hectic with end of school field trips and activities. Please forgive me.

This  month’s challenge was hosted by Shelley of C Mom Cook. She asked everyone to make cinnamon buns, or one its many variations. And there are tons. I think cinnamon rolls was one of the first breads that I ever made and   there is something so comforting about rich, warm bread filled with sugary goodness and covered in more sugary goodness. If you have never tried making these (or some version of them), please don’t hesitate to try. It’s  really quite simple.

The basic concept of a cinnamon roll is yeasted dough rolled out into a rectangular shape, then brushed with a good dose of butter. A cinnamon sugar mixture is then sprinkled over this and then the dough is rolled up and sliced. the slices are place, cut side up, in a pan to  rise and then baked.

What is the difference between a “cinnamon” bun and a “sticky” bun? The first is drizzled with either a cream cheese or confectioners sugar glaze when still warm from the oven while a sticky bun has a butter/sugar mixture in the bottom of the pan that sliced dough gets placed into for their final rise. basically the extra sugary goodness goes in either before baking or after. In mine I did a little of both!

A variety of doughs can be used. An enriched dough is most common. All that means is that the dough has some butter and eggs in it. Sourdough is ultra tasty. Brioche dough is crazy wonderful for this (lots  of added butter and eggs in the dough). Hell, let all thoughts of calories go out the window and use puff pastry. While this is more like a cronut it still counts as a cinnamon bun to me (and my thighs).  Don’t let the thought of making bread dough frighten you. It is one of the most rewarding things you can do in the kitchen. That being said , I have at times used plain old white bread dough bought from the freezer section at the market and made sticky buns with delicious results. Seriously, all paths lead to the same end. Deliciousness.

I baked a few versions this month. First I went with one with a filling of cinnamon, candied orange peel and walnuts. I know my friend Kathy is cringing right now at the thought of candied orange peel but I love it.  Later in the month I made little mini cinnamon buns for the volunteer appreciation night at the grade school. For these I just made a half batch of dough and rolled a skinnier rectangle so that when I rolled it up it only rolled 1 1/2 turns and then I cut 1/3 inch slices. I hope that makes sense. These were good and went quickly due to their manageable size. Nobody wants to be at a school gathering trying to eat a mammoth sized pastry in front of strangers. That is something better left for home.

DSC_1183

For my final version I went with a rhubarb and custard filled sticky bun. My rhubarb plant outside is gigantic and I need reasons to use it. I used Bird’s custard after reading in a food history book about how Birds came about. It turns out that during WWII families in England were rationed one (yes, 1) egg per week so the manufacturers came up with a product that required no eggs and very little sugar, which was rationed as well. Since I keep a can in the closet for when the urge to make Nanaimo bars strike, this seemed perfect. Well, actually, I used the last of my eggs to make the dough and didn’t feel like going out to get some more….

The best part about making cinnamon/sticky buns? other than eating them, is that you can prepare them the day before and slip the pan of unrisen slices in the fridge until morning. You just wake up, turn your oven on, and let the cold rolls warm up a bit on the counter while your oven heats up. I find that even 15 minutes at room temperature is enough before popping them into the oven.

Please make sure to visit Shelley’s site to see her tasty versions. BAKE ON!

 Dough

3 ¼ to 3 ½ cups all-purpose flour
2 tbsp sugar
2 ¼ tsp instant yeast (if using active dry yeast make sure to proof it first)
½ tsp salt
1 cup of  milk, heated to just around 100F  (I used 2%)
2 large eggs, at room temperature
1 tsp vanilla extract
½ cup unsalted butter, at room temperature


Stir three cups of the flour, sugar, yeast, and salt in a stand mixer fitted with the dough hook or in a large mixing bowl.

Add the milk, eggs ,vanilla  and butter to the dry ingredients and continue mixing until the dough comes together.  If necessary, add the remaining flour, a little at a time, until the dough is smooth and not sticky to the sides of the bowl. Continue to knead for about 5 minutes.

Place the dough into a lightly greased bowl and cover with cling wrap or a tea towel until it has doubled in bulk. This should take about hour. If it is very hot in your house this might be shorter or if your house is cool it could take a little longer.

Meanwhile, prepare the filling.

Rhubarb:

Take 4-5 stalks of fresh rhubarb and cut them into 1/4 – 1/3 inch slices. Add  1/2 cup sugar (or more to taste) . Mix this together and let it macerate until ready to use.DSC_1193

Custard:

1 1/2 Tablespoons (22 ml) Bird’s custard powder
1 1/2 Tablespoons (22ml) granulated sugar
1 cup  (250ml) milk
1/2 vanilla bean, seeds scraped out (save the pod for your sugar or salt jar) or 1 teaspoon rum


In a small saucepan, mix together the custard powder and the sugar. Over medium high heat, whisk in the milk until well blended. If using the seeds of a vanilla bean, add it now. Bring to a full boil, whisking frequently. Take off the heat. If using rum, add now. Place the hot custard into a bowl and place a piece if cling wrap directly onto the surface to prevent a “skin” forming. Cool in the fridge while the dough is rising.


Get your pan ready:

In a 12 hole muffin tin, place 1/2 teaspoon each of butter and brown sugar. Place in a warm oven for a few minutes to slightly melt the two.

Set aside .

June 28, 2014


Assembly:

Roll out your dough onto a lightly floured surface. Make a rectangle roughly 12 x 9 inches. Feel free to eyeball this. Spread a layer of cooled custard over the dough leaving about 1/2 inch border all the way around.

Lightly drain your rhubarb, reserving the pink liquid for your glaze (optional)

Sprinkle the rhubarb over the entire surface . With the wide end facing you, start rolling up your dough, jelly roll style. Pinch the seam together and slice into Twelve 1 1/2 inch slices. Place cut side up into each muffin cup.

Cover with cling wrap and place in the fridge overnight until morning.

When you are ready to bake, take the cold pan out of the fridge and place on the counter. Remove the cling wrap. Heat your oven to 350F. After about 15 minutes, pop the sticky buns into your oven and bake for 25 minutes or until golden brown.

May 28 2014

If you are baking the same day: after placing the sliced rolls into your muffin tin, cover them with either plastic wrap or a tea towel and let them rise again for another hour before baking at 350F for 25 minutes.

If you don’t have a muffin tin, place them into a rectangle or round cake pan with a little space around them to expand.

Optional glaze:(since my daughter was having a friend sleepover this was not optional in out house)

Take 1 1/2 cups confectioners sugar and mix with 2 tablespoons of the reserved pink rhubarb syrup. If it is too thick, add a tiny bit more until you get a consistency of thick cream. When the sticky buns come out of the oven, take them out of the pan and drizzle the pink icing of each of them.

DSC_1213

This easy dough recipe is from Anna Olsen.


.

Read Full Post »

DSC_1091

I have to admit I loved this months Daring Bakers Challenge. Why? Because even after looking at the recipe several times this month I just got around to trying it out today and was thrilled to see how fast it came together. 5 minutes to mix it together, 20 minutes in the oven and then you are rewarded with little magic puffs, crispy on the outside and pillowy soft on the inside. Oh, did I forget to mention they are filled with cheesy goodness? I would say these are the Brazilian version of French gougères. But different. And gluten-free. Isn’t that a nice bonus? This is a recipe worth keeping for when you have company over with dietary needs that you normally don’t cook for. Like gluten-free cooking. the secret ingredient is sour cassava (tapioca) starch. Made from the yucca plant, the sour tapioca starch undergoes a natural fermentation process and the texture is more granular before baking than regular tapioca flour. Our host this month, the lovely Renata from“Testado, Provado & Aprovado!”, has this to say about the starch:

“TAPIOCA STARCH (also known as CASSAVA STARCH) is the main ingredient of Pão de Queijo. Here in Brazil there are two types: REGULAR and SOUR. The regular type is easier to find in other countries, but if you are lucky enough to find the sour type in your area, I highly recommend you try it (quantities will be provided when applicable). It looks pretty much like any other starch, powdery and white, sometimes it has little granules.
You can find tapioca starch at amazon.com:
Regular Tapioca starch (tapioca flour)
Sour Tapioca Starch (this is a Brazilian brand, quite overpriced. Here in Brazil it costs around US$ 2!)”

DSC_1312
Here in Calgary I had no problem finding the sour starch at my local South American market (yes, I have a  South American market down the street). I hope that it is just as easy for you (try looking in the spanish section). Otherwise, just use regular  tapioca flour.

The second most import ingredient is cheese. The authentic recipe calls for “Queijo Minas Curado” which is typical from Minas Gerais. They did not have this at the store so I relied on what I had in the fridge, smoked applewood cheddar. I don’t know what the other cheese tastes like, Reneta compares it to Monterey Jack, but the applewood cheddar was AMAZING.

DSC_1323

These are super simple to make, and are best are best eaten straight from the oven, or warm if you can wait that long. Keep a batch of rolled dough balls in the freezer to bake straight out of the freezer. Roll smaller balls so when company pops by they are the perfect accompaniment with cocktails, or larger balls for a dinner side dish or Panini roll.

I made the traditional version, but you must visit Renata’s site to get the two other versions. If I only had a waffle iron… I also cut the recipe down to 1/4  since there was just the three of us but next time (and there will be a next time) I will make the full batch and freeze the uncooked dough balls. Bake On!

TRADITIONAL PÃO DE QUEIJO
Servings:
Yields about 80 small balls

Ingredients:

500 gm (4 cups) tapioca starch (If you have access to sour tapioca, you can use 250gm (2 cups) of each)
1 cup (250 ml) whole milk
2-3/4 tablespoons (40 ml) (1½ oz) (40 gm) butter
1 teaspoon (5 ml) (3 gm) salt (or to taste depending on how salty your cheese is)
3 cups (750 ml) (9 oz) (250gm) Monterey Jack Cheese (or another cheese of your liking, or a mix of cheeses), coarsely grated
1 to 3 large eggs

Directions:

Heat milk, butter, and salt in a small sauce pan until it comes to a boil. Watch closely as it may boil over. Remove from heat and set aside.

Sift the  tapioca starch into a large bowl.

Pour the hot liquid  mixture over the tapioca and start stirring with a fork. The milk mixture will not be enough to form a dough yet. You will have a lumpy mixture, that’s what it is supposed to be.Keep stirring with the fork, breaking down the lumps as much as you can, until the mixture cools down to warm.

Preheat your oven to moderately hot 400° F/200° C/gs mark 6

DSC_1310

Add the grated cheese to the tapioca mixture and mix well, now using your hands.

Lightly beat the eggs with a fork and add little bits until the dough comes together into a soft but pliable dough. You only have to knead it a bit, not as much as you knead a yeasted bread. It’s OK if it is slightly sticky.Form balls with the dough and place them on a baking sheet lined with parchment paper or silicon mat or lightly greased with vegetable oil. If necessary, you can oil your hands to make shaping easier. The size of the balls may vary from small bite-sized balls to the size of ping-pong balls. They will puff up quite a bit after baking.25 minutes or until they just start to brown on the bottom. You may have golden spots of cheese on the crust. Don’t over-bake as they will get hard and bitter.

DSC_1311

NOTE: If your dough gets too soft and sticky to shape balls, you can always add a bit more tapioca starch or pop the dough into a piping bag and pipe the dough on a baking sheet.


Additional Information from Renata:

This recipe doesn’t require a stand mixer and, traditionally, it is made by hand. This recipe does not require a stand mixer and, traditionally, it is made by hand. However, it is indeed sort of a “heavy” dough. However, it is indeed a sort of “heavy” dough. Though I have never tried using a stand mixer here, I found someone who has. Though I have never tried using a stand mixer here, I found someone who has. Her name is Raiza Costa and she blogs at Dulce Delight. Her name is Raiza Costa and she blogs at Dulce Delight. She’s a Brazilian living in the US and she makes lovely videos in English. She’s a Brazilian living in the U.S. and she makes lovely videos em Inglês. I thought I’d share her “Pão de Queijo” post (with video) with you: I thought I’d share her “Cheese Bread” post (with video) with you:
Another link to a video showing the process by hand. Another link to a video showing the process by hand. It’s in Portuguese but the method is clearly shown: It’s in Portuguese but the method is Clearly shown:
Sour manioc starch (poviho azedo) and manioc starch (also known as sweet manioc starch or poviho doce) are both extracted from yucca. The difference is that sour manioc starch undergoes a natural fermentation process. As a result, manioc starch (the sweet one) has a much finer consistency and more delicate texture than sour manioc starch.
Read more at http://leitesculinaria.com/32757/recipes-brazilian-cheese-rolls.html#Xhw8sSPoMEYCkob6.99


DSC_1316


Read Full Post »

DSC_1186


The April Daring Baker’s Challenge was hosted by Wolf of Wolf’s Den . She challenged us to Spring into our kitchens and make Easter breads reflecting cultures around the world. Please make sure to visit her blog and see the amazing German (Osterbrot) and Italian (Anello dDi Pasqua Maria Pia) Easter breads  that she made. I so wanted to bake the Osterbrot but I just didn’t have enough time so it goes on the bucket list…


Since moving to Canada  10 yrs ago I have been so blessed with not only a luscious husband and amazing daughter, but with extraordinary friends. Both my husband and I have no family out West so to be able to fill our house on holidays with good friends is such a treat for us and helps fill that empty hole in our hearts not being with our moms and family. Over the years our house has become a sort of commune, with one friend or another eating (or sleeping over ) a few nights a week. We always welcome them with open arms and love sharing good times with them. My husbands best friend, who has been living with us a few days a week for the past year while conducting business here in Calgary, now has one of his old friends moving here from back East. And I mean very Greek. He drove out west a month ago not knowing DSC_1218anybody. Since we both know how that is, he has been over for dinner at least 5 times already, with everyone  being extremely welcoming (or trying to be). So with that in mind, I baked Tsouréki , a very traditional Greek Easter bread to help make him feel more at home.

Holiday breads, especially Easter breads, are enriched breads. This means that they contain eggs, and usually also butter and milk, making them more indulgent than “lean” bread. Eggs represent rebirth, or new life. Many holiday breads are braided as well, like this one. If you have never tried baking a braided bread, I can’t express enough how much fun they are to make. You can make anywhere from 3 to 12 strand loaves. Start with 3 strands and move your way up as you get more comfortable. I personally like the look of a 6 strand braid but that is just me. Please look at the  end of my post on challah bread for multiple links on braiding techniques to help you.

DSC_1183

This bread is scented with makhlépi, (also known as mahleb, mahlepi and other spelling variations) is a spice derived from the seed kernels of the Prunus mahaleb, a type of cherry tree (also referred to as a Rock cherry or St. Lucie cherry), and primarily used in Middle Eastern, Mediterranean and Eurasian cuisines. They are small kernals with a bitter almond kind of flavor. I was very excited when I saw this ingredient since I had some on hand from when I made Assyrian Spinach Pies last year. The kernals are steeped in water, discarded and then the liquid is used to flavor the dough. Now, I realize this might not be easy to find in some areas, so just substitute plain water in its place if you cannot find it.

At one end of the bread a red-dyed egg is inserted into the dough before baking. This represents the blood of Christ. the best way to get a dark red egg is by using commercial red dye as opposed to the little tablets that come in Easter egg dying kits. Bake On!

DSC_1190

Tsouréki 
Makes 2 small loaves


1 1/2 teaspoon active dry yeastDSC_1199
1 cup (8 oz) warm milk
4-5  cups flour
3/4  cups sugar
2 tsp. makhlépi , also known as Malhab (optional)
1/4 cup water
4 tbsp. butter, melted and cooled
4 eggs, 1 lightly beaten and set aside for the egg wash
Salt
2 teaspoons. grated orange zest
2 teaspoons grated lemon zest
2 hard-cooked eggs, dyed red

pearl sugar or black cumin seeds to decorate, if desired


Dissolve yeast in milk in a large bowl. Stir in 1/2 cup of the flour and 1/4 cup of the sugar, cover bowl with plastic wrap, and set aside for 1 hour. Steep makhlépi, if using, in 1/4 cup simmering water for about 5 minutes. Strain, discard makhlépi, and set aside liquid to cool.

scented liquid into yeast mixture; if you aren’t using the makhlépi then just use plain water instead. Add the butter and 3 of the eggs and mix thoroughly. Sift 4 cups of the flour, salt, and remaining 1/2 cup sugar into mixture. Add orange and lemon zest, and mix thoroughly. Turn out dough onto a floured surface. Knead (adding more flour if necessary) until smooth, about 10 minutes, then form into a ball and place in a lightly greased bowl. Alternatively, knead using a stand mixer, fitted with the dough hook, for 10 minutes. Place in a clean, lightly grease bowl and cover with a clean dish towel. Set aside to rise for 2 hours.

Turn the dough back onto the floured surface. Divide into 6 parts, rolling into ropes about 15″ long. For each loaf, tightly braid 3 ropes, then press 1 dyed egg  near the end of each braid. Set bread aside to rise again for 1 hour on a parchment paper lined baking sheet.

Preheat oven to 350˚  thirty minutes before baking.

Brush bread with reserved beaten egg, sprinkle with pearl sugar if desired, and bake until golden, 40–50 minutes .Let cool completely.

Enjoy!

DSC_1181


Enjoy!


This recipe was adapted from here

Read Full Post »

DSC_3884-001
Wow- what a fun bakers challenge this month!  Baumkuchen (which translated to tree cake) is a cake that is traditionally cooked on a spit, with a thin layer of batter spread on, then cooked, then another thin layer of batter, cooked, and so on, until many layers (as many as 30) are built up. It is then taken off the spit and stood upright. When cut into the slices look like the many rings of a tree. This cake is also extremely popular is Asia during weddings since it looks like a ring. During the 18th & 19th centuries these cakes were very popular in Europe, sometimes with 300 (!) eggs being used for a big occasion.

Since not many people own a spit, for this months Bakers Challenge, Francijn , from “Koken in de Brouwerij gave us  simpler version to try,  which is Schichttorte (layered cake, Schicht means layer). This is a simple version of Baumkuchen, with horizontal layers. The layers in Schichttorte are not dipped, but smeared, and the cake is not baked on a spit, but in a baking mould (tin) (pan) producing a flat multi-layered cake. It is Schichttorte that we will be baking for this month’s challenge.

I have two old pastry books that have information about Baumkuchen but I never thought I would be giving it a go, even in a modified version. My first version was made using Francijn’s recipe. It was moist and delicious, thanks to almond paste and 6 eggs. This cake definitely improves with age. The big problem with this cake? I didn’t brown it enough on top to get the distinct layered look.DSC_3868
And this is 10 layers of batter!. I was so afraid of burning it and drying it out that I lost the effect. I also had the oven rack in the middle of the oven when it should have been on the top, closer to the top burner. Not all was lost though, since it was really tasty. Next time I will try it with the oven on broil and see what happens.

For my next version, I decided to use a recipe from my own pastry book, Traditional Cakes and Pastries by Barbara Maher. This book is out of print, unfortunately. I used a 6 inch square pan for this one, so I halved the recipe (less temptation). A few tablespoons of cocoa powder went into half of that batter and orange zest (& a drop of color) into the other half.

Each layer takes about 4 minutes to cook so this is not a cake to make when you are busy doing other things. It’s also very easy – it just takes time. Bake On!

Baumkuchen

Prepare a  10-inch (25 cm) spring form pan or a 8×10-inch (20×25 cm) cake pan
Makes 12 pieces

Batter:

6 large eggs (room temperature)
pinch of salt
1/2 cup plus 2 tablespoons (150 ml) (4-1/4 oz) (120 gm) granulated sugar
2/3 cup (160 ml) (5-1/3 oz) (150 gm) marzipan
1 cup minus 2 tablespoons (1-3/4 sticks) (7 oz) (200 gm) softened unsalted butter
3/4 cup (180 ml) (3-1/2 oz) (100 gm) confectioner’s (icing) sugar
2 teaspoons (10 ml) (1 package) (8 grams) vanilla sugar or granulated sugar
2/3 cup (160 ml) (3-1/2 oz) (100 gm) all-purpose flour (sifted)

Glaze:
1/3 cup (80 ml) (3½ oz) (100 gm) apricot jam
2 tablespoons (30 ml) orange liqueur (optional)
1 cup (240 ml) (7 oz) (200 gm) dark chocolate couverture chunks
1 tablespoon (15 ml) pure coconut oil

oil to grease your pan parchment paper 10-inch (25 cm) spring form pan / 8×10 inch (20×25 cm) cake tin

Directions: Preheat your oven to hot 450°F/230°C/gas mark 8. Line your cake tin with parchment paper, grease both paper and pan.

Separate the eggs.

Beat the egg whites with the salt until nearly stiff, add the sugar and beat until really stiff.  Finely crumble the marzipan and beat it with the softened butter, confectioner’s (icing) sugar and vanilla sugar until soft and creamy. Add the egg yolks one by one and beat well between each addition. Add the stiff egg whites and flour and gently fold it into the batter, trying not to lose too much air.

Smear 1/12th to 1/10th  of the batter (about 2 tablespoons) on the bottom of the pan, keep the sides of the pan clean, and bake for (about) 4 minutes in the oven, until it is cooked and brown. Take the pan out of the oven, smear the next portion of batter carefully over the first, and bake for another 4 minutes or until cooked and brown. Repeat until all batter is used. If you need to flatten a bubble insert a tooth pick or similar to deflate the bubble.This is only 2 tablespoons of batter
Let the cake cool down for a few minutes, take it out of the pan, remove the parchment paper and let the cake cool completely on a wired rack. Trim the edges.  Heat the jam a little, pass it through a sieve, and add the orange liqueur (optional). Cover the cake with the jam and let it cool.
Melt the chocolate with the coconut oil in a bowl above warm water. Pour it over the cake to cover completely, move the cake to a cool place and wait until the glaze is dry
DSC_3865

Version 2
for a 6 inch square pan

125 g/4.5 oz butter, softened
125 g/4.5 oz granulated sugar
4 eggs, separated
1 tbsp. rum
25 g/1 oz ground almonds
65 g/2 1/4 oz AP flour, sifted
65 g/ 2 1/4 oz potato flour, sifted

2 Tablespoons cocoa and zest of 1 orange. One drop orange coloring, if desired.

follow the same mixing method as above except before adding the stiff egg whites, split the batter in half. I used a scale to make this very easy but by eye is fine too. Add the cocoa powder to one half, then the zest and coloring to the other half. Now fold half of the egg whites into the chocolate mixture and the other half of the egg whites into the orange mixture. Layer the batter and cook as above.

Read Full Post »

DSC_3342
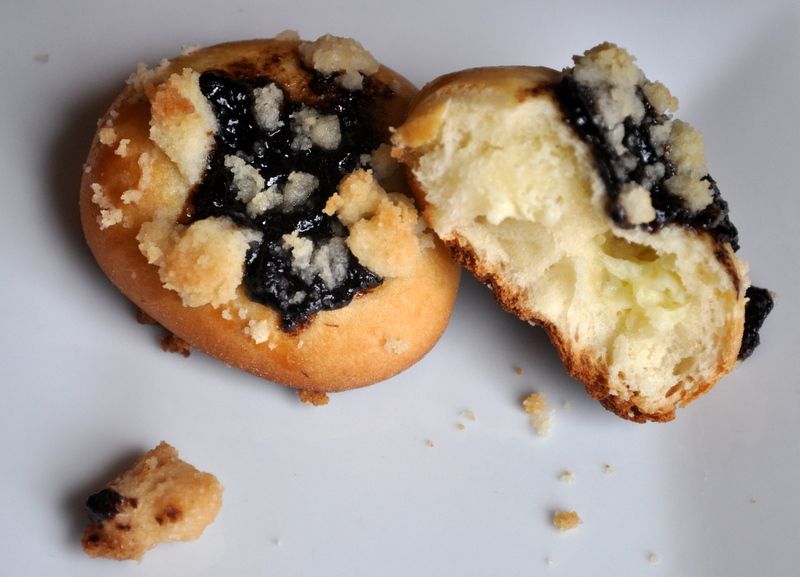
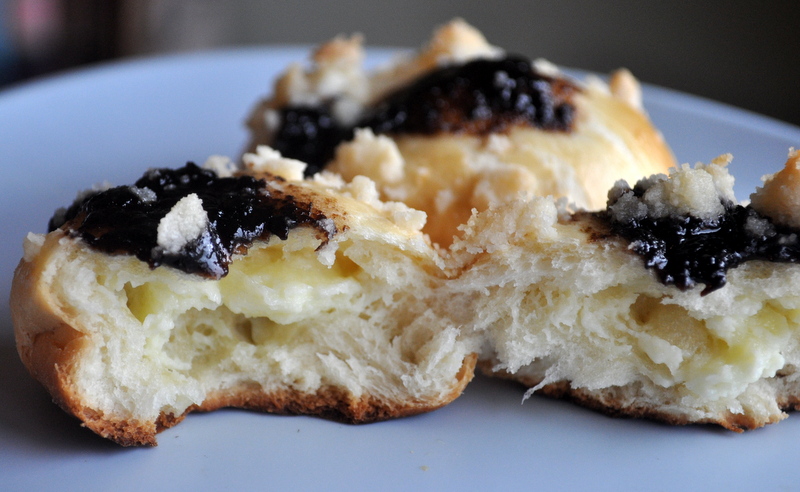
Can you believe it? I’m hosting this months Baker’s Challenge!! For my turn as hostess extraordinaire, I have chosen the gorgeous Neapolitan pastry, sfogliatelle. You might recognize them as the clam shaped pastry with hundreds of layers. They are filled with a  semolina-ricotta mixture that has added candied orange peel and a touch of cinnamon, served hot out of the oven (though I have eaten my fair share of room temperature ones).Here is a very interesting article on the history of this beloved pastry.

Growing up in Long Island, New York, it is virtually impossible to get away from Italian food.I think the natural progression for many Italian immigrants was to go from Italy, to Ellis Island, to Brooklyn, and then to Long Island.  For me though, my real love of Italian food, (and cooking in general) came later when I lived in Manhattan with my then boyfriend. We lived together for 10 years and the large family feasts at his parents Long Island home were memorable. We would arrive around noon and continue until late in the night with everyone pitching in with the cooking at one point or another. I really learned that the meal was as much about gathering together as it was about eating. Luckily for me, I am still extremely close with him and his family. He now even owns an Italian wine store in Brooklyn to go with the great food.  I now follow this tradition with my husband  by having our friends over as much as possible to enjoy their wit as well as food.
I wanted to choose something that would be a challenge; not only to you but for me as well. And I was right on point. I won’t lie to you, the first two times I made these it was a disaster. The third time was the charm and now they almost seem easy to make. The sfogliatelle ricci can be made over a period of days, if this makes it easier for you. I tend to like to make things in stages myself but you could also make this over the course of a long day. Keep in mind that you must chill the dough at various points before baking.
There are two main Italian versions of sfogliatelle. The first is sfogliatelle ricci (or Napoletane) and this is the crispy multilayered version. The second is sfogliatelle frolle, a tender almost cakey version covered in a soft pie crust like shell.
The American version goes by the name “lobster tail” and is a larger shell filled with a creme diplomat (pastry cream mixed with whipped cream) after it is baked. The dough is the same as Ricci but a dollop of pate a choux pastry is placed in the center of the shell before baking. This puffs up the core of the shell so that you can pipe in the creamy filling afterword. In one word, divine!

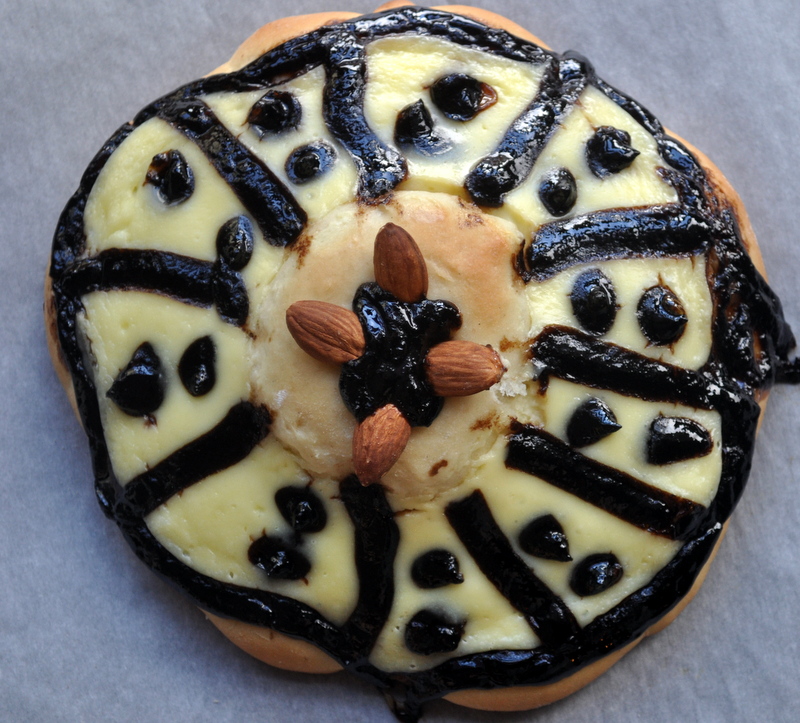
I am providing recipes for homemade ricotta cheese (so easy and so delicious), candied orange peel, sfogliatelle ricci and frolle dough. You must make the homemade cheese or the candied peel and at least one version of the sfogliatelle. Please experiment with filling flavors. I think chocolate ricotta with finely chopped pears would be lovely…The filling provided for the American Lobster Tail is a diplomat cream but I personally love marscapone mixed whipped cream. Again, amaze and inspire me. While I believe that the ricci version can only be made using a pasta roller, I hope that many out there prove me wrong!

Have Fun and Bake On!

Recipe Source:
The pastry dough recipe is from Great Italian Desserts by Nick Malgieri. Unfortunately this book is out of print but you can still find used copies online or if your lucky, your local library. The Ricotta Cheese recipe is from Luscious Creamy Desserts by Lori Longbotham. The method for making the lobster tails is from the Cake Boss You Tube video. The Pastry cream recipe is from Martha Stewart (but feel free to use any pastry cream recipe)

Dairy Free Ricotta Cheese: http://low-cholesterol.food.com/recipe/ricotta-cheese-substitute-vegan-gluten-free-447217

http://cassidyscraveablecreations.com/2012/09/ricotta-cheese-dairy-soy-nut-free.html

Equipment needed

Pasta machine to roll out the dough (this is for the Ricce and Lobster Tail)
Stand mixer with paddle and whisk attachments or hand-held mixer. You can make the dough in a bowl with a wooden spoon. If you choose to make the French Cream for the lobster tail you can whip the heavy cream by hand with a whisk
food processor (optional)
Whisk
rolling-pin
Grater for lemon and orange zest
Large pot to make the cheese
large glass or ceramic bowl
large strainer/colander
cheesecloth (I have used paper coffee liners as well)
medium saucepan for semolina
small bowl for butter/shortening mixture
Saucepan for pastry cream
Bowl for Pastry cream
Pastry Brush
Plastic wrap/cling film
parchment paper
baking sheets
cutting board
1/2 inch round pastry tip
Cooling rack

Fresh Ricotta Cheese (makes 2 cups)DSC_3361
8 Cups (1/2 gallon/64 oz/2 litre/4 pints) Whole Milk (or goats milk)
1 Cup (8 oz/250 ml) heavy whipping cream
1/2 tsp salt
3 Tablespoons fresh lemon juice

Line a large colander or strainer with 2 layers of cheesecloth that has been lightly dampened over a large glass; set aside.

Pour the whole milk, heavy cream and salt into a large pot and bring to a boil over medium heat, whisking occasionally. reduce the heat, add the fresh lemon juice and stir/whisk continuously for 2-3 minutes. The mixture will curdle, which is exactly what it is supposed to do. DSC_3363

Pour this into the cheesecloth lined strainer and let it drain for about 1 hour or until it comes to room temperature. At this point you can scrape the ricotta from the cheesecloth into a container and refrigerate for up to 2 days. The liquid in the bowl is the liquid whey, a very nutritional and tasty leftover byproduct from making cheese. It is excellent to use instead of water when baking bread, or adding it to soup stock. I love the stuff and never discard it. Here is an excellent article on the wonders of whey!

DSC_3395

Semolina-Ricotta Filling
This type is used for both the Ricci and the Frolle versions

5 minutes to make plus about 2 hours to chill

1 Cup (8 oz/250 ml) milk
1/2 cup granulated sugar
2/3 Cup fine semolina or cream of wheat (I have tried both and personally like the semolina version)
1 1/2 Cups whole milk ricotta, preferably fresh (see above)
2 large egg yolks
2 teaspoons pure vanilla extract (or the seeds of one pod and 1 tsp extract)
1/4 teaspoon ground cinnamon
1/3 cup candied orange peel (commercial or home-made)
zest of 1 lemon

Combine the milk and the sugar in a medium saucepan. Bring to a boil, lower the heat and slowly add the semolina (or cream of wheat), whisking quickly as to avoid any lumps. Cook, stirring often, until the mixture is smooth and thick, about 2 minutes. Spread the mixture onto a lined baking sheet, about 1/2 inch, to cool. When cool, break into pieces and place into the bowl of your stand mixer, fitted with the paddle attachment (or a food processor), and add the ricotta cheese, egg yolks, vanilla and cinnamon. Beat until very smooth and creamy. Stir in the candied orange peel and lemon zest. (Maybe even some mini chocolate chips? Or pistachios??mmmm…I can’t wait to see what you come up with)
Scrape into a container, place plastic wrap directly onto the surface and refrigerate until needed (up to 2 days)

DSC_3345

Sfogliatelle Ricci
You will need a large/long workspace for this. I used my dining room table for this though I am sure someone will be more creative with limited space!
4 minutes to make the dough
10 minutes to condition the dough in the pasta roller
2 hours chilling
35 minutes to roll the dough
2 hours additional chilling

Dough
3 Cups (12 3/4 oz/ 334 g) all-purpose flour
1 teaspoon salt
3/4 cup (6.2 oz/ 175 g) warm water (about 100F)

4 oz lard (I used Crisco butter flavored shortening)
4 oz (1 stick/1/2 cup) unsalted butter, softened

Combine the flour and salt in a large mixing bowl and stir in the water, or use your standing mixer with the paddle attachment for this.. The dough will be very dry. If you feel absolutely compelled, add an extra teaspoon of water but it is supposed to be very dry. Turn this out onto a clean work surface and knead the dough together, bringing in all the dry bits. At this point get your pasta roller out and ready. Roll out the dough to about 1/3 inch and pass through your pasta machine at the widest setting. I find it much easier to cut my dough in half and work 1/2 at a time for this step. Fold the dough in half after each pass also change the direction of the dough occasionally. After about 15 passes the dough should be very smooth. Knead the dough back into a ball and wrap in plastic wrap. Refrigerate and rest the dough for at 2 hours ,or overnight.

New York summer 20133

Beat the lard/shortening and butter together in your mixing bowl until very fluffy. Make sure it is thoroughly combined. Place into a bowl and set on the workspace in easy reaching distance.

New York summer 20131

Remove the dough from the refrigerator and divide it into 4 equal pieces. Working with one piece of dough at a time (cover the other pieces with a towel or plastic wrap), lightly flour a piece pass it through the pasta roller set at the widest setting. Try to get the dough as even as possible, your goal is an even rectangle strip, about 4 inches in width. If needed, fold it over on itself a few times until you get an even strip. Once even, Pass the dough through every setting, ending with the highest (mine is 7)
You should end up with a long 4 inch wide strip. Repeat with the other 3 remaining pieces of dough.DSC_3278

*For my own ease of use I made my own rolling pin contraption like you can see on many instructional videos. I turned 2 bowls upside down and placed them on my table where I was planning to work. I then took a rolling pin (w/handles, not french) and taped the handles to the bowls. Every time that a piece of dough is finished and ready I lightly floured the dough and rolled it up onto the rolling pin. When all 4 pieces of dough dough were finished it made it much easier to pull out a section at a time to stretch the dough. If you are clumsy like me you might like to try this too!

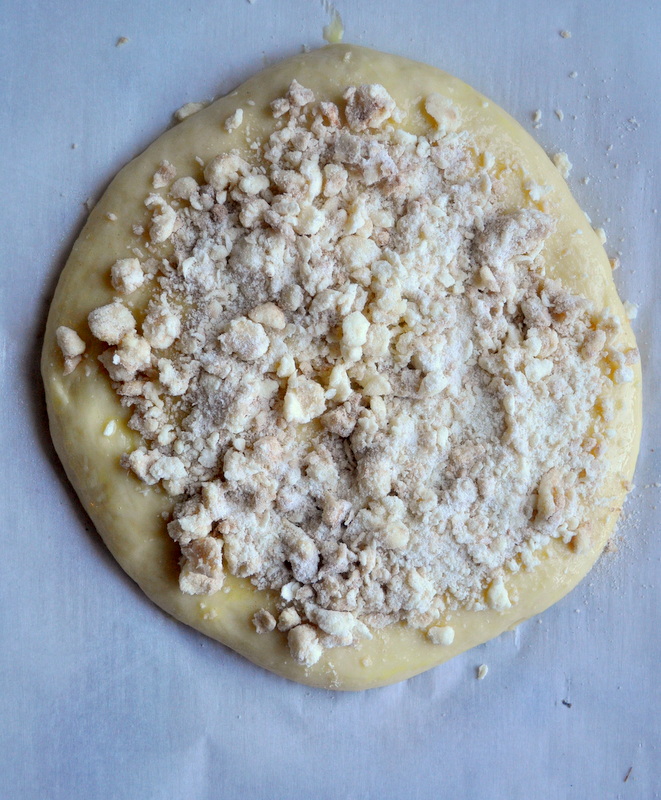
Place one piece of a strip on you clean work surface and paint (or smear) it liberally with the lard/butter mixture. I did about a 8 inch section at a time. Gently pull the sides of the dough and stretch it, starting from the middle and going out, until it is about 8 or 9 inches in width. Begin from the short end and start rolling the dough into a very tight roll. When you start to reach the end of your stretched section, stop and liberally grease up another section, stretching and rolling until all the dough is finished. When one strip of dough is finished, overlap the end of one to the beginning of the other; continue to pull, stretch and roll up.

New York summer 20132

Spread the lard/butter mixture over the entire finished log and starting in the middle gently run the hands down the length to extend the length another inch or so. This will release any air pockets and tighten the roll. Your finished roll should be approximately 10 or 11 inches.DSC_3288
Wrap in plastic wrap and chill for at least 2 hours or overnight. The dough may freezefrozen, for up to 3 months, at this time. Defrost it in the refrigerators overnight before using.

Preheat your oven to 400 F
Line 2 baking sheets with parchment.

Remove the dough from the refrigerator, unwrap, and place on a cutting board. Slice off about an inch from each end so that they are straight and even. Cut the roll into 1/2 inch slices.
Put the semolina-ricotta mixture into a pastry bag with a 3/4 inch opening (A disposable pastry bag or even a ziploc bag with the corner cut off is fine).

DSC_3313

Take one slice of dough and place it on your workplace. With the heel of your hand, push out from the center in one direction. Rotate the dough and do this in all four directions. This forms the dough and opens up the layers. New York summer 20135

Pick up the piece and insert your thumbs on the inside with your forefingers on the outside, and gently stretch the center to make it more into the shape of a cone. You don’t want the layers to actually separate.DSC_3321 Holding the cone in one hand, squeeze some of the filling into the cavity so it is full. Lightly push the opening closed. You do not have to seal the opening as the filling is too thick to ooze out during baking.

Place onto the prepared baking sheet and very lightly brush the outside of each completed pastry with the lard/butter mixture. Bake them for about 20 to 25 minutes or until they are a deep golden brown.
Remove from the oven and cool on a rack. These are best served warm with a sprinkling of confectioners sugar on the day they are made. To reheat them, just place them in a 350F oven for about 5-10 minutes.

DSC_3325

DSC_3354

Sfogliatelle Frolle (Makes 12 pastries)
This is a tender pastries, made with dough similar to pie crust |(and much easier to make). Some of my friends preferred these to the crispy sfogliatelle.

DoughDSC_3449
2 1/3 Cups all purpose flour
1/3 Cup granulated sugar
1/8 teaspoon salt
8 Tablespoons (4 oz) unsalted butter, cold
2 large eggs, beaten

Filling
See sfogliatelle ricci (I used dried apricots in this version)

Egg Wash
1 Large egg yolk
1 large egg
pinch salt

By hand: combine the flour, sugar and salt in a mixing bowl. Remove the butter from the fridge and pound in a few times with a rolling pin to make it pliable. Add it the flour and start rubbing it into the flour mixture with your fingertips, working from the bottom of the bowl upwards. Work quickly so the butter doesn’t get warm from your hands. This only takes a minute or two to complete. Add the eggs and stir into the dough with a fork until it starts to hold together. Empty it out onto your workspace and knead a few times. Shape into a disc, wrap in plastic and chill until firm. The dough can be made up to 3 days in advance.

New York summer 20134

Prepare the filling and chill it. Whisk to egg yolk, egg and salt together for the egg wash.

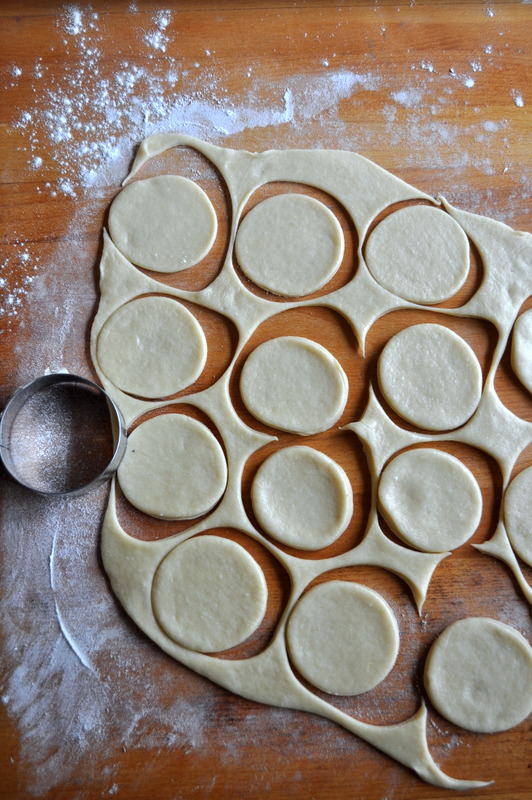
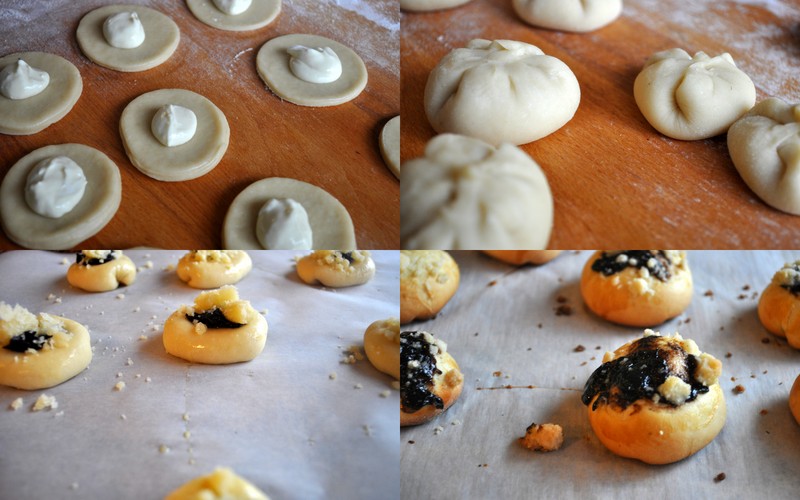
Divide the dough into 10 equal pieces. Roll each piece into 5 inch rectangle . Place a hefty tablespoon amount of filling on the lower half of the dough and pull the top half over this. Use your hands to press down around the filling and seal the edges together (like making ravioli). Use a 3 inch round cookie cutter (or glass) and cut away any excess dough.

Recently Updated
Place the formed frolle on a prepared baking sheet and chill for 2 hours
Preheat your oven to 375F
Brush the frolle with the egg wash and bake approximately 20 minutes, just until the frolle is baked through. Cool briefly on a rack.

and finally….

DSC_3385

American Lobster Tails

You need to prepare (and roll) a batch of the Sfogliatelle Ricci dough. Refridgerate until firm.

Pastry Cream

DSC_33815 minutes to make and 2 hours to chill

2 Cups (16 oz) whole milk
1/2 cup granulate sugar
1/2 vanilla bean, split lengthwise, seeds scraped
1/8 tsp salt
4 egg yolks
1/4 cup corn starch
2 Tablespoons butter
In a medium saucepan, combine milk, 1/4 cup sugar, vanilla bean and seeds, and salt. Cook over medium heat until mixture comes to a simmer. Meanwhile, in a medium bowl, whisk together egg yolks, cornstarch, and remaining 1/4 cup sugar. Whisking constantly, slowly pour about 1/2 cup of the hot-milk mixture into the egg-yolk mixture, 1/2 cup at a time, until it has been incorporated. Pour mixture back into saucepan, and cook over medium-high heat, whisking constantly, until it thickens and coats the back of a spoon, about 2 minutes. Remove and discard vanilla bean. Remove from the heat and add the butter, whisking constantly until the butter melts completely and is thoroughly blended into the mixture. Transfer to a bowl, cover with plastic wrap, pressing it directly onto the surface of the pastry cream to prevent a skin from forming. Refrigerate until chilled, at least 2 hours or up to 2 days.

Preheat your oven to 400 F. Line a baking sheet with parchment paper
Prepare the pate a choux:

Pate a Choux (this a HALF batch )
3/8 cup (87ml) water (this is half of a 3/4 cup)
3 Tbsp. (42g) unsalted butter
1/8 Tsp. Salt
2 teaspoons Sugar
1/2 cup (63g.) all-purpose flour
2 large eggs

Preparing batter:
Combine water, butter, salt and sugar in a saucepan over medium heat. Bring to a boil and stir occasionally. When it comes to a boil, remove from heat and add the flour, stirring to combine completely.
Return to heat and cook, stirring constantly until the batter dries slightly and begins to pull away from the sides of the pan (this will happen very quickly).
Transfer to a bowl and stir with a wooden spoon 1 minute to cool slightly.
Add 1 egg. The batter will appear loose and shiny.As you stir, the batter will become dry-looking like lightly buttered mashed potatoes.
It is at this point that you will add in the next egg. Repeat until you have incorporated all the egg. Now, I happen to use my KitchenAide standing mixer for this, but it’s just as easy to do this by hand (I’m just lazy).

Spoon into a disposable pastry bag. You do not a tip for this, you can just cut a 1/2 opening across the bottom when you are ready to fill your lobster tail pastry.

Watch this little video….

Take your prepared sfogliatelle Ricci dough out of the fridge and cut it into 1 inch thick slices. Press down on all four sides just like you were making sfogliatelle ricci (you are, just making a bigger version). Pipe in the pate a choux paste until it is about three quarters fulls. Gently close the opening (there is no need to seal it shut) and place it on your prepared baking sheet. Repeat until all of your Ricci dough is finished (You should get about 11 or 12 pastries). Lighlty brush the outside of the lobster tail with the lard/butter mixture and bake for about 20-25 minutes or until a deep golden brown. Cool on a wire rack.

DSC_3380

To make the diplomat cream you will need:
1 batch pastry cream
1 cup heavy cream, whipped

I like a 2:1 ratio of pastry cream to whipped cream but you might like a 1:1 ratio. I would whip 1 cup of heavy cream and start by only adding half of it to the pastry cream. Do you like the texture? Maybe you want it a little lighter… Either way, when you decide what you like.DSC_3384
Fold the whipped cream into the cold pastry cream. Transfer it into a pastry bag fitted with a 1/2 inch round tip and insert it into the wide end of a lobster tail. Squeeze in as much filling as you can get into it (the more the better!). These should be eaten the day they are filled (this won’t be a problem, trust me). Hope you enjoy!!

DSC_3393

Read Full Post »

Everyday we learn, and must appreciate, how delicate life is. Earlier this week, Lisa Cifelli, the co-founder of the Daring Baker’s, suddenly passed away. She was 46 and was scheduled to have back surgery today. Too young, too early.

In 2006, Lisa (La Mia Cucina) and Ivonne (Cream Puffs in Venice) started the DB’s after the both of them got together and used the same pretzel recipe and posted the results on their respective blogs. They had so much fun they chose another recipe the next, and so on, and so on, and so here we are today.

I had the pleasure of “working” with her over the past few months while I prepared for my hosting stint of the Daring Baker’s, posting later this month. It is a bittersweet honor to be the  last host with her at the helm.  She was  extremely encouraging,  sharply funny, and seemed to answer my emails with almost lightening speed. Her organization skills seemed mystifying and I always looked forward to her enthusiastic introduction to each monthly challenge.

Since I discovered the Daring Bakers it has been an incredible journey of international delights and I am constantly amazed and in awe of the talented bloggers (and non-bloggers) who participate in the challenge. I’ve missed a few months here and there but overall it has been a great learning adventure and I  look forward to all of the upcoming challenges.

What is there to say other than Lis will be sorely missed by all Daring Baker’s and Daring Cook’s everywhere. Let us all honor her by continuing the  DB legacy for years to come. Bake On!

Sept 17 2013

Vols-au-Vent
Macarons
Cannoli
Nanaimo bars
Tiramisu
Tian
Steamed pudding
Cromquenbouche
Pavlova
Swiss Roll Ice Cream Cake
Ice Cream Petit Fours
Paczki
Crostata
Stollen
Joconde Imprime
Panna Cotta
Meringue Coffee Cake
Edible Containers with Maple Mousse
Marquise on Meringue
Frasier Cake
Candy
Povitica
Sans Milan
Biscuits
Quick Bread
Tiger Rolls
Armenian Nazook and Nutmeg Cake
Challah
Battenberg Cake
Empanada Gallega
Mille Feuille
Panettone
Gevulde Speculaas
Matzoh
Savarin
Swedish Princess Torte
Hand Pies
Tres Leches
Crackers


I baked a batch of macarons today in her honor…

Read Full Post »

Tres Leches

DSC_3422

Since I had baked this earlier in the month, I have no excuse for not posting this on the 27th, other than I just forgot! What a dingbat I can be. The host for the September bakers challenge  is Inma from la Galletika, and she chose Pastel de Tres Leches, a cake that is very popular in Central and South America ( and here!) . My friend Heidi and her husband love this cake, with her version being only a single layer which I think makes it much easier for all of the liquid to get soaked up since you can leave it in the pan. Her husband enjoyed this two layer version as well. I hope you do too… Bake On!

Pastel de Tres Leches

vanilla sponge cake
5 large eggs (separated)
½ cup (120 ml) (4 oz) (125 gm) sugar
2 teaspoons (10 ml) of vanilla extract
1 cup (240 ml) (5 oz) (140gm) all-purpose  flour (sifted)

For three milks syrup
1 can (14 oz) (400 gm) sweetened condensed milk
1 can (12 oz) (340 gm) evaporated milk ( I used coconut milk)
1 cup (240 ml) heavy cream (about 35% fat) or 1 cup of half & half or 1 cup milk
1 cinnamon stick (I deleted this)
2 teaspoons (10 ml) rum (or other flavoring) (I used Amaretto)

Topping and filling
2 cups (500 ml) of whipping cream (about 30% fat)
½ cup (120 ml) (4 oz) (125 gm) sugar
Canned or fresh fruit (to fill and decorate the cake) (I used fresh nectarines)

DSC_3428

Directions For the Sponge Cake:
Preheat oven to moderate 180°C/350°F/gas mark 4. Prepare a square 9”x9” (23cmx23 cm) pan or 9” (23 cm) round cake pan
Separate the egg whites from the yolks. Beat the egg whites on medium speed, 3 – 5 minutes.When soft peaks form slowly add the sugar in small batches. and whip until stiff peaks form about 5 minutes. Set aside.DSC_3403

In a medium bowl beat egg yolks at medium-high speed for about 5 to 6 minutes, or until the egg yolks become pale colored, creamy and puffy. Stir in vanilla.
Pour the egg yolks over the egg whites, gently fold until just combined trying not to lose any volume from the mixture.
Fold in the flour little by little in the form of rain (OMG, isn’t that lovely!). Mix until just combined (over-beating will result in a denser, flatter cake).
Pour the batter into the prepared 9”x9” (23cmx23 cm) square cake pan or 9” (23 cm) round cake pan.Bake in the preheated moderate oven for 25 minutes or until the toothpick comes out clean
Let it cool completely.
Split the cake in half, flip the top of the cake and place it on a base. Poke using a fork holes all over the cake to better absorb the three milk soaking liquid.

DSC_3413
Three milks syrup
1.In a saucepan add the sweetened condensed milk, evaporated milk, heavy cream and cinnamon stick, bring to a boil, reduce the heat and continue boiling for 5 minutes. Remove it and let it cool.
2.Once it is cool, add the rum or any other flavoring you are using
3.Gradually brush all the milk soaking liquid into all sides of the cake (including the cut surfaces) until all absorbed. Best to rest the cake in the fridge overnight to complete the soaking process.
Topping
1.Whip the cream, when soft peaks form add the sugar little by little, continue whipping until stiff peaks form about 2 mins.

DSC_3421

Decoration
1.Layer some whipped cream on the bottom layer and cover with canned or fresh fruit and decorate the top layer with whipped cream and the fresh or canned fruit.

DSC_3427

Read Full Post »

DSC_2741

Or is it a finger in every pie? I’m not sure and who cares because these hand pies are outrageously delicious!

The host for the June Daring Bakers Challenge is Rachael from Pizzarossa and she asked everyone to roll out the crust and bake some pie. I urge you all to go visit her site for some wonderful pie ideas. The crack pie (from Milk Bar fame) is really a winner, but it should be called fat pie since that is what happens when you can’t stop yourself from eating it. |I really love baking pie and had a lot of grand ideas of all the pies I would make this month. Except that life got in the way. I was baking croissants like crazy for a school function and have been baking a lot of vegan food for a close friend. I then developed a nasty sinus infection which was accompanied by a headache that wouldn’t stop. And the flood (and state of emergency). So I had to let a few things slide. Like Pie. I think I will make a plan to bake a pie once a week this summer. There are a lot of recipes out there to try , and to invent.  In particular, I own a book called “Farm Journal’s complete pie book” published in 1965 which contains 700 pie recipes that I would love to tackle. Maybe not all 700 but a few at least…. So on the pie (s) I did bake.  Luscious Saskatoon berry hand pies. DSC_2733

Never heard of a Saskatoon berry? Neither did I until I moved to western Canada. They are similar to a blueberry but with a little huckleberry flavor thrown in. Not too sweet and very fleshy too (where a blueberry is more squishy). I love them because when you cook them they still hold their individual shape instead of popping and turning into one big mass. I had to empty out my freezer last week and found some hand picked Saskatoon berries (courtesy of my friend Heidi) from last fall. Oh, the excitement. If you are lucky enough to find frozen Saskatoon berries at the market, buy them!  Fresh or frozen blueberries would work just as great. You know what? ANY fruit would work great in this recipe.

Okay, so what’s the big deal about pie anyway? Well, it’s all in the crust. Which is why so many people are afraid to make it. A bad crust is well, bad, but a great crust is heaven. My advice? try a few different recipes until you find the one that you are comfortable with and then make it a bunch of times. All of sudden pie dough is really simple to make and to handle. The best tip of all? Have everything cold. It makes the whole process so much easier. Now, there are MANY dough recipes out there. Really flaky pie crust is achieved using lard or shortening while a rich pate brisee is made using all butter. A good medium is using half shortening and half butter. Whatever you are using cut it up into small pieces and place in the freezer for about 30 minutes first. Remember, cold. I personally like to use ice cold vodka instead of water in my dough. I believe it makes a better crust (along with a little vinegar). Pie dough comes in all shapes and sizes though; crushed cookies mixed with butter, oil based dough, cheese based, coconut, chocolate, meringue, pretzel crumbs, crushed cereal…. you get the idea. Any special equipment? While a food processor makes the entire process take just about 1 minute, a pastry cutter works great too. Two butter knives work just as well, it just takes a little while longer to cut the fat into the flour. Pie dough also freezes quite nicely, so when you make some it’s not a bad idea to prepare some extra and wrap well to place in the freezer for a later use.  I remember my mom always taking the scraps of pie dough and smearing them with butter and cinnamon sugar to bake off in the oven as a treat for us kids. Memories… like the corners of my mind….

This particular pie dough is made with flour,  butter, sour cream and a touch of baking powder. No liquid. The “letter folding” technique when you roll out the dough also makes such a tender, high and flaky pastry. It really is divine. Bake On!!

Pastry Dough

  • 2 cups (8.8 oz/ 241 g) all-purpose flour
  • 1/2 teaspoon salt
  • 1/2 teaspoon baking powder
  • 1 cup (16 tablespoons/8 oz /227 g) cold unsalted butter
  • 1/2 cup(4 oz/ 113 g) cold sour cream

Filling

  • 2 Cups (8 oz/227g) Saskatoon berries, fresh or frozen (or blueberries/blackberry/raspberry)
  • 1/4 Cup (1 3/4 oz/50g ) granulated sugar
  • 1 tablespoon instant tapioca (or cornstarch or instant clear- gel)
  • 3 teaspoons lemon juice

* 1 egg (beaten) and some sanding sugar for the topping . This step is optional but the egg wash gives the pastry a lovely golden color when baked. The sprinkling of sugar is purely decorative but a nice touch.


Make the pastry dough:

Whisk together the flour, salt, and baking powder. Add the butter, working it  to make a coarse mixture. Leave most of the butter in large, pea-sized pieces. If using a processor use the pulse button to cut the butter in (The somewhat large pieces of cold butter will create steam when it goes in the oven which makes for a flaky pastry).DSC_2717 Stir in the sour cream. The dough will be crumbly. Don’t panic. . Turn it out onto a floured work surface, and bring it together with a few quick kneads.

Roll it into an 8″ x 10″ rectangle. Dust both sides of the dough with flour, and starting with a shorter end, fold it in three like a business letter. Flip the dough over, give it a 90° turn on your work surface, and roll it again into an 8″ x 10″ rectangle. Fold it in three again.

Wrap the dough, and chill for at least 30 minutes before using.

2013-06-22


Make the filling:

Place all the ingredients in a small pan set over medium heat. Cook until the mixture starts to thicken, about 5 minutes. Pour into a clean bowl and let cool to room temperature.

Assembly:

Preheat the oven to 425°F; place a rack on the middle shelf. Line a baking sheet with parchment paper.

Take the dough our of the fridge and let it sit at room temperature for 10 minutes so it is easier to handle. Roll the dough into a 14″ x 14″ square.  Cut out sixteen 3 1/2″ squares.DSC_2729

 Divide the filling among eight of the squares, using about a heaping tablespoon for each. Brush some of the beaten egg along the edges of each filled square. Cut a little vent into the each of the remaining eight squares so that steam can escape while baking. Top each filled square with a vented square, and press firmly  along the edges with the tines of a fork  to seal.  Transfer the pies to a parchment lined baking sheet. Place into the refrigerator for 15 minutes before baking.  Brush the top of each pie with the remaining beaten egg, and sprinkle with sparkling sugar.

DSC_2732

 Bake the pies for 18 to 20 minutes or until golden brown.

Let cool for at least 20 minutes before serving or you will scald the roof of your mouth. Enjoy!

DSC_2734


This amazing recipe is from King Arthur Flour. Can I tell you how much I would love to work in their test kitchen….

Read Full Post »

Older Posts »