Feeds:
Posts
Comments

Archive for February, 2013

Assyrian Spinach Pies

DSC_2268


image

Happy Anniversary to the Bread Baking Babes! They are celebrating five years of baking bread together. How cool is that??! I’ve only been a buddy for the past year but I have been secretly watching for much longer than that. I stumbled upon this group talented bakers by way of Susan at Wild Yeast. I love, love, love her site and was most intrigued with her small group of baking friends and now they are five years strong. Congratulations to you all!

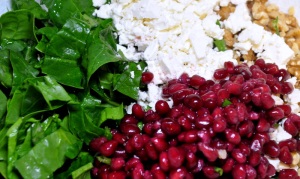
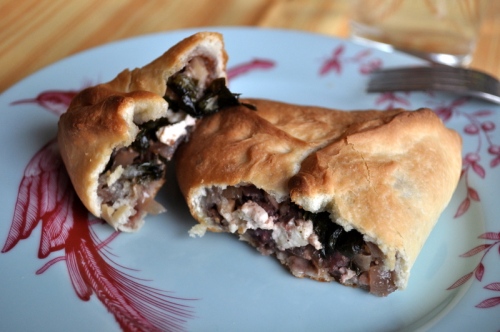
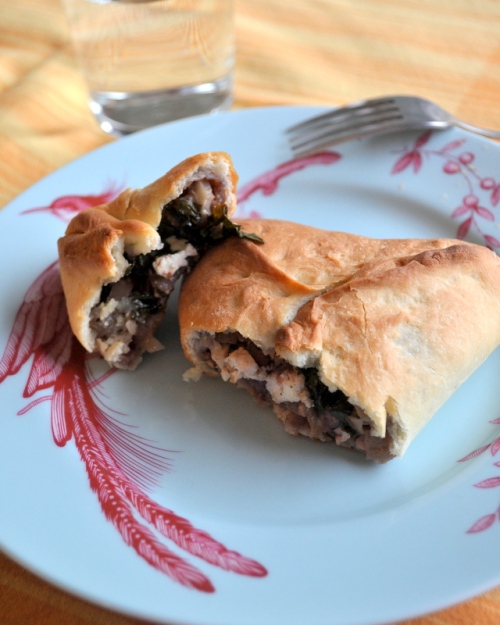
The host for this special occasion is Tanna of My Kitchen in Half Cups. She picked Assyrian Spinach Pies from A Baker’s Odyssey  by Greg Patent. I was so excited because for once I actually own this book. What a wonderful book it is!  I keep telling myself that one day I will bake every recipe in the book….  oh- I was just letting my mind wander about this some more, let me get back on track. These  hand pies are delicious with a bright, salty, almost tangy filling due to the addition of pomegranate seeds and feta. What is really interesting is the addition of Malhab , which is the pits of sour black cherries, which is added to the dough itself to add another layer of complexity. It was not able to find ground Malhab, only whole seeds, but they ground up into a powder very easily in my grinder. I have never used this spice before and am now looking forward to trying in some different baked goods. Isn’t always fun to be exposed to new things?DSC_2249

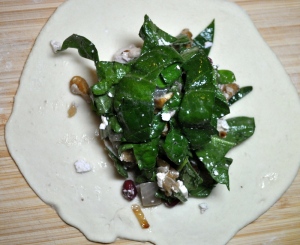
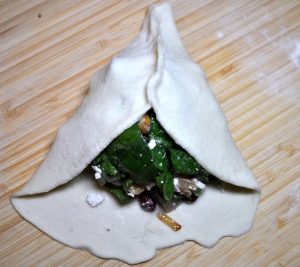
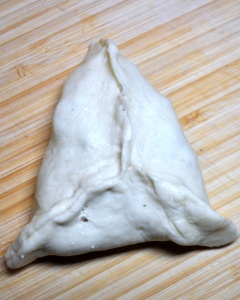
The shaping of this hand pie is the only slightly tricky part of this recipe. A piece dough is rolled out into a circle and then the filling is placed in the middle. You then bring up two sides of the dough, in the 10 o’clock and 2 o’clock position, pinching the dough together to firmly seal the edges so it now looks like the bottom part of a Y.  Now bring up the bottom part of the dough (the 6 o’clock position) and pinch the dough together, making the top part of the Y. The first one seemed awkward but then it was quite fast to do after that.  If you are intimated by this technique there is no reason why you couldn’t just shape it into a half-moon and seal the edges that way. Bake On!

Assyrian Spinach Pies

Dough

2 1/4 teaspoons active dry yeast

2 Cups warm water (around 110F)

1 teaspoon ground mahlab (I increased this from 1/2 tsp)

5 Cups unbleached AP flour

2 Tablespoons granulated sugar

2 teaspoons salt

1/3 Cup extra virgin olive oil

FillingDSC_2252

1/2 Cup extra virgin olive oil

1 large yellow onion, finely chopped

1 pound fresh spinach, cleaned and coarsely  chopped

1 Cup (4 oz) chopped walnuts

1 Cup pomegranate seeds (I increased this from 1/2 cup)

1 Cup crumbled feta cheese (about 4 oz)

1/3 Cup fresh lemon juice (I used Meyer lemons)

1 teaspoon fresh ground pepper

To make the dough

Sprinkle the yeast and the ground malhab over 1/4 cup of the warm water. Whisk well to combine and then let it sit for 10 minutes to activate the yeast (it will get foamy during this time).

Place the flour, sugar, and salt into a large mixing bowl  and stir to combine. Add the yeast mixture along with the remaining 1 3/4 cups water and the olive oil. Stir with a wooden spoon until the dough starts to come together and then let it rest for 5 minutes.  If using a stand mixer like me, then attach the dough hook and knead on low-speed for 2 minutes. Adjust the speed to medium and knead for another 5 minutes. If you are kneading by hand, then place your dough on a lightly floured surface and knead for 10 minutes. The dough will still be slightly tacky.

Place the kneaded dough into a lightly oiled bowl, turn to coat, and cover with plastic wrap. Let the dough rise until doubled in size, 1 1/2 to 2 hours. This depends on the warmth of your kitchen. My house is usually  on the chilly side so it takes the full 2 hours for me. It is ready when you press your finger into the dough and the impression stays.

Dived the dough into 24 pieces (I did 26). Shape them into balls and cover with a some tea towels. Let the dough rest for 30 minutes while you prepare the filling.

DSC_2257

DSC_2259

DSC_2260

Filling

Saute the onion in 3 tablespoons of the olive oil over medium heat for about 10 minutes. You want them golden brown and tender. remove from the pan and set aside.

Place the chopped spinach, pomegranate seeds, walnuts, feta, lemon juice ,and the remaining 5 tablespoons olive oil together. Add the sautéed onions and toss well to combine. Add the pepper and a pinch of salt if you think it needs it.

Preheat your oven to 375F. Line 2 baking sheets with parchment paper.

Working with 1 piece at a time, roll out the dough, fill with about 1/2 cup of the spinach mixture and shape as described above. Place them about 1/2 inch apart on the prepared baking sheets, spraying them lightly with cooking spray (such as PAM).

Bake for 25-30 minutes. Prepare the remaining pies while the first batch is baking in the oven.

Serve warm or at room temperature. (Greg suggests serving these with plain yogurt but we had a side salad instead). After baking you can freeze these (ours didn’t last that long)

DSC_2270

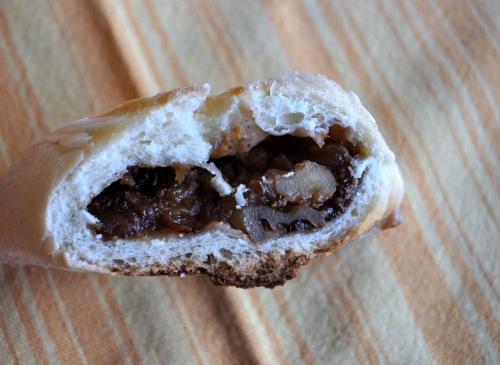
I found that I did run out of filling with 4 pieces of dough remaining so in my mini processor I whipped together a diced apple and some dried prunes. I added a splash of Calvados to loosen it up a bit and then threw in a handful of walnuts. I filled and folded as above and when they came out of the oven I drizzled them with a little confectioners icing. These were divine….

DSC_2271

Please visit all of The Bread Baking Babes to check out their awesome work:

Bake My Day – Karen Bitchin’ Bread Baking Babe Bibliothécaire – Katie blog from OUR kitchen – Elizabeth Feeding my enthusiasms – Elle Life’s A Feast – Jamie Living in the Kitchen with Puppies – Natashya Lucullian Delights – Ilva My Kitchen In Half Cups – Tanna Notitie Van Lien – Lien Paulchens Foodblog – Astrid Provecho Peru – Gretchen
Read Full Post »

DSC_2234

I was going to begin this with my usual, “where did month go?” but |I had to change it to, “where is my motivation?”. Don’t get me wrong, I cook and bake everyday (well, I cook everyday and bake 2-3 times a week), it’s just that my desire to write about a recipe is just not there. Maybe it’s the dark winter nights, but by 8pm I just want to crawl into bed with my husband and a good book (I’m reading The Orphan Master’s Son right now). I really only have time to sit at the computer after my little girl goes to sleep and I just have had no motivation to stay in the kitchen and type away. I have been baking up some nice things though… Banana bread with pecans, Cornflake crunch-marshmallow-chocolate chip cookies, Brioche, Ciabatta, Blueberry-meyer lemon fruit crisp with honey-sour cream ice cream, and these…
individual chocolate cakes layered with DSC_1946raspberries and creme fraiche whipped cream. They are encased with chocolate sheets and drizzled with raspberry coulis. There were six cakes made altogether  and made for the perfect dessert to a dinner party with friends. The cake itself was vegan and one day I will get around to posting the recipe. Just not now.

With all that said, it is the end of the month and time for the Daring Baker’s Challenge! Thank goodness that I love participating every month and that at least I am forced to do one post. Yahoo! Our host this month is Sarah from  All Our Fingers in the Pie. She has challenged everyone to make crisp crackers and/or flatbread. Who doesn’t love a crispy cracker?? well, maybe someone without teeth, but luckily  I still have all my chompers! My first thought was raincoast crackers since I make them quite often, but decided to go with something different since I didn’t have any buttermilk  in the house at the time. What I did have though was flour, and water, and… well, you don’t need anything else…. for matzoh! And to be perfectly honest, I was planning on doing 2 or 3 crackers but I ended up baking matzoh four times this month! I forgot how much I like these and because they are so easy, delicious and addictive (seriously).

This is one of those ridiculously easy recipes but they are sooooo much better than those cardboard things in the store (which I can’t even find here in Calgary). A few things to note: you oven must be hot before you start baking, so turn it on to 450F at least 45 minutes before you start. A baking stone is also very useful. Place it in your cold oven before turning it on; this ensures your stone has enough time to heat up and so that your stone doesn’t crack. If you don’t have a baking stone use a large baking sheet instead. Just make sure that you place it in the cold oven and let it heat up the entire 45+ minutes. These only take a few minutes to cook and it needs that hot surface to do so. You will also need a rolling-pin so you can roll out your dough paper-thin. If you have one of those fancy pastry dockers, then this is the time to break it out. I don’t so I use the tines of a fork instead. Works great and takes about 10 seconds longer. You don’t get that perfectly even docked effect that you see on store-bought versions but who wants store-bought anyway? Not me. Oh, and you will need another flat baking sheet to act as a pizza peel to transfer the uncooked matzoh into the oven, Unless you own a pizza peel. I do not, and  I seem to manage just fine with a rimless baking sheet as my trusty substitute.  One day I will have dream kitchen with room for all of my fun toys…

DSC_2233

You can change this up anyway you like.  A wonderful presentation is to very lightly brush the cooked and cooled matzoh with some olive oil that has been seasoned with fresh garlic, a pinch of salt and finely minced parsley. Just break off pieces and place in a small bowl while entertaining;  your guests will go wild over this. You could also replace some of the white flour with whole wheat flour (just add a touch more water). One of my favorites is to add 1/4 cup of sesame seeds to the dough (as seen in these pictures)  but I am sure that flax seeds would be just as tasty. Or dried herbs. How about 1/2 teaspoon of chipotle powder?  Mmmm….. Bake On!

Preheat your oven to 450F and place a baking stone or baking sheet in the center of the oven. Let the oven and stone/sheet preheat for 45 minutes.

Matzoh

1  3/4 Cups (about 7 oz)  unbleached all-purpose flour, plus more for rolling

3/4 Cup (6 oz) water, room temperature

(another variation is to substitute some of the water with a little oil)

Place the flour into a large mixing bowl. If you want to add seeds or spices/herbs, stir into the flour now. Make a well in the center of your flour and slowly add the water , stirring with a large wooden spoon until the dough comes together. You might need a bit more water depending on where you live and the weather. Knead for 3 or 4 minutes (either by hand or stand mixer w/dough attachment). The dough should be slightly tacky. Cover with a clean tea towel and set aside for 5 minutes.

Feb 21, 2013

Generously  flour you work surface. Take the dough and divide it into 10 pieces. Working with one piece at a time, roll it out as thinly as you can. You should almost be able to see through the dough.  Sprinkle flour over the surface as you do this to prevent it from sticking. With the tines of a fork (or a docking tool) prick the matzoh all over to dock it. Pick the matzoh up and place it onto a flat (rimless) baking sheet. Open the oven and quickly transfer the matzoh onto the hot baking stone. Bake the matzoh for about 3 to 4 minutes. Check after two minutes as ovens differ. They will be light colored with some brown bits and bubbly all over. I use a pair of tongs to remove the matzoh so I don’t have to keep the oven door open long. Repeat with the remaining dough until all are baked. Let them cool completely. They will get crispier as they cool. If you can, wait until the next day to eat them. Enjoy!!

DSC_2240
recipe source: A Bakers Odyssey by Greg Patent (fantastic book)

Read Full Post »